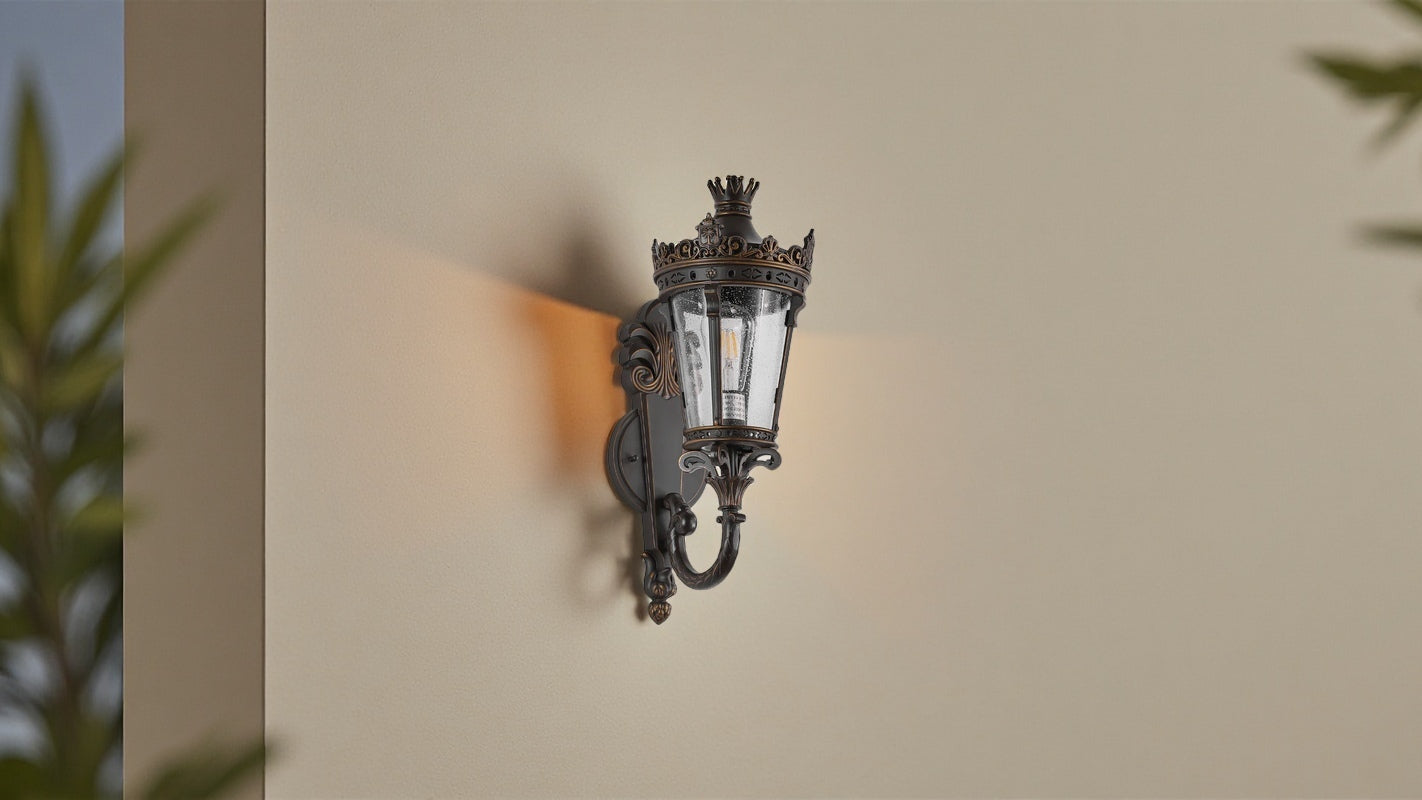
Picture your villa patio glowing with the timeless charm of a vintage outdoor wall lantern. You can create a welcoming patio atmosphere that blends vintage charm with modern strength using the Rackora 21" Coffee Golden Aluminium 120V Vintage Outdoor Wall Lantern. This lantern transforms your patio, making every wall and outdoor corner feel special. The lantern’s vintage design adds charm, while its durable outdoor construction stands up to any weather. Outdoor wall lighting like this lantern does more than brighten your patio—it brings out the best in your porch and patio, adding layers of charm and elegance.
Key Takeaways
- Match your vintage outdoor wall lantern to your porch style for a charming, harmonious look.
- Choose lanterns about one-third the height of your door and place them near entrances for balanced lighting.
- Pick durable materials like powder-coated aluminum to ensure your lantern withstands all weather conditions.
- Install lanterns at eye level, between 60 and 72 inches from the ground, for safe and stylish illumination.
- Use LED bulbs with an E26 base to save energy and enjoy long-lasting, warm light on your porch.
- Add motion sensors to your lanterns to boost security and save energy by lighting only when needed.
- Clean your lantern regularly with mild soap and water, and check bulbs often to keep your porch bright.
- Follow safety steps during installation, including turning off power and using outdoor-rated wiring, or hire a professional if unsure.
Choosing a Vintage Outdoor Wall Lantern
Porch Style Match
When you want your villa patio to stand out, start by matching your vintage outdoor wall lantern to your porch’s architectural style. Think about the overall look of your home. Does your porch have classic columns, arched doorways, or a colonial vibe? A lantern with a traditional lantern style, like the Rackora 21" Coffee Golden Aluminium model, fits right in with these features. Its vintage design, with ornate details and curved lines, brings out the best in traditional and European-inspired patios.
- Match the lantern’s style to your porch’s architecture for a harmonious look.
- Choose vintage or traditional lanterns for classic or colonial homes.
- Look for designs with elegant flourishes and carved details to echo your villa’s character.
- Pick finishes that blend with your home’s exterior colors for a seamless effect.
Tip: A well-chosen lantern does more than light up your patio. It highlights your porch’s unique features and creates a warm, inviting atmosphere for guests.
Size and Proportion
Getting the right size for your outdoor wall lighting is key. You want your lanterns to look balanced—not too big, not too small. Before you buy, measure your porch and patio area. For most homes, a lantern that is about one-third the height of your door works best. If your porch is large, go for bigger lanterns. Smaller patios look better with compact fixtures.
- Measure your porch and patio before choosing lanterns.
- Select lanterns that are about one-third the height of your door.
- Place lanterns 6 to 12 inches above or beside doorways for the best effect.
- For large patios, use multiple lanterns and space them evenly to avoid dark spots.
- Install lanterns at eye level, usually between 60 and 66 inches from the ground.
This approach ensures your outdoor wall lanterns provide enough lighting while keeping your patio looking stylish and well-proportioned.
Material and Finish
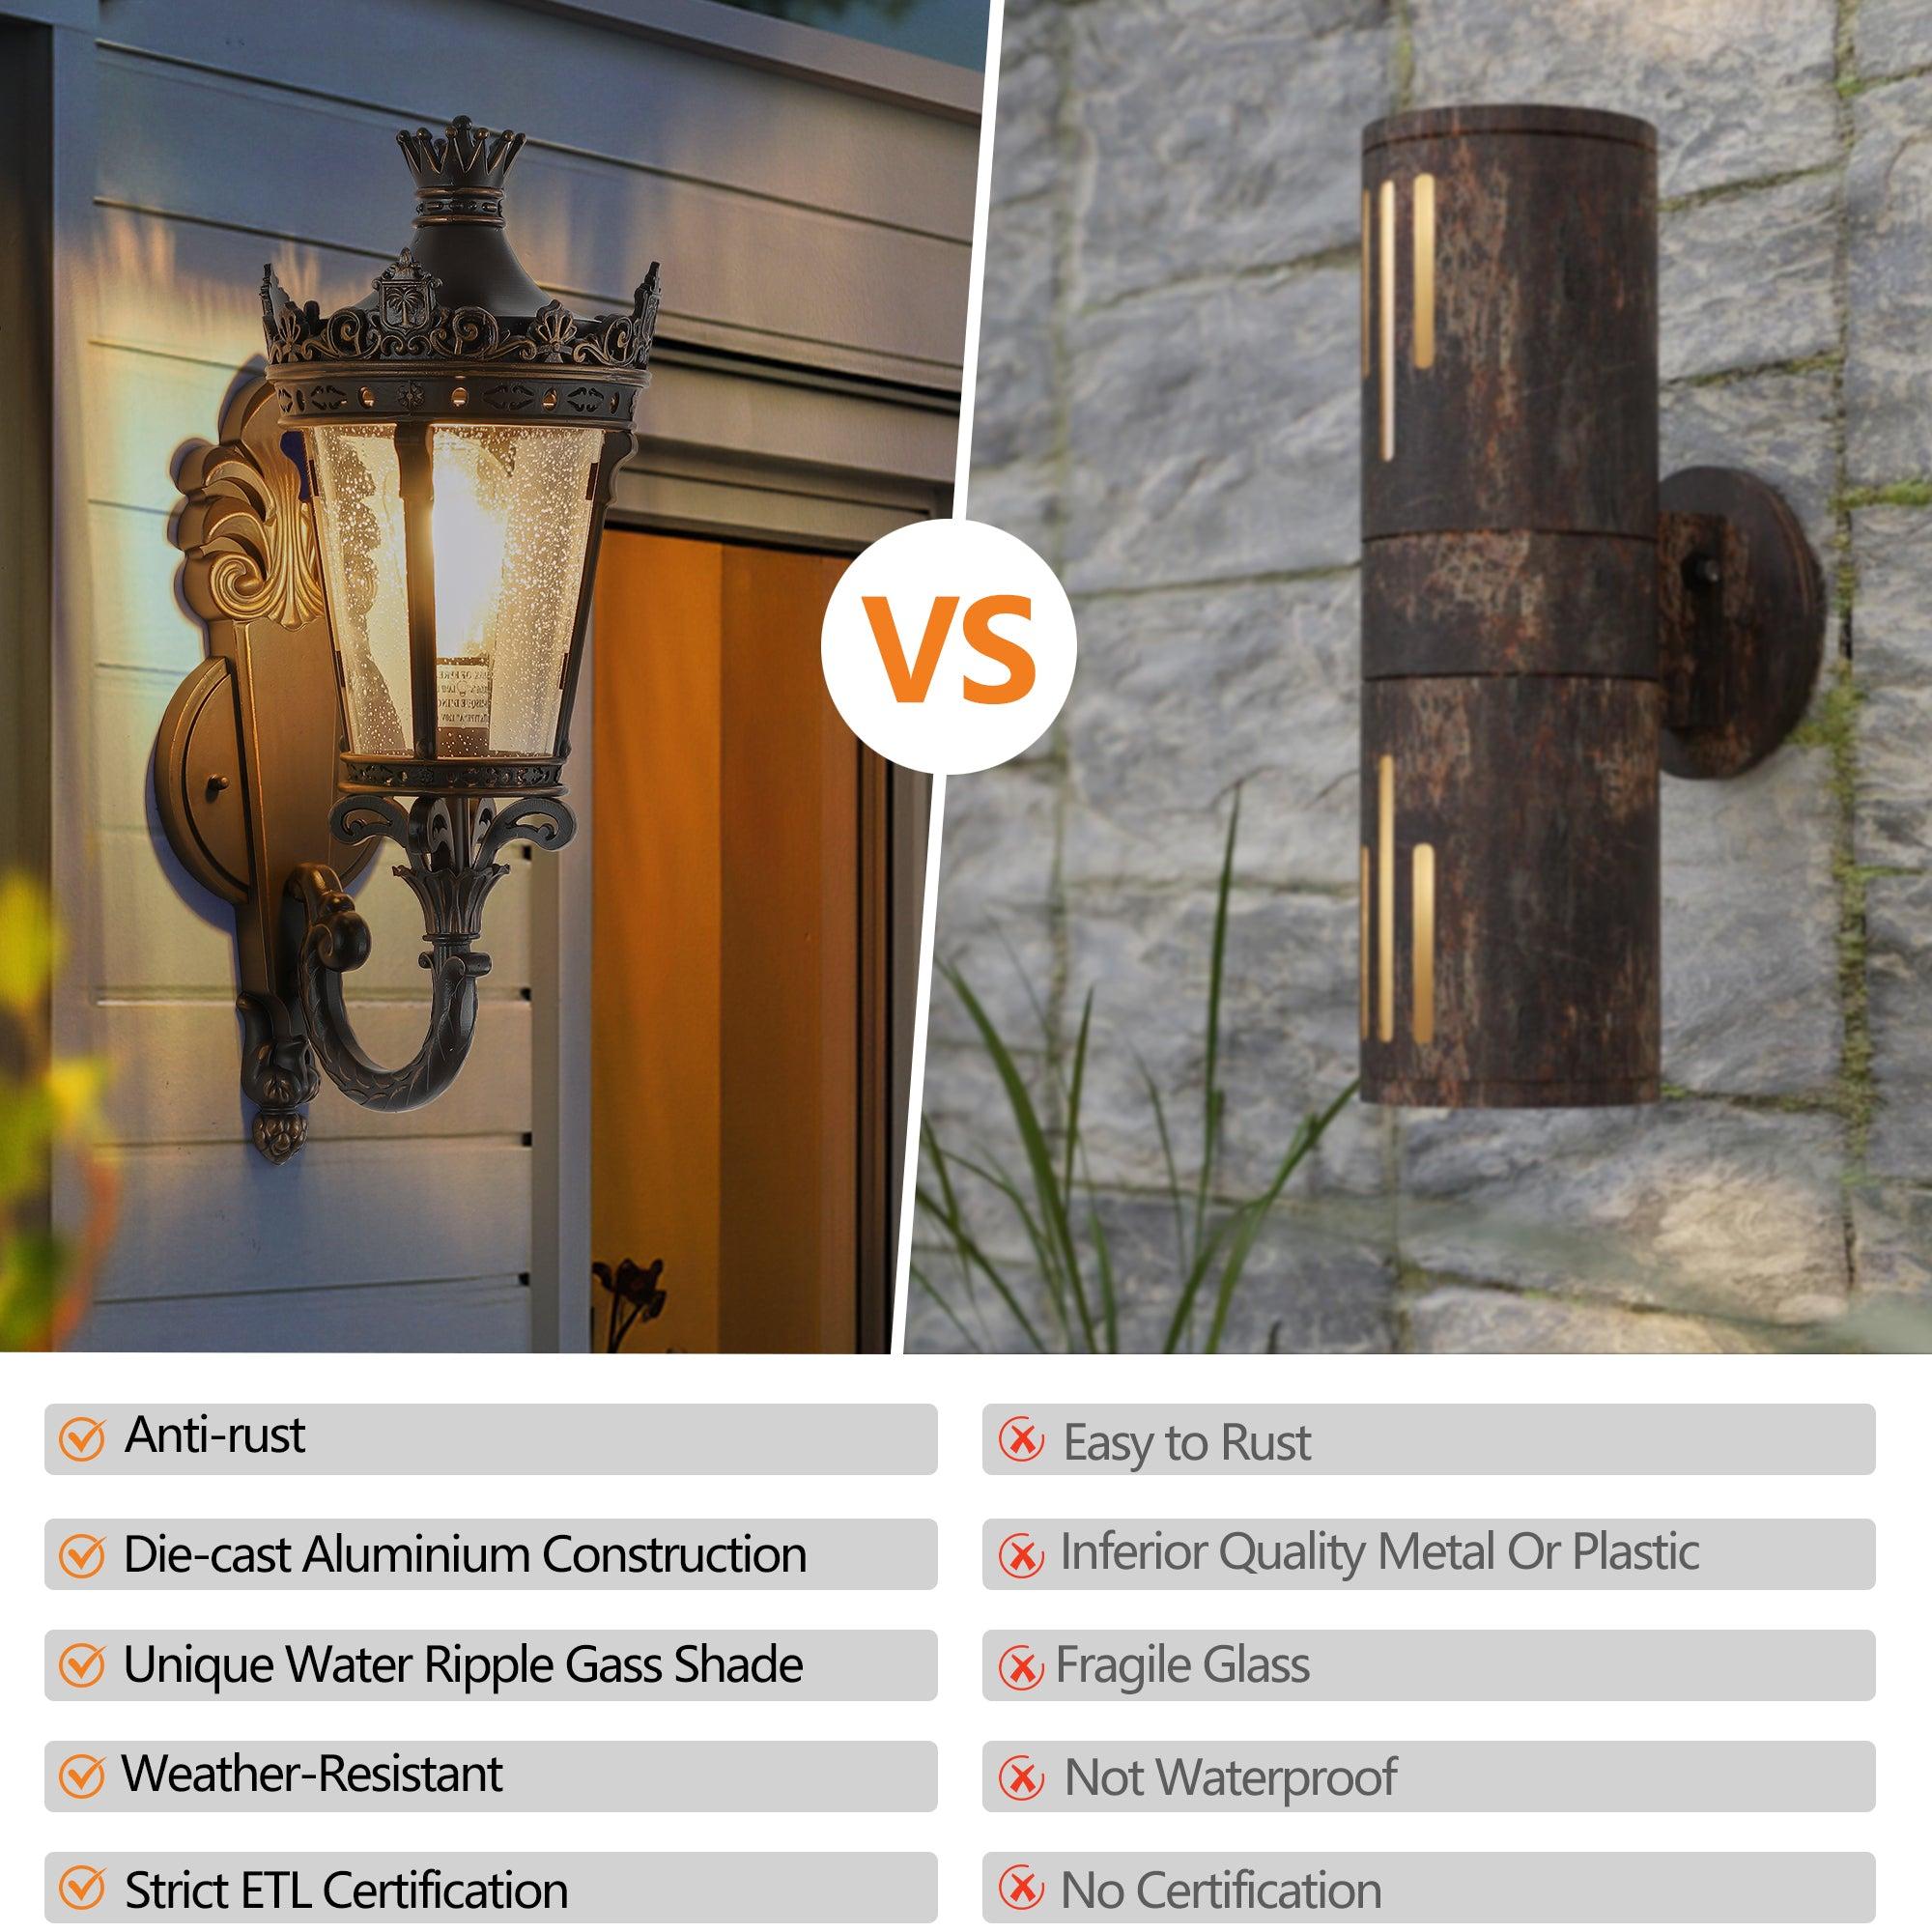
The material and finish of your lantern make a big difference in both durability and style. Outdoor wall lighting faces all kinds of weather, so you need something tough. Aluminum is a top choice for outdoor lanterns. It’s lightweight, strong, and naturally resists corrosion. The Rackora lantern uses high-quality aluminum with a special anti-corrosion treatment, so it stands up to rain, humidity, and sun without losing its shine.
- Aluminum is easy to shape into intricate designs, perfect for vintage lanterns.
- Powder-coated aluminum adds extra weather resistance and keeps the lantern looking new.
- Glass lampshades, like those on the Rackora lantern, diffuse light beautifully and add to the vintage charm.
- The coffee golden finish on the Rackora lantern brings warmth and elegance, boosting your home’s curb appeal.
Note: Choosing the right material means your lantern will last for years, keeping your patio and porch bright and beautiful through every season.
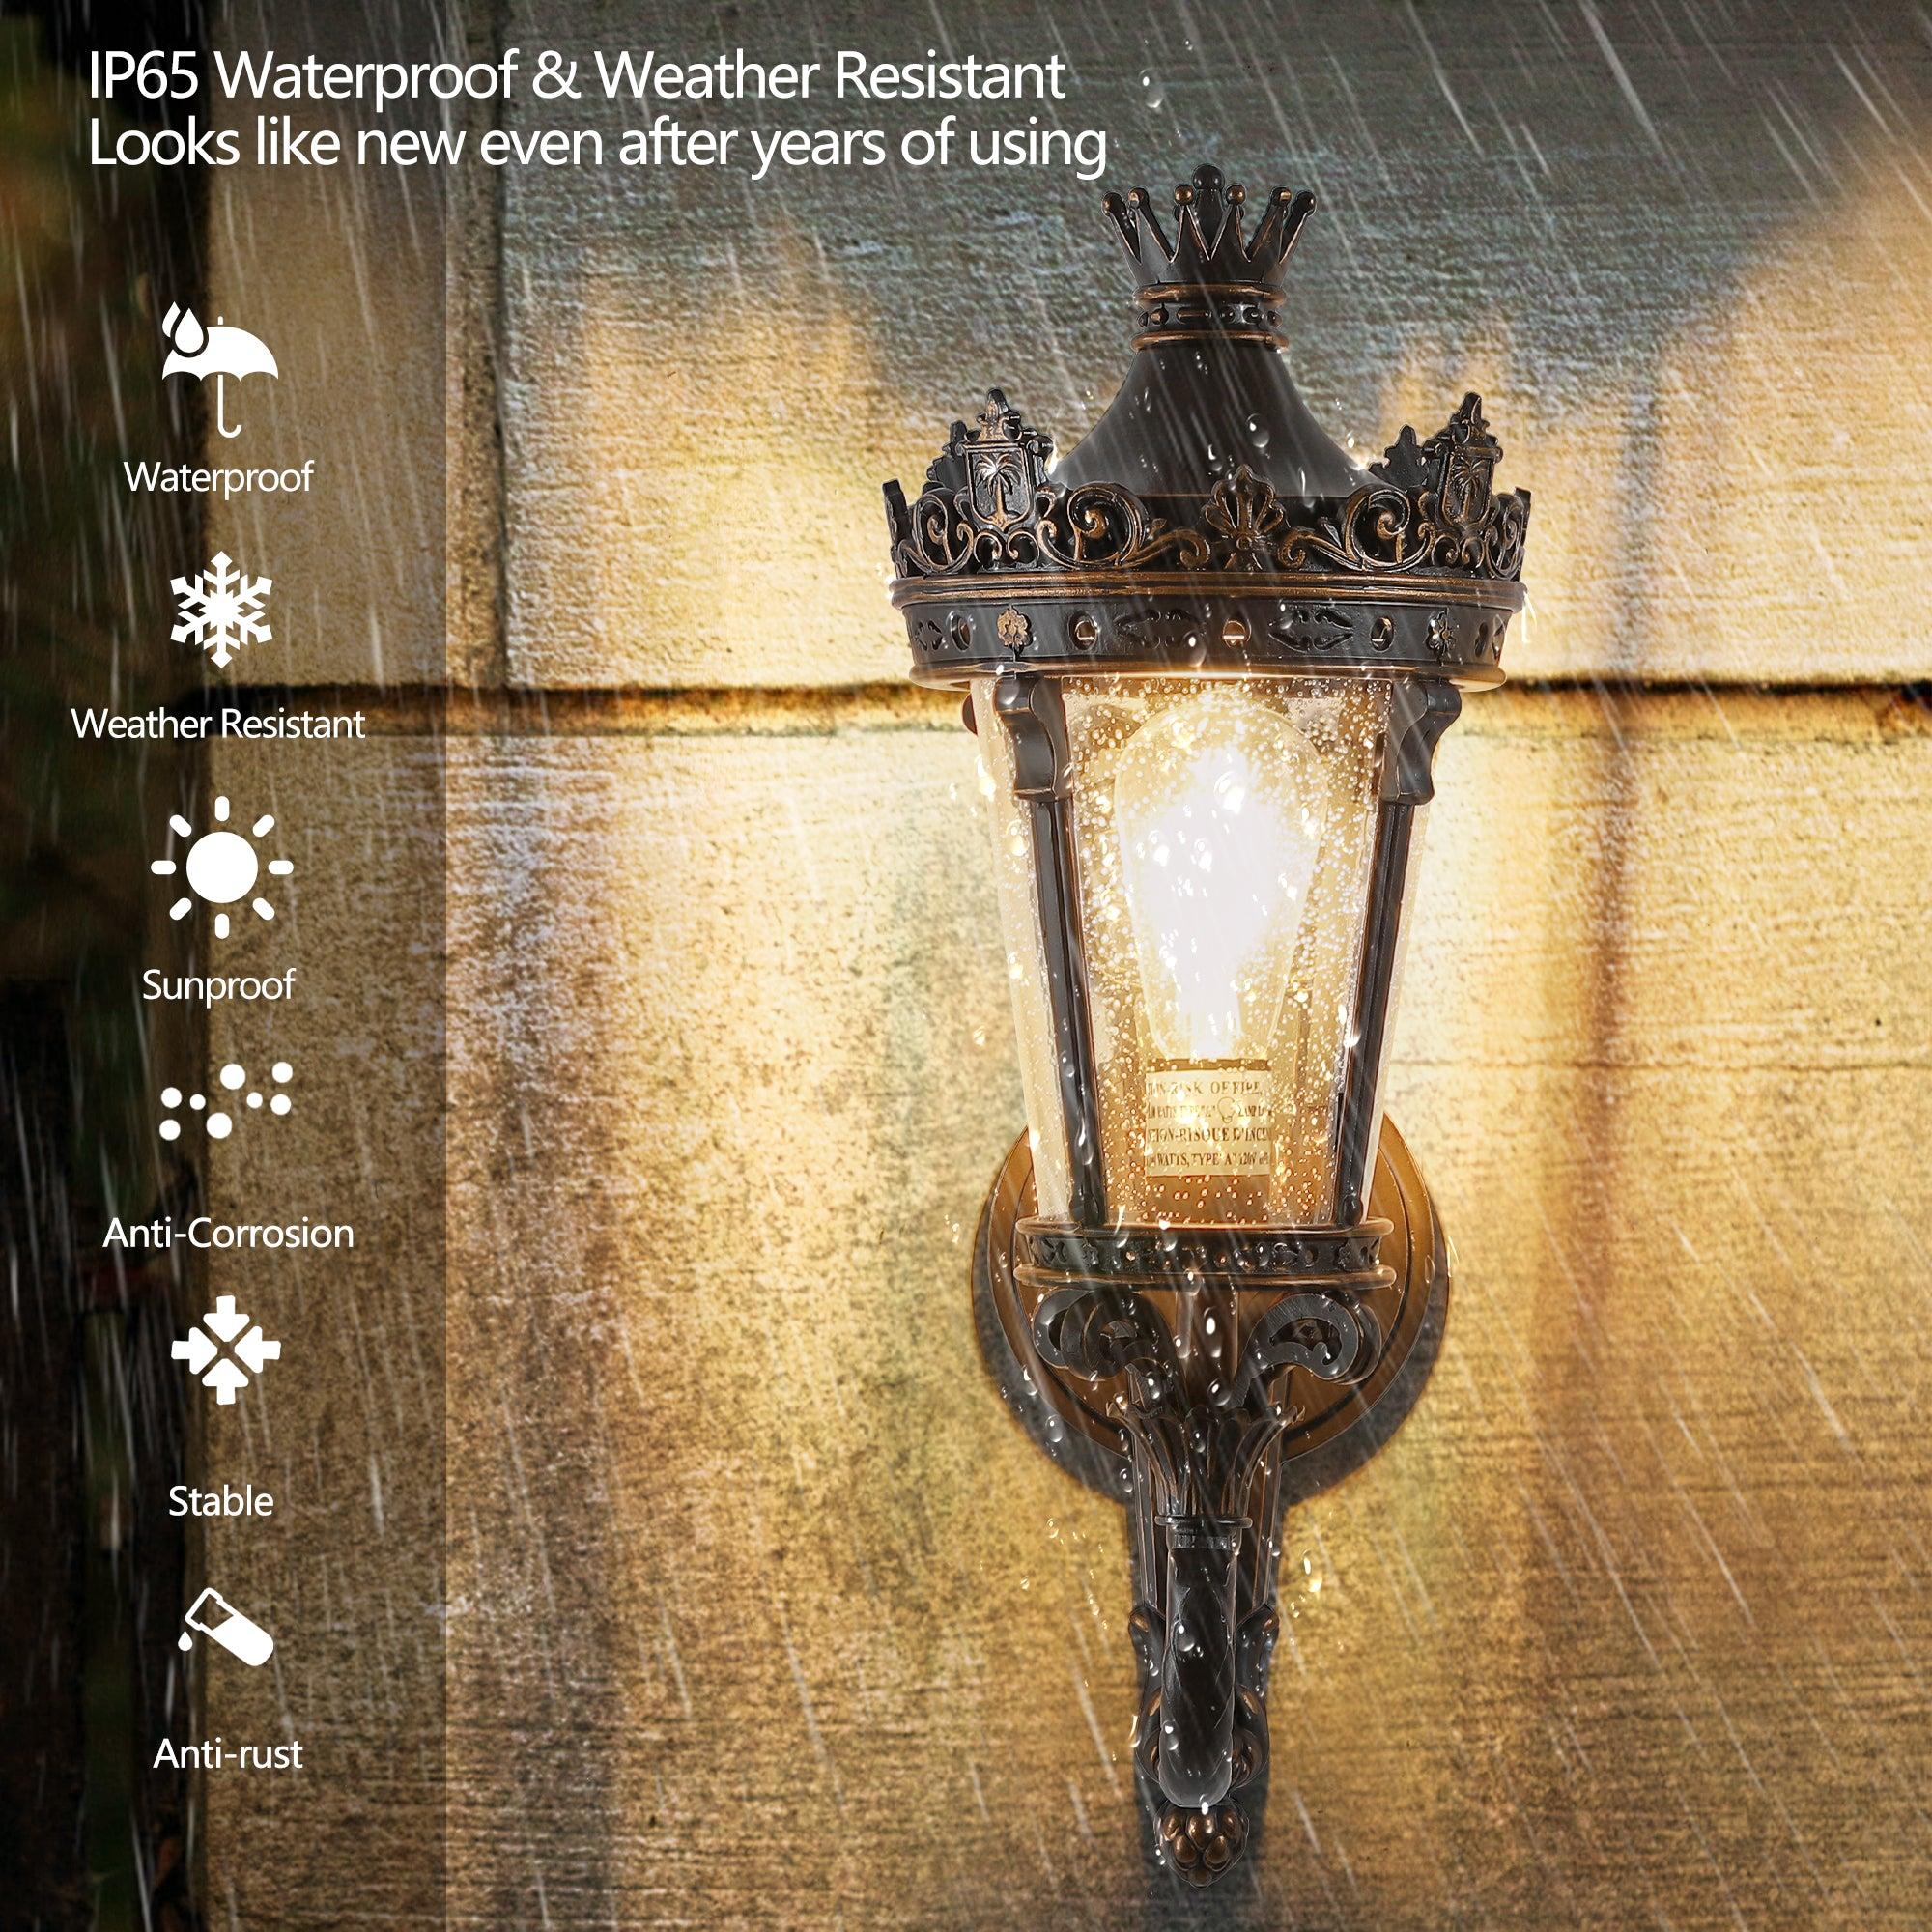
Weather Resistance
When you pick outdoor wall lighting for your villa patio, you want it to last through every season. Weather resistance is a must, especially if your home sits near the coast or in a humid area. Rain, wind, and salty air can wear down ordinary fixtures fast. You need a lantern that’s built for the outdoors and keeps shining year after year.
The Rackora 21" Coffee Golden Aluminium Vintage Outdoor Wall Lantern stands out because it’s suitable for outdoor use. The high-quality aluminum body has a special anti-corrosion treatment. This means you don’t have to worry about rust or fading, even if your patio faces heavy rain or salty breezes. The lantern’s finish stays rich and beautiful, keeping your patio looking elegant.
Here’s what you should look for in weather-resistant outdoor wall lighting:
- Corrosion-resistant materials like powder-coated aluminum or marine-grade finishes.
- Fixtures sealed for wet locations, so moisture and salt air can’t get inside.
- Wet-rated lanterns with sealed enclosures to protect the bulb and wiring from rain and humidity.
- Rust-resistant designs that keep your patio lighting strong, even in harsh weather.
- Easy maintenance, such as wiping down the lantern and checking seals every few months.
Tip: Before winter, apply a thin layer of clear wax to your lantern’s surface. This simple step helps preserve the finish and keeps your outdoor wall lighting looking new.
Outdoor wall lanterns with these features can last a long time. Many weather-resistant patio lights, especially those with LED bulbs, offer lifespans between 25,000 and 50,000 hours. That’s years of reliable lighting for your patio, with fewer bulb changes and less hassle. The Rackora lantern’s durable construction means you can enjoy a glowing patio, no matter what the weather brings.
If you want your villa patio to stay bright and welcoming, choose outdoor wall lighting that’s made for the outdoors. Look for lanterns that promise both style and strength, so your patio always feels like home.
Outdoor Wall Lighting Placement
Best Location
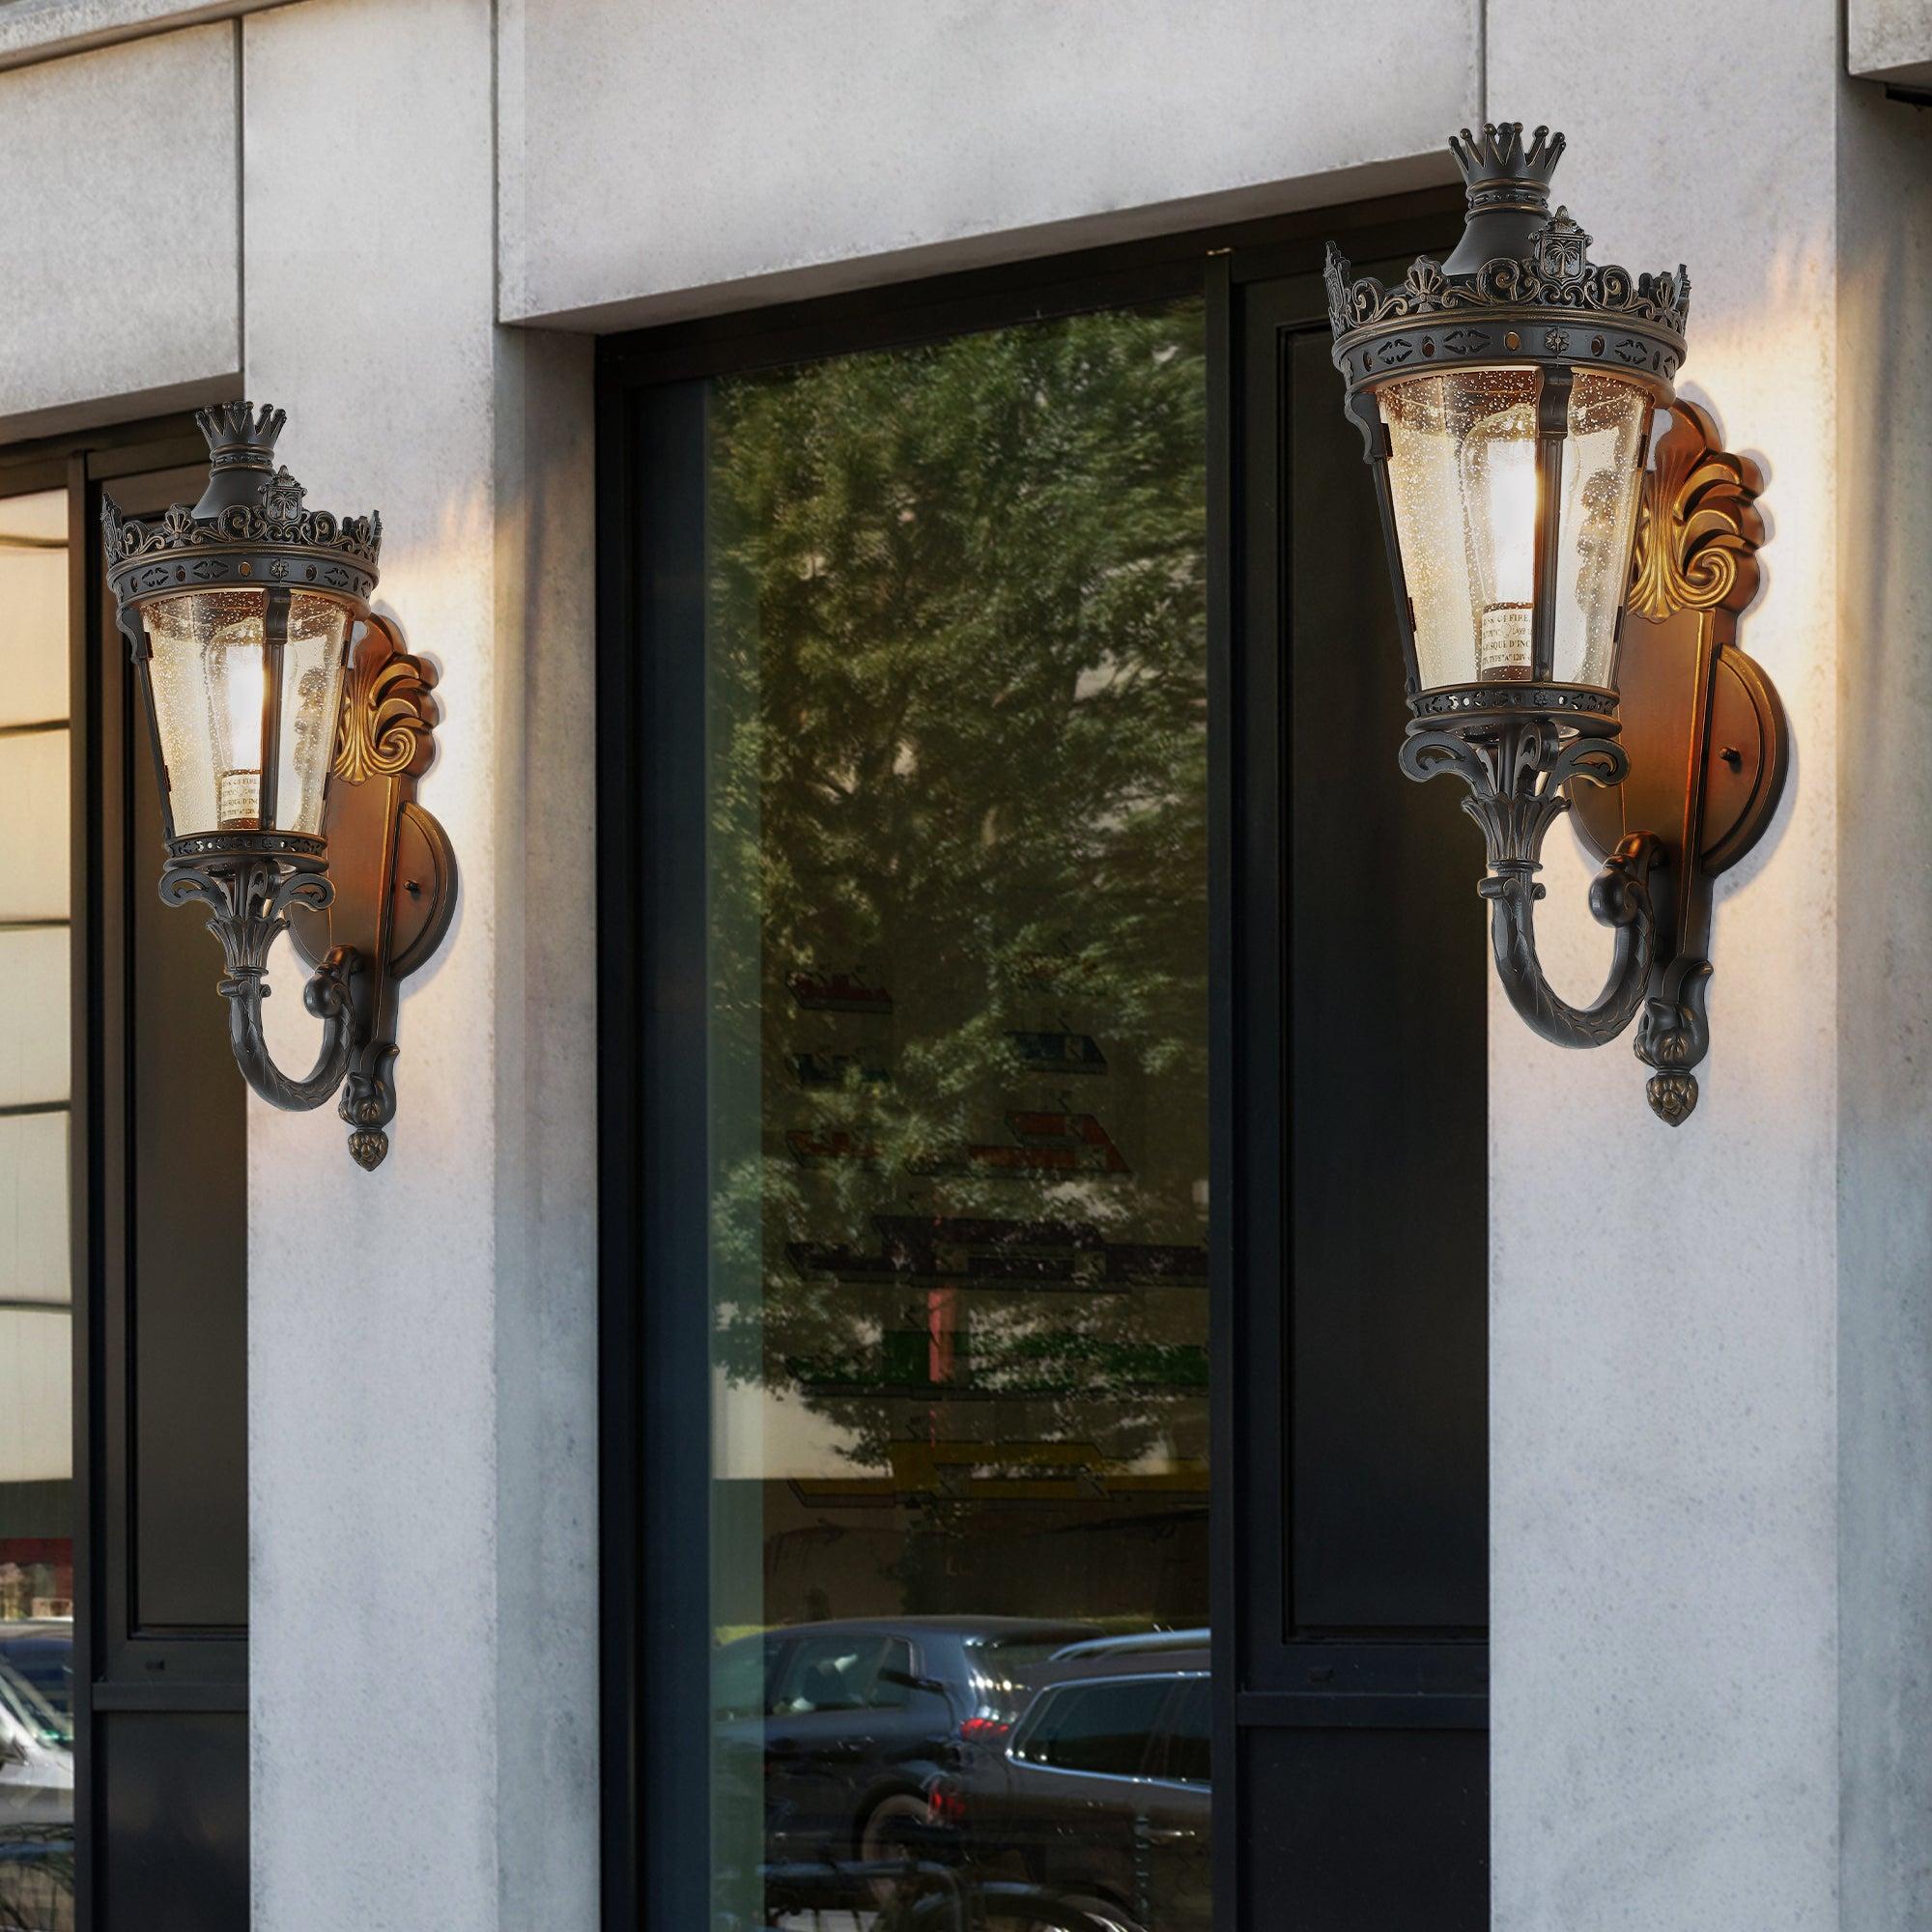
Finding the right spot for your outdoor wall lantern can make all the difference on your villa porch. You want your lighting to feel welcoming and look beautiful. Start by placing your lantern near the main entrance. This spot gives you the best mix of function and style. Mount the lantern about 6 inches from the door frame. This distance lights up the entryway and helps guests see steps or paths clearly.
If you have a double-door entry or a wide porch, use a pair of lanterns. Place one on each side of the door. This symmetrical setup frames your entrance and adds balance to your porch. For larger or wraparound porches, add more outdoor wall lighting along the walls. This way, you avoid dark corners and keep the whole area bright and safe.
Tip: Choose a vintage outdoor wall lantern like the Rackora model to bring classic charm and reliable illumination to your porch.
Height and Spacing
Getting the height and spacing right is key for both safety and style. Mount your lanterns at shoulder or eye level, usually between 66 and 72 inches from the ground. This height gives you enough downward light without causing glare. It also lines up with most doorways and architectural features.
Here’s a quick guide for perfect placement:
- Mount lanterns 66 to 72 inches above the floor for the best illumination.
- Space lanterns about 6 inches from the door frame.
- For multiple lanterns, keep them 8 to 10 feet apart along the wall to spread light evenly.
- Use lanterns that are about one-third the height of your door for a balanced look.
This setup ensures your outdoor wall lighting covers the porch without harsh shadows or bright spots. You get even illumination and a polished appearance.
Highlighting Features
You can use outdoor wall lanterns to show off your villa’s best details. Place lanterns on either side of the entryway to highlight columns, arches, or unique trim. This draws attention to your home’s design and makes your porch stand out at night.
Try placing lanterns beneath the eaves or near special features like stonework or decorative railings. Soft, warm light from the lantern creates a cozy mood and brings out textures and colors. For a layered effect, combine your wall lantern with ceiling or pendant lights. This adds depth and makes your outdoor space feel inviting.
Note: The Rackora lantern’s vintage style and warm glow work perfectly to accentuate your villa’s architecture while providing practical outdoor illumination.
Lanterns Installation
Tools Needed
Before you start installing your new lantern, gather all the tools you need. You don’t want to run back and forth looking for a screwdriver or wire nuts. Here’s a quick table to help you see what you’ll need for a vintage outdoor wall lantern compared to other outdoor lighting types:
|
Lighting Type |
Required Tools |
Notes on Comparison |
|---|---|---|
|
Vintage Outdoor Wall Lantern |
New light fixture, multi-head screwdriver, pliers, wire nuts, light bulb, electric gasket (optional) |
Fewer tools needed; installation is straightforward and flush to the wall. |
|
Outdoor Pendant Lights |
Ceiling junction box, mounting strap, new light fixture, multi-head screwdriver, wrench, pliers, wire nuts, light bulb |
Similar tools, but may need extra hardware for ceiling mounting. |
|
Outdoor Lamp Posts |
New light fixture, multi-head screwdriver, wrench, wire cutters, shovel, quick-setting cement, bucket or wheelbarrow, pliers, wire nuts, light bulb |
More tools and effort needed for ground installation. |
You’ll notice that installing a vintage outdoor wall lantern is much simpler than setting up a lamp post. You just need basic hand tools and your new lantern.
Mounting Steps
Ready to install your lantern? Follow these steps for a smooth setup. The Rackora 21" Coffee Golden Aluminium 120V Vintage Outdoor Wall Lantern comes with a user-friendly mounting system, so you can handle it without calling an electrician.
- Turn off the power at your circuit breaker. Safety comes first.
- Check the wall where you want to mount the lantern. Make sure it can support the weight. If you have brick or stone, use masonry anchors.
- Mark the mounting holes and attach the bracket to the wall. Don’t assemble the bracket yet.
- Connect the wires. Match white to white (neutral), black to black (hot), and green or bare copper to ground. Use wire nuts and wrap with electrical tape for extra security.
- Carefully position the lantern on the wall. Make sure you don’t pinch any wires. Secure the lantern with the provided hardware and tighten everything.
- Install the light bulb that fits your lantern’s specifications.
- Turn the power back on at the breaker and test your new lantern. If the light turns on, you did it right!
Tip: Always double-check your connections before you secure the lantern to the wall. This helps you avoid having to take it down and start over.
Electrical Safety
When you install a hard-wired outdoor wall lantern, you need to keep safety in mind. Here are some important tips:
- Use only fixtures and wiring rated for outdoor use. These resist moisture and temperature changes.
- Make sure all electrical connections are weatherproof. Use waterproof junction boxes and sealed connectors.
- Always turn off the power at the breaker before you start working.
- Install GFCI protection on outdoor circuits. This helps prevent electrical shock.
- Follow your local electrical codes and regulations.
- If you feel unsure about any step, call a professional electrician. Your safety matters most.
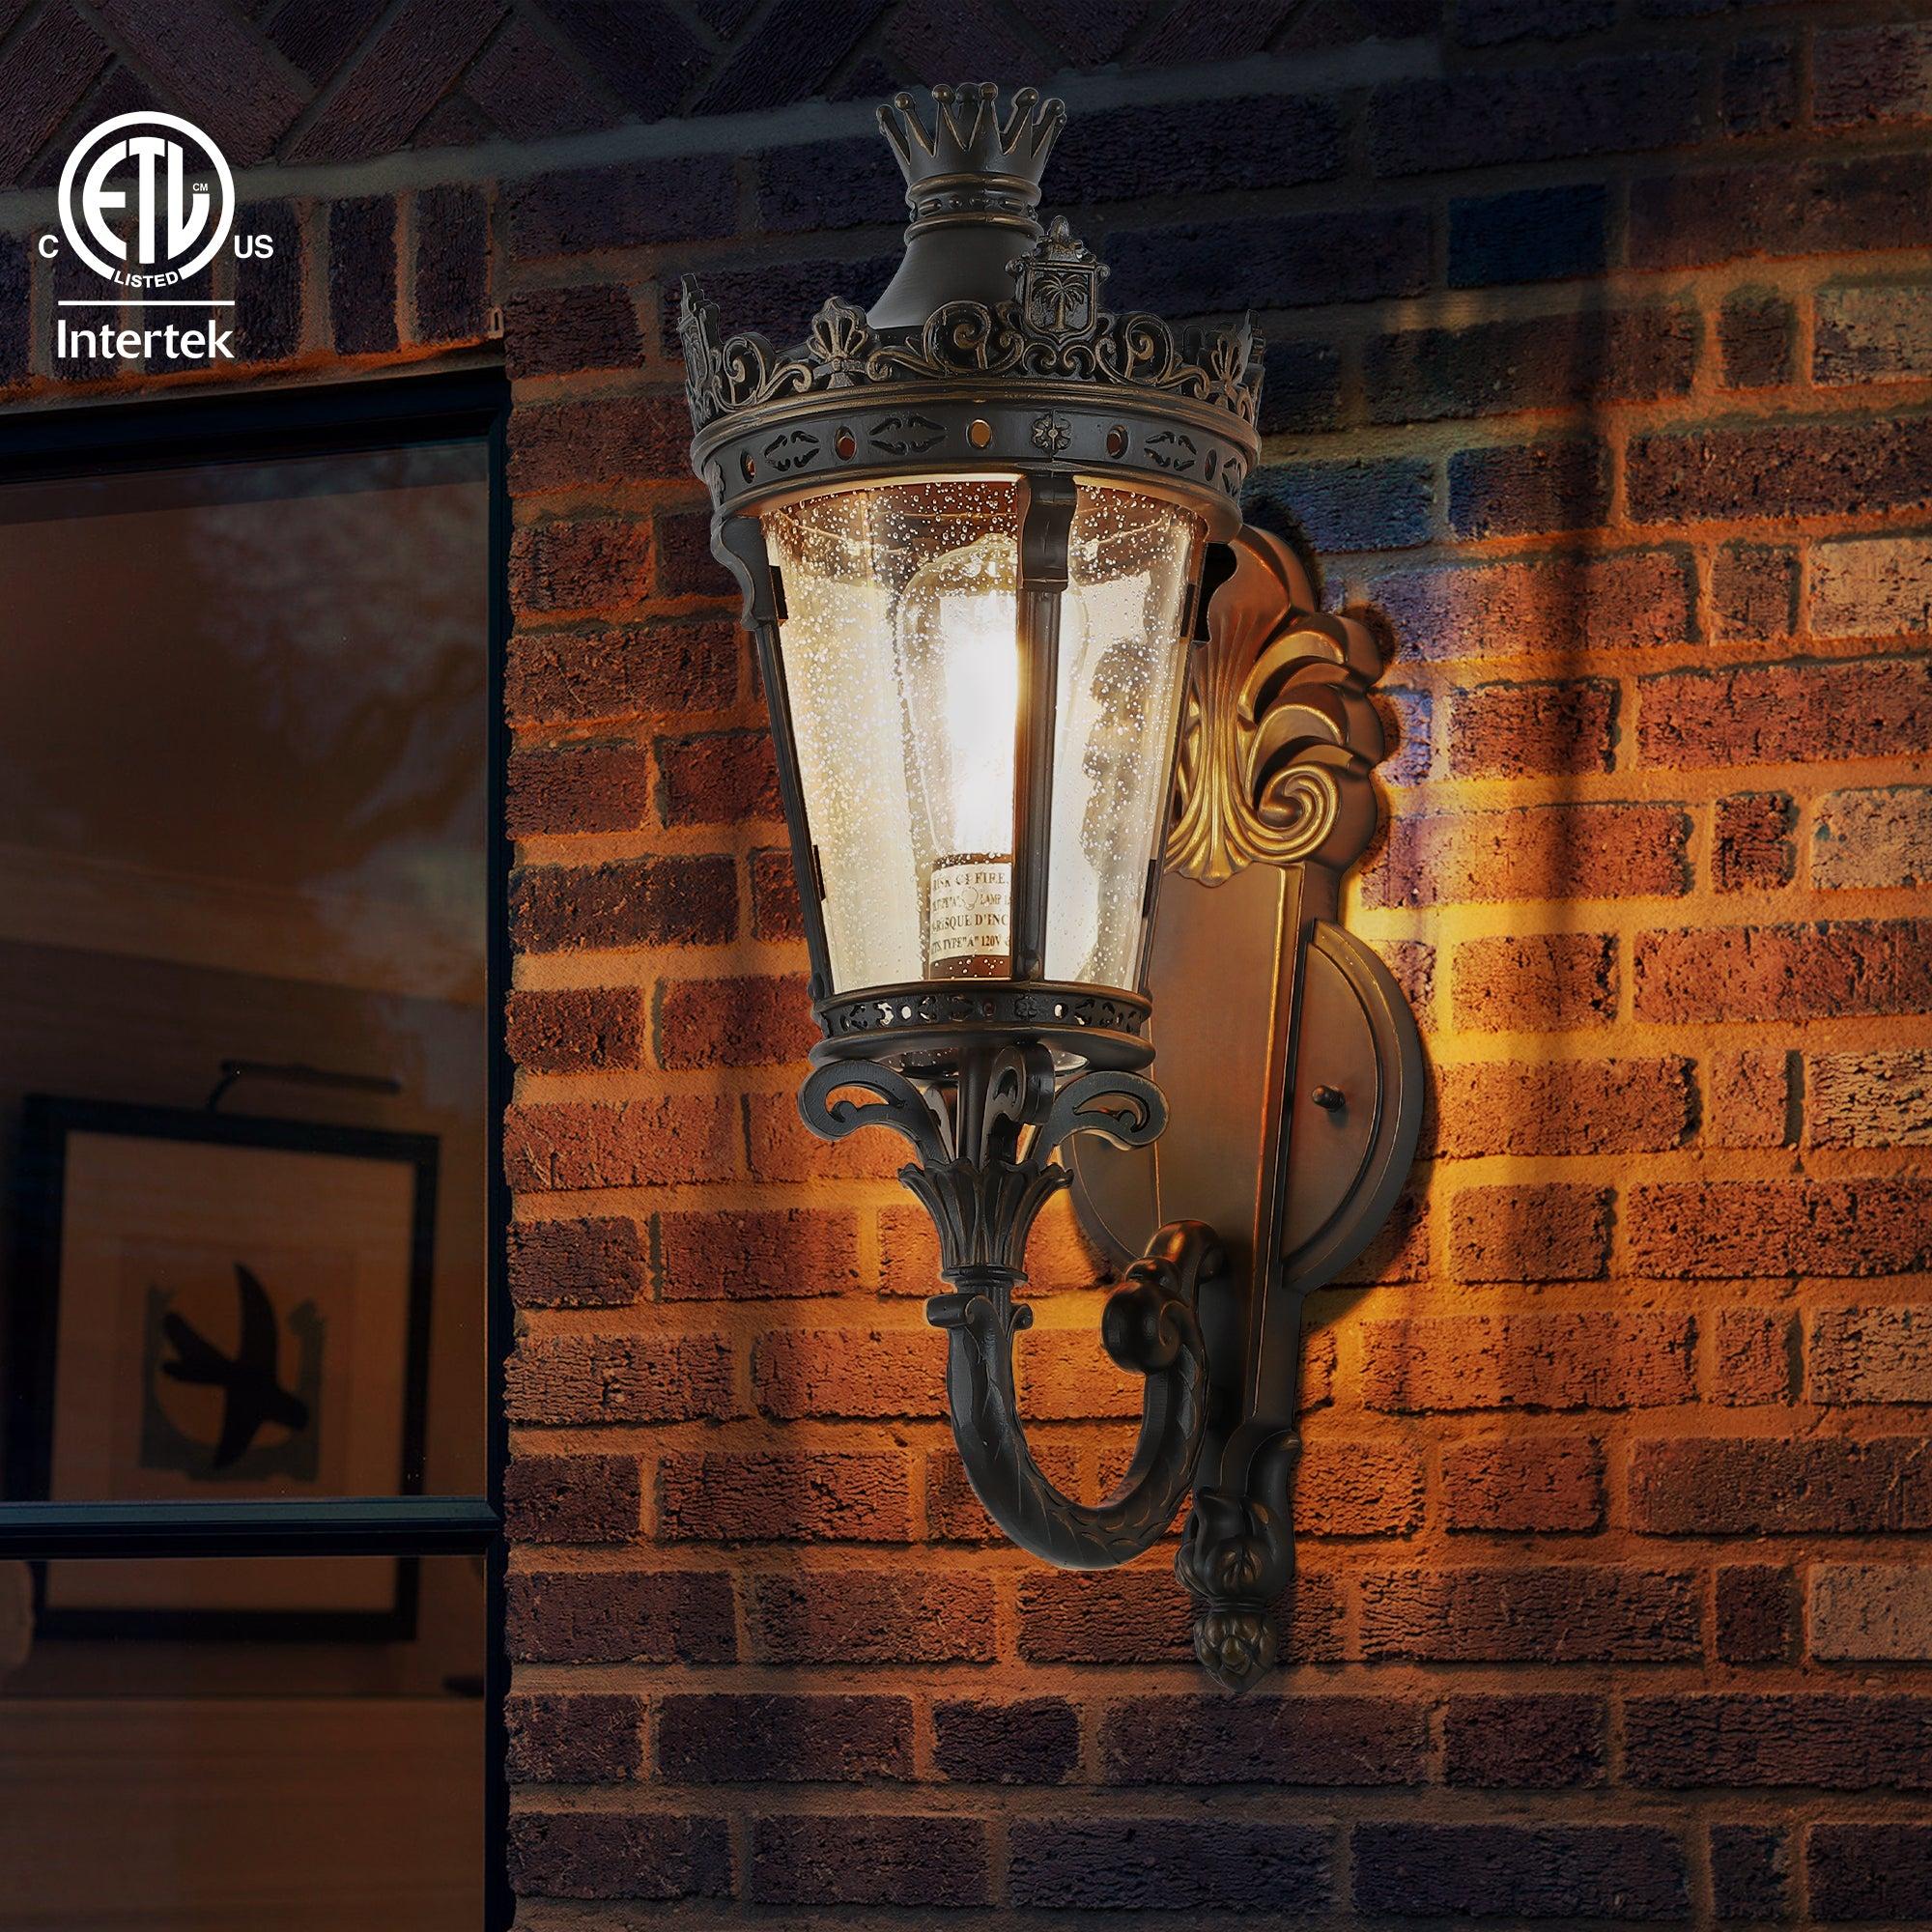
Note: The Rackora lantern is designed for easy wall mounting and safe 120V hard-wired installation. You can enjoy beautiful outdoor light with peace of mind when you follow these safety steps.
Testing Light
You have finished installing your vintage outdoor wall lantern. Now comes the exciting part—testing your new fixture to make sure everything works as it should. This step helps you catch any issues before you start enjoying your beautifully lit villa porch.
Start by heading to your circuit breaker. Flip the breaker back on to restore power to the area where you installed the lantern. If you used a fuse, replace it. Once the power is back, walk over to your switch and turn it on. Watch for the lantern to glow. If the light comes on right away, you have done a great job!
Tip: Always stand clear of the fixture when you first turn the power back on. This keeps you safe in case of any unexpected issues.
If your lantern does not light up, do not worry. This happens sometimes, even with careful installation. Turn the power off at the breaker again before you check anything. Safety always comes first. Next, look at your wiring connections. Make sure each wire is matched correctly—white to white, black to black, and ground to ground. Check that the wire nuts are tight and that no copper is exposed.
After checking the wiring, look at the bulb. Sometimes a bulb is loose or not screwed in all the way. Remove the bulb and put it back in, making sure it fits snugly. Also, confirm that you are using the correct type of bulb for your lantern.
Here is a quick troubleshooting checklist:
- Power is restored at the breaker or fuse box.
- The switch is turned on.
- All wiring connections are secure and correct.
- The bulb is properly installed and not burned out.
- The fixture is grounded.
If you have checked everything and the lantern still does not work, you may want to try a different bulb. Sometimes, a new bulb can solve the problem. If the lantern still does not light up, it might be time to call a professional for help.
Note: Testing your outdoor wall lantern right after installation gives you peace of mind. You know your porch will stay bright and welcoming every evening.
Once your lantern lights up, step back and admire your work. You have added both beauty and safety to your villa porch. Enjoy the warm glow and the classic style your new fixture brings to your home.
Vintage Lantern Styles
Coordinating with Architecture
When you want your villa porch to look stunning, start by matching your lantern to your home’s architecture. You have many vintage lantern styles to choose from, and each one brings its own charm. European antique lanterns work well with classic villa designs. They often have elegant curves and detailed carvings, just like the Rackora lantern. Rustic farmhouse lanterns fit traditional exteriors and add a touch of warmth. Nordic art deco mounts bring a modern twist to vintage lighting, making them perfect for villas with clean lines. American vintage wall sconces, with brass or copper finishes, look great on patios and hallways.
- European antique lanterns: Classic and elegant, ideal for villa gardens.
- Rustic farmhouse lanterns: Great for traditional exteriors.
- Nordic art deco mounts: Stylish for modern villas.
- American vintage wall sconces: Perfect for patios and hallways.
Most vintage lanterns use materials like iron, brass, aluminum, and glass. These materials last a long time and handle outdoor weather well. The Rackora lantern uses high-quality aluminum and a glass lampshade, so you get both beauty and durability.
Layered Lighting
You can create a welcoming porch by layering your lighting. Start with your main lantern by the door. Add smaller lanterns along the walls or near steps for extra safety. Try mixing vintage lanterns with modern fixtures, like recessed lights or string lights. This mix gives your porch depth and makes it feel more inviting.
Tip: Use a table to plan your lighting layers.
|
Lighting Layer |
Placement |
Purpose |
|---|---|---|
|
Main Lantern |
By the entrance |
Main illumination |
|
Accent Lanterns |
Along walls/steps |
Highlight details |
|
Overhead Lighting |
Ceiling/eaves |
General glow |
|
Decorative Lights |
Railings/plants |
Seasonal charm |
Layered lighting helps you avoid dark spots and creates a cozy, balanced look. Your porch will feel brighter and more stylish.
Ambiance Creation
Ambiance matters when you want your villa porch to feel special. The right lantern can set the mood for every evening. The Rackora lantern’s intricate details and textured glass lampshade create a soft, diffused glow. This gentle lighting adds warmth and makes your space feel cozy. Place your lanterns where you want to highlight beautiful features, like columns or stonework.
You can also change the ambiance with seasonal decor. Add wreaths, garlands, or lanterns with colored bulbs for holidays. Mix in candles or fairy lights for extra charm during gatherings. Vintage lanterns shine brightest when you use them to create a welcoming atmosphere that fits every season.
Note: The right lantern brings ambiance, charm, and warmth to your villa porch. You get a space that feels both elegant and inviting, perfect for relaxing or entertaining guests.
Light Maintenance
Keeping your outdoor wall lighting in top shape is easier than you might think. With a little regular care, your vintage lantern will keep your villa porch glowing for years. Let’s break down the best ways to clean, replace bulbs, and protect your outdoor lanterns from the elements.
Cleaning Tips
Outdoor wall lighting faces dust, rain, and pollen every day. You want your lantern to look as beautiful as the day you installed it. Here’s a simple cleaning routine you can follow:
- Mix a mild detergent with warm water. Use this to gently wipe down the metal surfaces. This keeps the finish looking fresh without causing damage.
- Grab a soft-bristle brush or a non-abrasive sponge. Dust off any dirt or cobwebs from the lantern’s details.
- For the glass lampshade, use a vinegar and water solution. This removes mineral spots and leaves the glass sparkling.
- Rinse everything with clean water and dry with a soft cloth. This step prevents water stains and mold.
- If you want a deeper clean, polish the metal with a gentle metal cleaner or a natural mix of lemon juice and baking soda.
- Try to position your lantern under an eave or awning. This reduces how much dirt and rain hit the fixture.
- During heavy storms, cover your lantern with a moisture-resistant shade or cover.
Tip: Clean your outdoor wall lighting every few months. Regular care keeps your lantern shining bright and extends its life.
Bulb Replacement
You don’t want your porch to go dark unexpectedly. Keep an eye on your bulbs and replace them as soon as you notice dimming or flickering. Here’s what you should know:
- Bulb life depends on the type you use. LED bulbs last much longer than incandescent or halogen options.
- Weather, humidity, and even pollution can shorten bulb life in outdoor wall lighting.
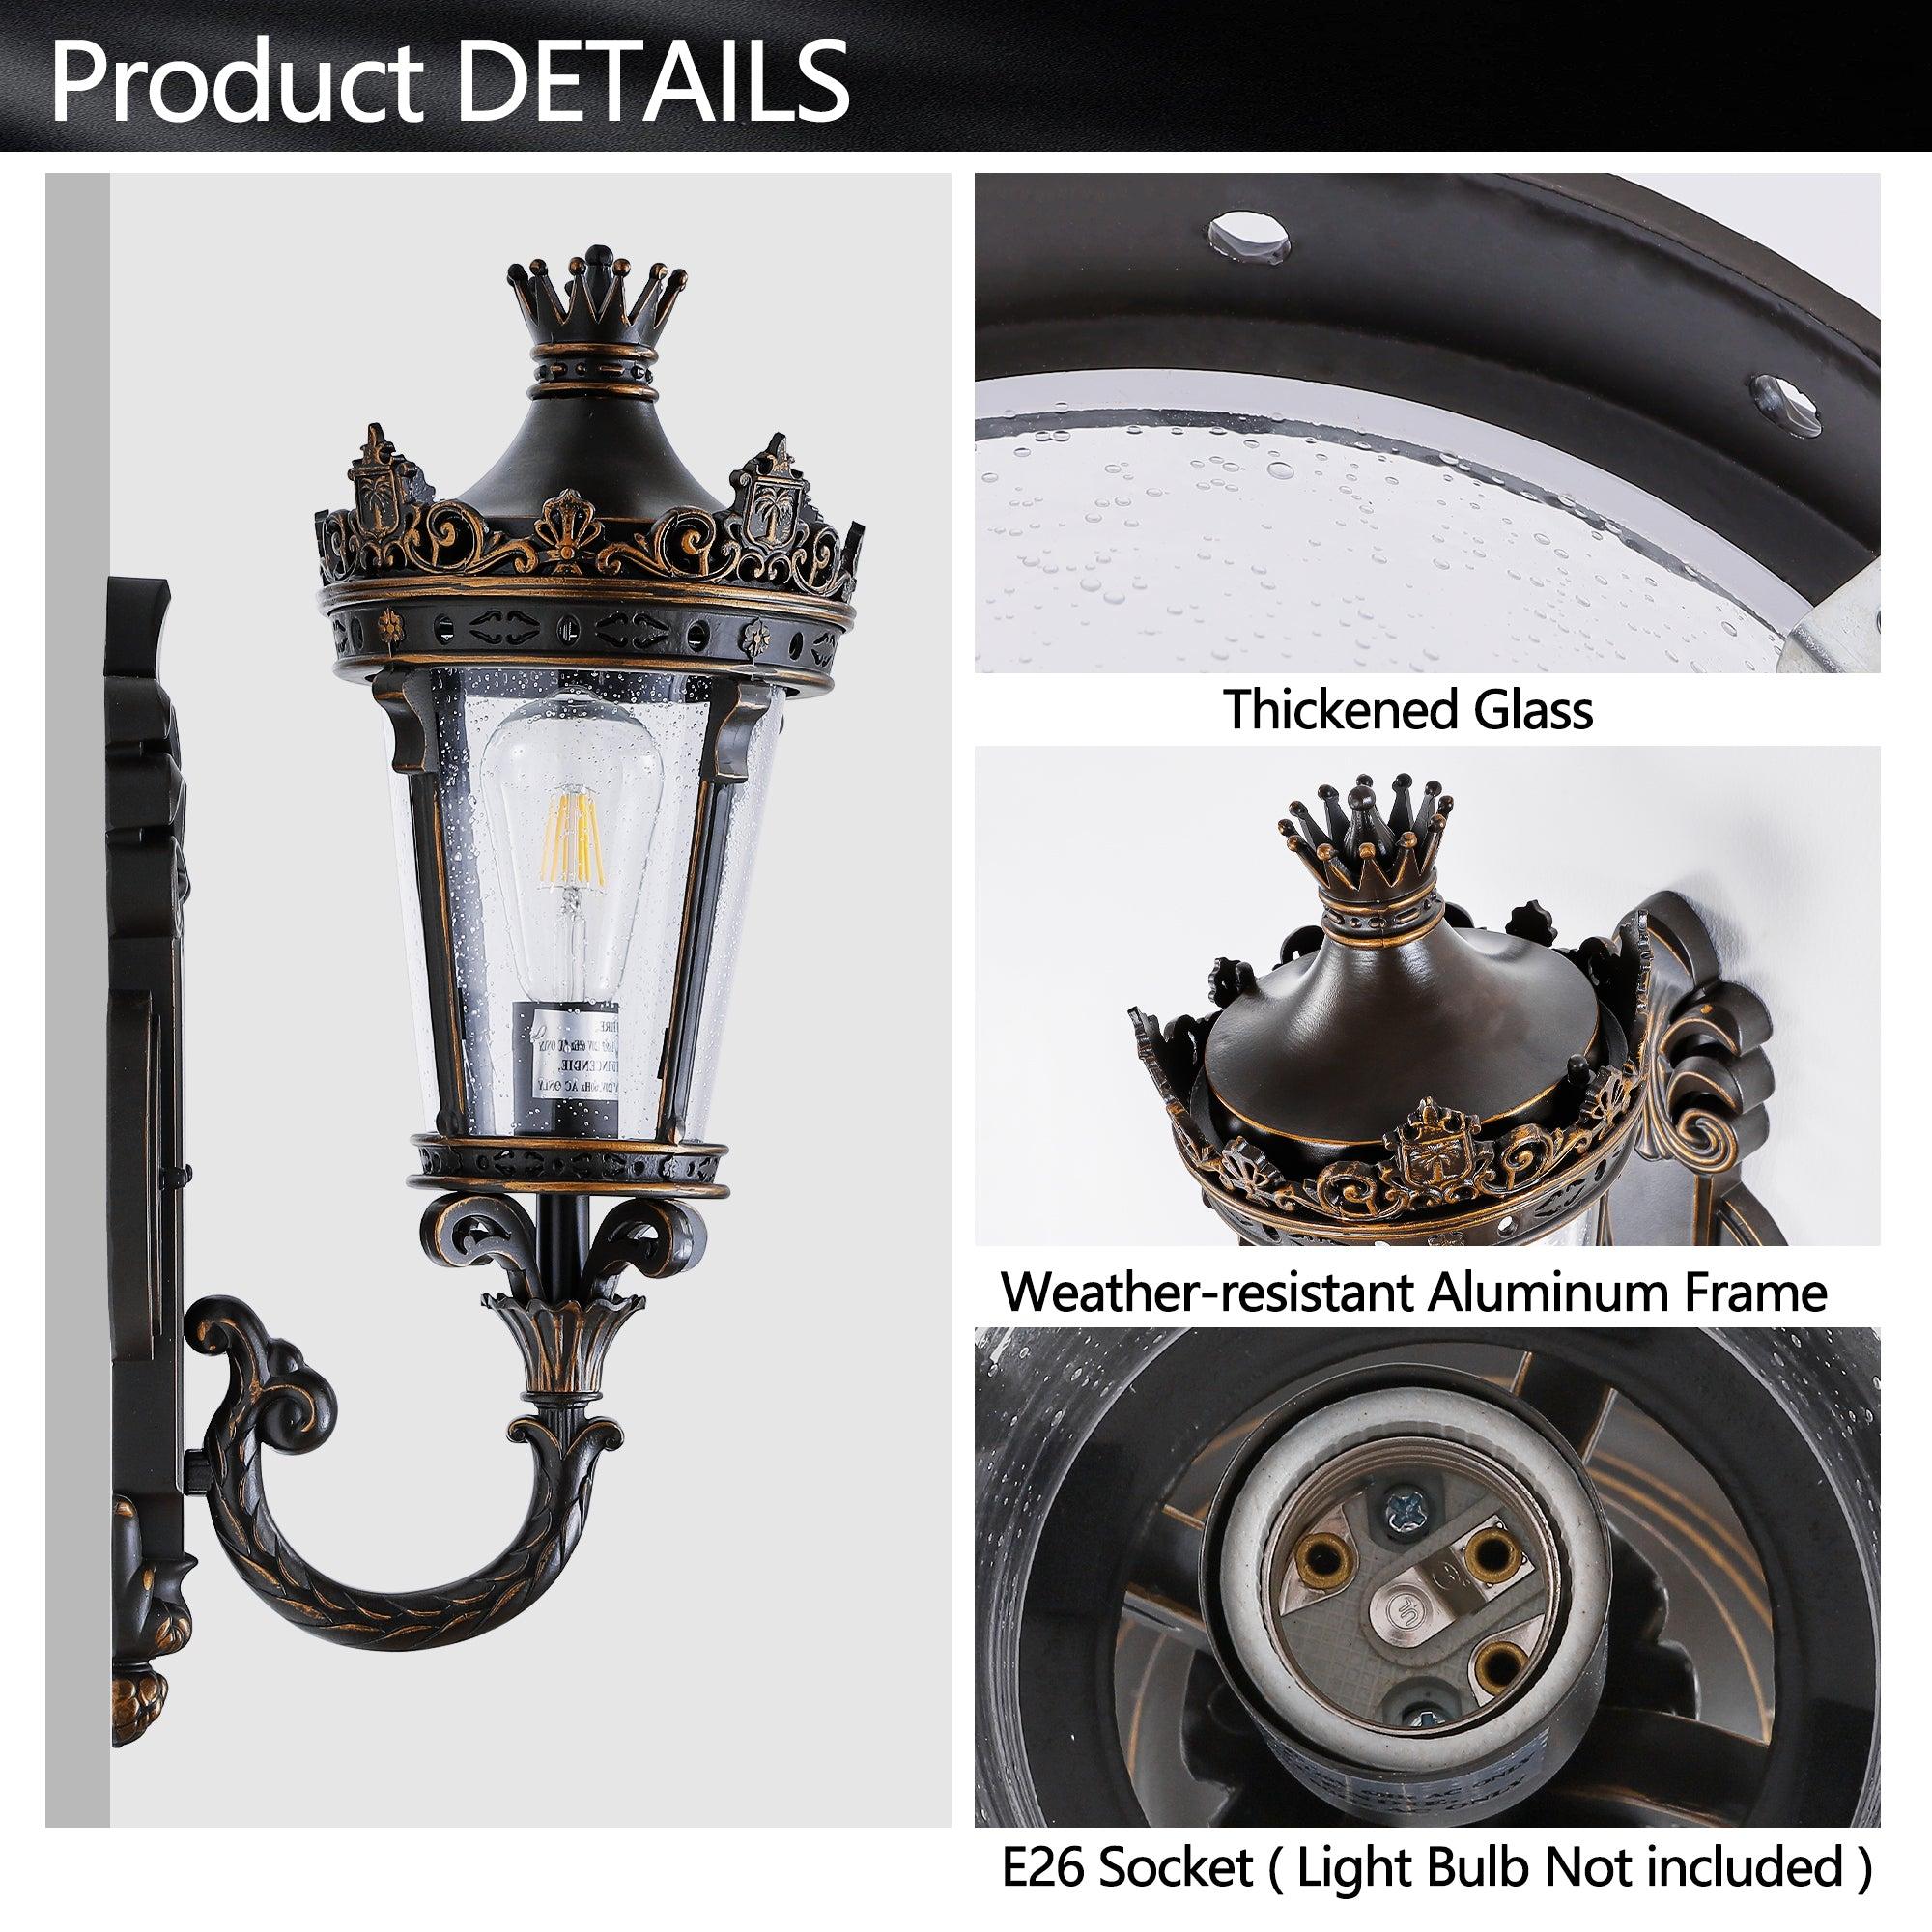
- The design of your fixture matters. Enclosed lanterns, like the Rackora model, help protect bulbs from the elements.
- Always check your bulbs during regular cleaning. Wipe away dust and debris to keep them working well.
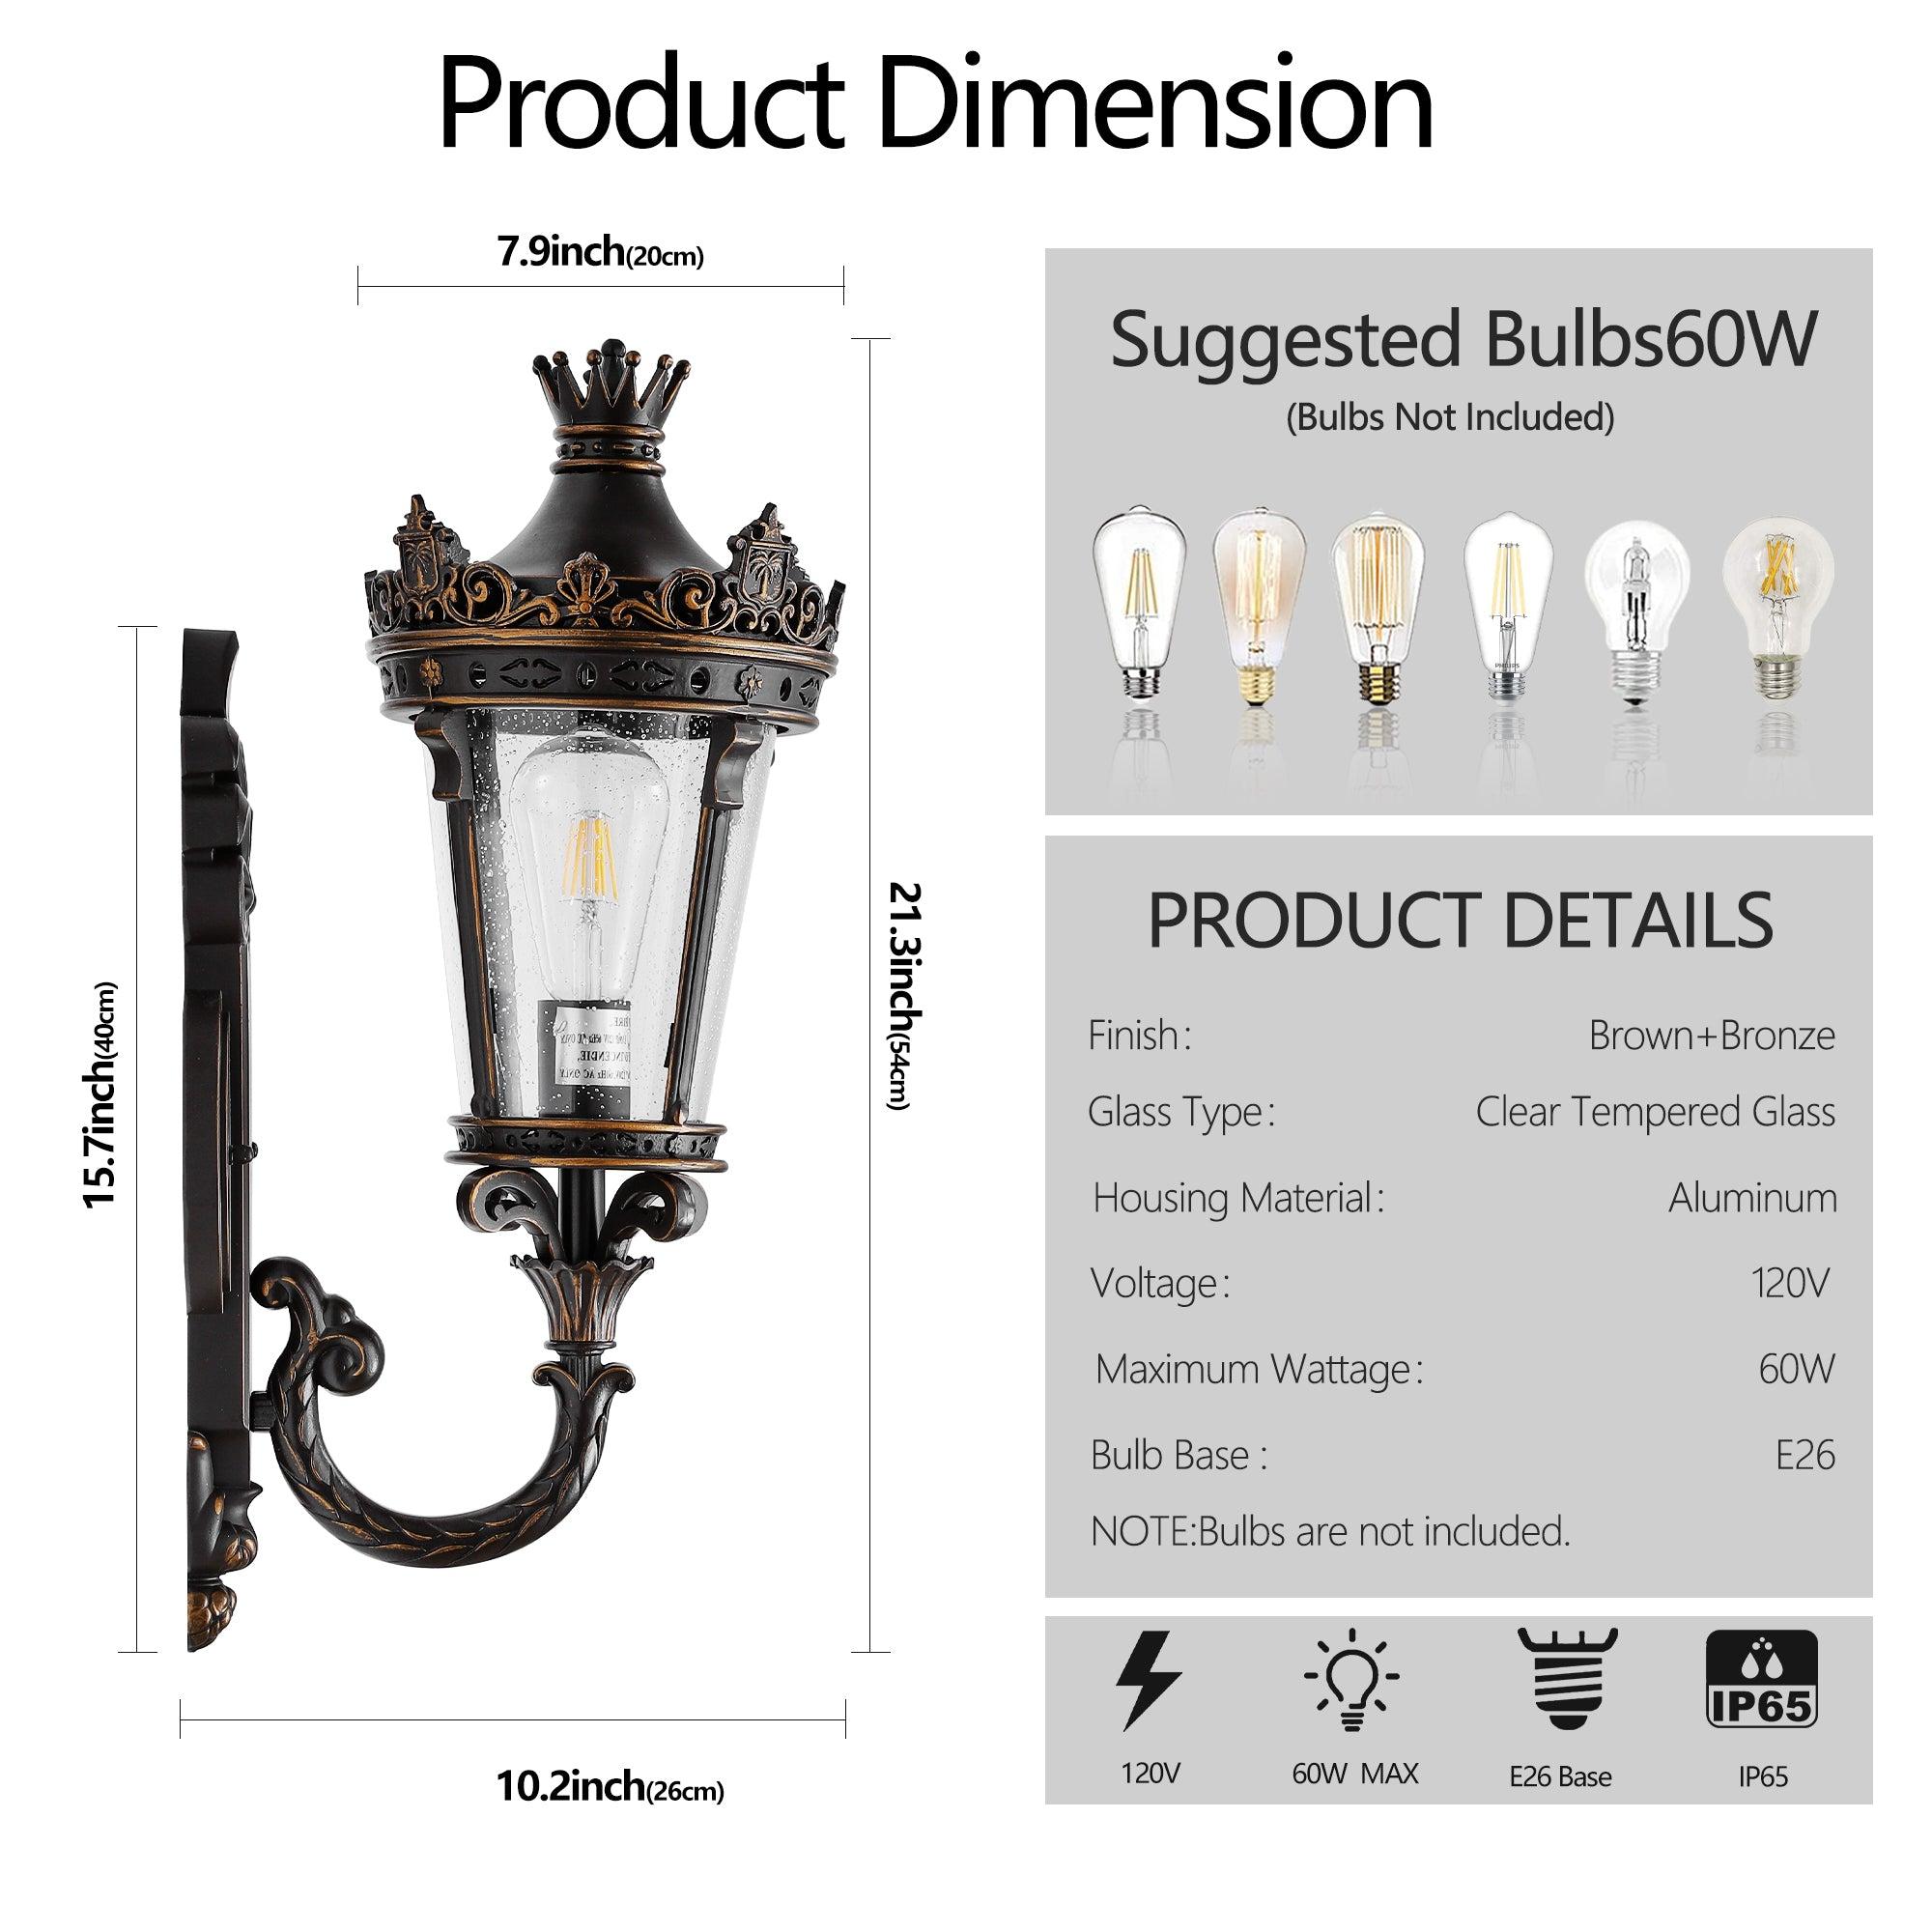
- Make sure you use the right bulb for your lantern. The Rackora lantern supports E26 bulbs up to 60W.
Note: Regular inspections and quick bulb changes keep your outdoor wall lighting reliable and safe.
Weather Protection
Outdoor wall lighting needs to stand up to all kinds of weather. You want your lantern to last through rain, snow, and sun. The Rackora lantern’s anti-corrosion aluminum body gives you a head start, but you can do even more:
- Choose lanterns made from weather-resistant materials. Aluminum with anti-corrosion treatment works great for outdoor use.
- Look for fixtures with waterproof ratings. This helps keep out rain and moisture.
- Clean your lantern with mild soap and water to remove dirt and debris.
- Check seals and gaskets often. Make sure no water can get inside.
- Add wire guards or shields to protect the glass and bulb from wind-blown debris.
- Use protective covers during harsh weather or when you’re away for long periods.
Callout: A little extra care goes a long way. Protecting your outdoor wall lighting from the weather means you’ll enjoy beautiful, reliable light every night.
Safety and Functionality
Bulb Choice
Choosing the right bulb for your vintage outdoor wall lantern makes a big difference in both style and performance. You want a bulb that fits the fixture, saves energy, and gives off the perfect glow for your villa porch. Most vintage outdoor lanterns, like the Rackora model, use an E26 base and support up to 60 watts. LED bulbs work best for these lanterns because they last longer and use less power.
Here’s a quick look at some top bulb options for vintage edison bulb fixtures:
|
Bulb Model |
Base Type |
Wattage Equivalent |
Actual Wattage |
Brightness (Lumens) |
Color Temperature (K) |
Features |
|---|---|---|---|---|---|---|
|
GE Vintage Style T9 LED Light Bulb |
E26 |
60W |
6W |
500 |
2150 (Warm Candlelight) |
Dimmable, Outdoor Rated, Vintage Style |
|
YANSUN LED Decorative Light Bulb |
E26 |
60W |
6W |
600 |
2700 (Warm White) |
Energy efficient, warm tone |
|
YANSUN LED Edison Vintage Style |
E26 |
100W |
10W |
1000 |
4000 (Neutral White) |
Vintage filament style |
|
JONATHAN YST58-4W LED Edison |
E26 |
40W |
4W |
350 |
2700 (Soft White) |
Non-dimmable, vintage look |
You can pick a warm candlelight bulb for a cozy feel or a neutral white for brighter illumination. Dimmable bulbs let you control the mood on your porch. Always check the maximum wattage for your lantern to avoid overheating.
Tip: LED bulbs not only save energy but also reduce how often you need to change them. This means more time enjoying your porch and less time on maintenance.
Motion Sensors
Adding motion sensors to your outdoor wall lantern boosts both safety and convenience. When you install a motion sensor, your lantern turns on automatically when someone approaches. This feature helps you see steps, walkways, and entryways clearly at night. It also deters unwanted visitors by lighting up the area as soon as movement is detected.
You can find motion sensors that work with most E26-based lanterns. Some sensors fit inside the fixture, while others attach to the wall nearby. Look for sensors with adjustable sensitivity and timer settings. This way, you can control how long the light stays on after detecting motion. Motion sensors help you save energy, too, since the light only turns on when needed.
Note: Motion sensors are a smart upgrade for any villa porch. They add a layer of security and make your outdoor illumination more efficient.
Wiring Checks
Safe wiring keeps your outdoor wall lantern working well and protects your home. You should check your wiring regularly, especially after storms or if you notice flickering lights. Here’s a simple checklist to follow:
- Inspect wires for fraying or damage.
- Check all electrical contact points from the fuse box to the lantern socket.
- Use outdoor-rated wiring and equipment to prevent weather damage.
- Wrap the ground wire around the green grounding screw on the mounting bracket.
- Twist color-coded wires together (black to black, white to white) and secure with wire connectors or electrical tape.
- Tuck wires neatly into the work box to avoid pinching or damage.
- Seal the top edge of the fixture base with clear caulk, but leave the bottom open for moisture to escape.
- Use the right tools and follow the manufacturer’s instructions.
- If you see any damage or feel unsure, call a professional electrician.
- Test your lantern after installation by turning on the power and checking for proper illumination.
Callout: Regular wiring checks keep your porch safe and your illumination steady. Don’t skip this step—your peace of mind is worth it!
Outdoor Lighting Inspiration
Villa Porch Ideas
You can turn your villa porch into a welcoming retreat with the right outdoor lighting. Start by thinking about how you use your space. Do you love relaxing with a book, hosting friends, or enjoying quiet evenings? Place outdoor lanterns near seating areas to create a cozy spot for reading or conversation. Hang a statement lantern by the door to greet guests with a warm glow. Try adding smaller outdoor lights along steps or railings for extra safety and style. If you have columns or arches, highlight them with wall-mounted fixtures. This approach draws attention to your home’s best features and makes your porch feel inviting every night.
Tip: Use outdoor lighting to guide guests from the driveway to your front door. A well-lit path feels safe and looks beautiful.
Mixing Styles
You can create a unique look by blending vintage and modern outdoor lighting on your porch. Start with a neutral color palette. This lets both styles stand out without clashing. Balance is key—don’t let one style take over. Try pairing a vintage lantern, like the Rackora model, with sleek modern furniture. Mix materials and textures, such as metal lanterns with wooden benches or glass tables. Antique lanterns and chandeliers, especially those updated for electric use, add historic charm and a soft glow. French wall sconces bring elegance and help tie the look together. When you combine these vintage pieces with modern outdoor lighting, you get a space that feels both timeless and fresh.
Here’s a quick table to help you plan your mix:
|
Vintage Element |
Modern Pairing |
Effect |
|---|---|---|
|
Antique lantern |
Minimalist bench |
Warmth + Clean lines |
|
Rewired chandelier |
Sleek planters |
Focal point + Simplicity |
|
French wall sconce |
Glass table |
Artistic + Functional |
Note: Mixing styles gives your outdoor space personality. You create a porch that feels personal and stands out from the rest.
Seasonal Decor
You can refresh your outdoor lighting with seasonal touches all year long. In spring, wrap string lights around railings or add lanterns with pastel shades. Summer calls for bold colors and outdoor lanterns with floral patterns. Fall is perfect for vintage-style decor—think lanterns with amber bulbs, pumpkins, and leafy garlands. Winter brings a chance to hang wreaths and use outdoor lighting with cool white bulbs for a frosty look. Swap out accessories and bulbs to match the season. This keeps your porch feeling new and festive.
- Spring: Pastel lanterns, floral garlands
- Summer: Bright colors, outdoor string lights
- Fall: Amber bulbs, pumpkins, vintage-style decor
- Winter: White bulbs, wreaths, evergreen branches
Callout: Seasonal changes don’t have to be big. Small updates to your outdoor lighting and decor can make your porch feel fresh and cozy every month.
You now know how to choose, install, and style a vintage outdoor wall lantern for your villa porch. This lantern brings vintage charm and modern strength to your outdoor space. The Rackora lantern stands out with its classic look and durable build. Outdoor wall lighting makes your porch safer and more beautiful. Try new outdoor lighting ideas or ask a pro for advice. Let your porch glow with charm every night!
FAQ
How do I choose the right size lantern for my porch?
Measure your door height. Pick a lantern about one-third that size. For double doors or wide porches, use two lanterns for balance. This keeps your porch looking stylish and well-lit.
Can I install the Rackora lantern myself?
Yes, you can! The Rackora lantern comes with a user-friendly mounting system. Just follow the instructions, turn off the power, and use basic tools. If you feel unsure, ask an electrician for help.
What type of bulb works best in a vintage outdoor wall lantern?
Use an E26 base bulb, up to 60 watts. LED bulbs last longer and save energy. Choose warm white for a cozy glow or neutral white for brighter light. Always check the lantern’s maximum wattage.
How do I keep my lantern looking new?
Wipe the lantern with mild soap and water every few months. Clean the glass with a vinegar solution. Check for dirt or cobwebs. A little care keeps your lantern shining and beautiful.
Is the Rackora lantern weatherproof?
Absolutely! The Rackora lantern uses high-quality aluminum with anti-corrosion treatment. It stands up to rain, humidity, and sun. You get reliable lighting all year.
Can I add a motion sensor to my outdoor wall lantern?
Yes, you can add a motion sensor. Many sensors work with E26-based lanterns. They help save energy and boost security by turning on the light when someone approaches your porch.
What should I do if my lantern flickers or won’t turn on?
First, check the bulb. Make sure it’s tight and not burned out. Next, inspect the wiring connections. Turn off the power before checking. If the problem continues, call a professional for help.