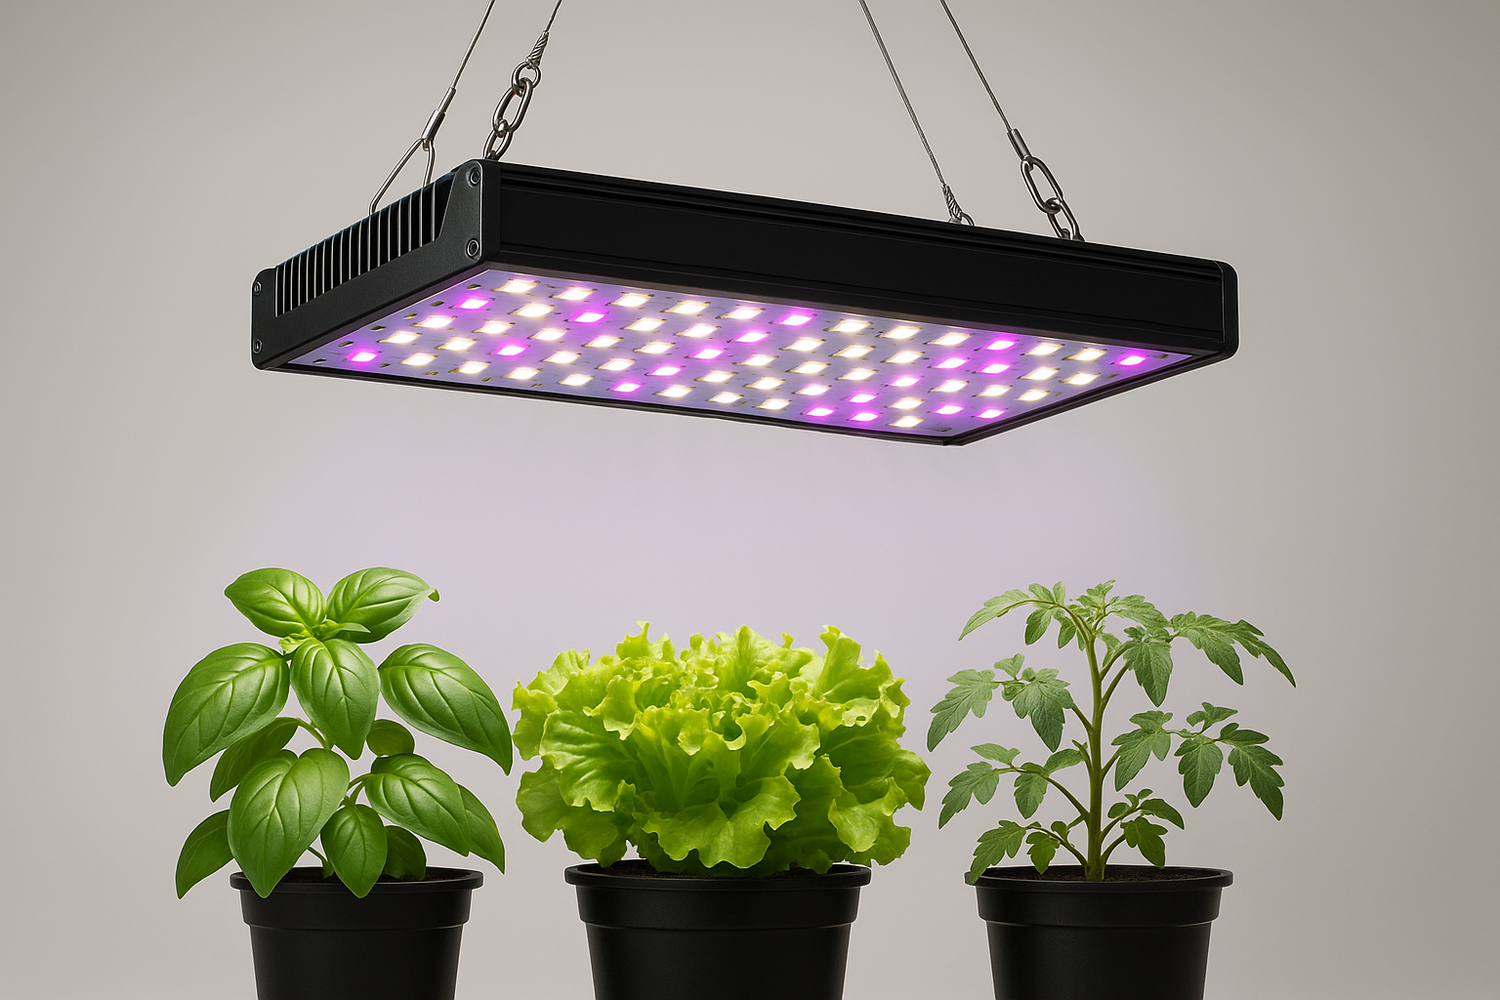
If you want your indoor garden to thrive, start by matching the right spectrum, intensity, and coverage of grow lights to your plants and space. LED grow lights make indoor gardening easy because they use less energy, last longer, and give off less heat than older bulbs. In fact, studies show that these energy-efficient LEDs can cut your electricity use by up to 40% and last between 50,000 and 100,000 hours—much longer than traditional grow lights. Before you pick an LED grow light, think about what your plants need and the space you have. The right choice helps your plants grow strong and healthy.
Key Takeaways
- Match your LED grow light’s spectrum and intensity to your plants’ type and growth stage for strong, healthy growth.
- Measure your plant canopy area carefully and choose enough wattage and fixtures to cover it evenly without dark spots.
- Choose the right type of LED grow light—panels, bulbs, or bars—based on your garden size and space constraints.
- Look for full-spectrum LED grow lights with adjustable blue and red light to support all growth phases from seedlings to flowering.
- Check key features like actual wattage, energy efficiency, heat output, and build quality to get the best value and long-lasting performance.
- Place your lights at the right height and adjust as plants grow to avoid light burn or weak, leggy plants.
- Avoid common mistakes like overpowering plants, poor light coverage, ignoring light spectrum, and neglecting regular maintenance.
- Read user reviews and compare features to find affordable, reliable LED grow lights that save energy and help your indoor garden thrive.
Plant Light Needs
When you start growing plants indoors, understanding their light needs is key. Not all plants crave the same amount or type of light. Some love basking in bright rays, while others thrive in gentle shade. The right grow lights for indoor plants can make all the difference in your home garden.
Grow Lights for Indoor Plants
Leafy Greens
Leafy greens like lettuce, spinach, and kale grow best under a blue-rich light spectrum. Blue light encourages strong, healthy leaves and compact growth. If you use a led grow light with a cooler color temperature, you’ll see your greens develop lush foliage. Place your lights about 6-12 inches above the plants for the best results. Most leafy greens need 12-14 hours of light each day. You can use a timer to keep things simple.
Fruiting Plants
Fruiting plants, such as tomatoes, peppers, and strawberries, need a different approach. These plants require more red light, especially when they start to flower and set fruit. Red light helps trigger flowering and boosts fruit production. For these plants, aim for 14-16 hours of light daily. Keep your led grow light close—about 6-12 inches above the canopy. If you want juicy tomatoes or sweet peppers, make sure your grow lights deliver enough red spectrum.
Tip: Use a full spectrum grow light that lets you switch between blue and red light. This way, you can match the light spectrum to your plant’s stage of growth.
Here’s a quick guide to help you match your plants with the right light:
|
Plant Type |
Light Spectrum Needs |
Light Duration |
Distance from Light |
|---|---|---|---|
|
Leafy Greens & Herbs |
Blue or mixed (cool) |
12-14 hours |
6-12 inches |
|
Fruiting/Flowering Plants |
Red or mixed (warm) |
14-16 hours |
6-12 inches |
|
Seedlings |
Blue or mixed |
16-18 hours |
4-6 inches |
|
Foliage Houseplants |
Blue or mixed |
12-14 hours |
12-24 inches |
Growth Stages
Seedlings
Seedlings are delicate and need lots of blue light for healthy roots and leaves. Place your grow lights close—about 4-6 inches above the seedlings. Give them 16-18 hours of light each day. Blue light helps seedlings stay short and strong, so they don’t get leggy.
Flowering
When your plants start to flower, they need more red light. Red wavelengths encourage buds and fruit to form. Switch your grow lights to a warmer color temperature if possible. Keep the lights about 6-12 inches above the plants and run them for 14-16 hours daily. This shift in the light spectrum supports healthy blooms and bigger harvests.
Plants use both red and blue light for photosynthesis, but each color plays a special role. Blue light boosts pigment and leaf growth, while red light powers flowering and fruiting. Full spectrum grow lights for indoor plants let you adjust the light spectrum as your plants grow. This flexibility helps you get the best results at every stage of plant growth.
Space and Coverage
When you set up your home garden, you want every plant to get the right amount of light. That means you need to think about both the size of your growing area and how well your lights spread across it. Let’s break down how you can measure your space and make sure your plants get even, healthy light.
Measuring Area
Square Footage
Start by measuring the actual area where your plants grow. Don’t count the whole room—focus on the plant canopy, which is the space right above your plants. Use a tape measure to find the length and width in feet, then multiply them to get the square footage.
Tip: If your space isn’t a perfect rectangle, split it into smaller sections, measure each one, and add them together.
Here’s a quick checklist to help you figure out your grow area:
- Measure only the plant canopy, not empty floor space.
- Convert all measurements to feet (1 meter ≈ 3.28 feet).
- Add 10-20% extra to your total area for overlap and to avoid dark corners.
Once you know your square footage, you can figure out how much power your LED grow lights need. For most home gardens, aim for 15-20 watts per square foot. If you grow high-light plants like tomatoes or peppers, bump that up to 40 watts per square foot. Always use the actual wattage (power draw) of your lights, not just what’s on the box.
Example Calculation:
|
Canopy Size (ft) |
Area (sq ft) |
General Wattage (15-20W/sq ft) |
High-Light Wattage (40W/sq ft) |
|---|---|---|---|
|
3 x 3 |
9 |
135-180W |
360W |
|
4 x 4 |
16 |
240-320W |
640W |
Light Distribution
Even Coverage
Getting the right coverage isn’t just about wattage. You also want to make sure your lights reach every plant with the right light intensity. If you use only one fixture, you might see bright spots in the middle and shadows at the edges. That’s why many indoor gardeners use multiple LED fixtures.
When you arrange several lights in a grid, you spread light more evenly. This setup helps every plant get the same amount of light, which leads to healthier growth and better harvests. Multiple fixtures also let you adjust the spectrum and light intensity for different plant stages. Since LEDs don’t give off much heat, you can place them closer to your plants without worrying about burning the leaves.
-
Arrange your lights so their coverage areas overlap slightly.
-
Raise or lower fixtures to adjust light intensity as your plants grow.
-
Check for dark spots and add extra lights if needed.
Using more than one LED grow light gives you flexible, even coverage and helps your plants thrive from seedling to harvest.
Types of LED Grow Lights

When you shop for grow lights, you’ll see several options. Each type of LED grow light has its own strengths, so you can match your choice to your garden’s needs. Let’s break down the main types of grow light you’ll find for home gardening.
LED Panels
LED panels are a popular choice for many indoor gardeners. You get a flat, square or rectangular board packed with LED chips. These panels cover a large area and deliver strong, even light. If you want to grow several plants at once, LED panels make it easy to provide uniform coverage. They work well in grow tents, shelves, or any setup where you need broad light distribution.
Panels use less energy than old-school fluorescent or incandescent grow lights. You’ll notice that a 300-watt LED panel can match the brightness of a 600-watt fluorescent fixture. That means you save money on your electric bill and avoid excess heat. LED panels also last much longer—up to 100,000 hours—so you won’t need to replace them often.
Tip: If you want a budget-friendly option, quantum board LED panels offer good coverage and simple installation. Just keep an eye on heat buildup, especially in tight spaces.
LED Bulbs
LED grow light bulbs are perfect for small gardens or single plants. You can screw them into standard sockets, making installation a breeze. Adjustable bulbs let you direct light exactly where your plants need it most. Some bulbs mimic traditional incandescent shapes, while others come as tubular LEDs for more uniform lighting.
Grow light bulbs work well for photoperiod control, so you can manage when your plants flower or fruit. They produce very little heat, so you can place them close to your plants without risk. If you want to start with a simple setup, LED bulbs are a great entry point. You’ll find that they use less energy and last much longer than incandescent bulbs, which burn out quickly and waste electricity.
Note: Modular design capacity lets you add more bulbs as your garden grows. This flexibility helps you expand your setup without buying a whole new system.
LED Bars
LED bars give you flexibility and precision. These slim, rectangular fixtures fit easily into tight spaces or along shelves. You can adjust the angle and placement to target specific plants. Single-bar styles suit small gardens, while multi-bar setups cover larger areas with even light and better heat dissipation.
If you need to manage heat in your grow tent, LED bars are a smart choice. They spread light evenly and keep temperatures low, which helps prevent plant stress. You’ll also find that LED bars use less energy and last longer than fluorescent tubes. The modular design capacity of bars means you can add or remove sections as needed.
Here’s a quick comparison to help you choose:
|
Feature |
Grow Light Bars |
Quantum Board Grow Lights |
|---|---|---|
|
Appearance |
Slim, rectangular bars, often multi-bar |
Flat, square panel with grid of chips |
|
Light Distribution |
More uniform and precise, adjustable |
Strong center intensity, less uniform |
|
Energy Efficiency |
Generally higher due to precise spectrum |
Moderate, but varies by model |
|
Price |
Higher cost due to complex design |
More affordable due to simpler design |
|
Heat Emission |
Better heat dissipation via spacing |
More heat accumulation due to compact design |
No matter which type you pick, LED grow lights offer big advantages over older options. You get energy efficiency, cooler operation, and a lifespan that can stretch up to a decade. You’ll spend less on electricity and replacements, and your plants will thank you for the steady, targeted light.
Key Features of LED Grow Lights
When you shop for a LED grow light, you want to make sure it has the right features and benefits for your home garden. The best lights help your plants grow strong, healthy, and productive. Let’s break down the most important things to look for.
Full Spectrum
A full-spectrum LED grow light gives your plants all the wavelengths they need, from seedling to harvest. You don’t have to switch lights as your plants grow. Instead, you get a mix of blue, red, and white light that mimics natural sunlight. This is what makes full-spectrum lights so popular for indoor gardening.
- Blue light (400-500 nm) supports leafy growth and strong stems.
- Red light (600-700 nm) encourages flowering and fruiting.
- Far-red (700-800 nm) and white LEDs fill out the rest of the spectrum.
- Full-spectrum light covers every stage of plant growth, so you can use the same fixture for both vegetative and flowering phases.
Tip: If you want the best results, choose a full-spectrum light that lets you adjust the intensity or spectrum. This way, you can match the light to your plant’s needs at every stage.
Color Temperature
Color temperature tells you how “warm” or “cool” the light looks, measured in Kelvin (K). For growing plants indoors, you want to pay attention to this number.
- For vegetative growth, look for a color temperature between 5,000 and 7,500 Kelvin. This range gives you more blue light, which helps your plants grow thick and leafy.
- For flowering and fruiting, a lower color temperature of 2,000 to 3,000 Kelvin works best. This range boosts the red light your plants need to make flowers and fruit.
- Full-spectrum LED grow lights combine both ranges, so you don’t have to swap out your lights as your plants mature.
Here’s a quick guide:
|
Growth Stage |
Ideal Color Temperature (Kelvin) |
Main Spectrum Needed |
|---|---|---|
|
Vegetative |
5,000 – 7,500 |
Blue |
|
Flowering/Fruiting |
2,000 – 3,000 |
Red |
|
Full Plant Cycle |
3,000 – 6,500 (full spectrum) |
Blue + Red + White |
PAR and PPFD
You might see the terms PAR and PPFD when you shop for a LED grow light. These are important for understanding how much usable light your plants get.
- PAR stands for Photosynthetically Active Radiation. It’s the range of light (400-700 nm) that plants use for photosynthesis.
- PPFD means Photosynthetic Photon Flux Density. It measures how many light particles (photons) land on a square meter every second, shown as µmol/m²/s.
Different plants need different PPFD levels. If you give your plants too little, they grow slowly. Too much, and you can stress or burn them. Matching the PPFD to your plant’s type and growth stage is key.
|
Plant Type |
Growth Stage |
Recommended PPFD (µmol/m²/s) |
Notes |
|---|---|---|---|
|
Sun-Loving Plants |
Vegetative |
400 – 600 |
Tomatoes, peppers, succulents |
|
|
Flowering |
600 – 900 |
For maximum flowers and fruit |
|
Shade-Tolerant Plants |
Active Growth |
100 – 300 |
Ferns, peace lilies |
|
Lettuce & Herbs |
Seedling |
~100 |
|
|
|
Mature |
100 – 250 |
|
|
Weed Plants |
Vegetative |
400 – 600 |
Without CO₂ |
|
|
Flowering |
800 – 1,000 |
Without CO₂ |
|
Cucumbers & Tomatoes |
Seedling |
100 – 200 |
|
|
|
Flowering |
500 – 600 |
|
|
Pepper & Flowering Plants |
Vegetative |
300 – 600 |
|
|
|
Flowering |
600 – 750 |
|
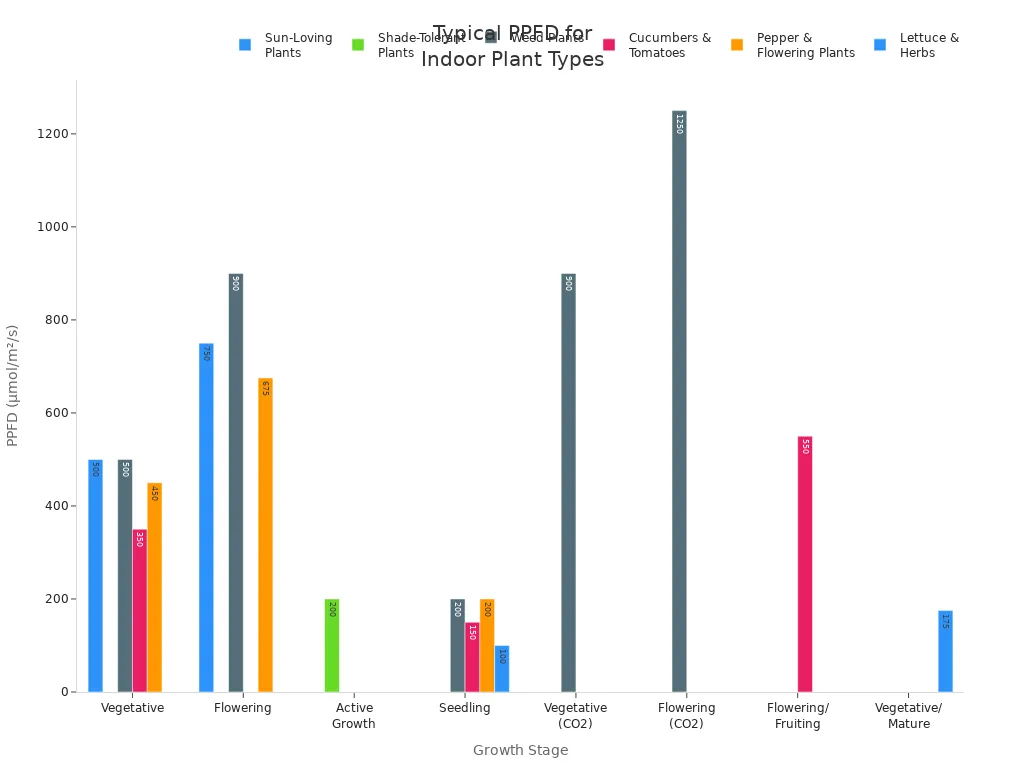
If you want to get the most from your LED grow light, check the PPFD values at the height you plan to hang your light. This helps you avoid weak growth or light burn.
CRI Rating
CRI stands for Color Rendering Index. It tells you how close the light is to natural sunlight. A high CRI means your plants get a more natural, balanced light spectrum. This helps them grow better and look healthier.
Most LED grow lights have a CRI of 80 or higher. If you want the best results, look for a CRI above 85. The closer to 100, the more natural the light. High CRI lights support plant health at every stage and make it easier for you to spot problems like pests or nutrient issues.
Note: A high CRI doesn’t just help your plants. It also makes your indoor garden look brighter and more vibrant, so you can enjoy your plants even more.
Wattage
Wattage tells you how much power your LED grow light uses. You might think that higher wattage means better growth, but that's not always true. What matters most is how much usable light your plants get, not just the number on the box.
When you shop for a grow light, look for the actual wattage, not the "equivalent" wattage. Manufacturers sometimes list a higher number to compare their lights to older bulbs, but you want the real power draw. For most home gardens, you need about 15-20 watts per square foot. If you grow high-light plants like tomatoes or peppers, aim for 40 watts per square foot.
Here's a simple table to help you match wattage to your garden size:
|
Garden Size (sq ft) |
Recommended Wattage (General) |
Recommended Wattage (High-Light) |
|---|---|---|
|
2 |
30-40W |
80W |
|
4 |
60-80W |
160W |
|
8 |
120-160W |
320W |
Tip: Always check the manufacturer's specs for actual wattage. This helps you avoid buying a light that's too weak or too strong for your space.
If you use too much wattage, you waste energy and risk overheating your plants. Too little wattage leads to slow growth and weak stems. Finding the right balance keeps your garden healthy and your electric bill low.
Energy Efficiency
Energy efficiency is one of the biggest reasons people choose LED grow lights. You want a light that gives your plants the most usable light while using the least electricity. This is where grow light efficiency comes in.
Energy-efficient leds convert more electricity into light and less into heat. That means you get brighter light for your plants without wasting power. Look for lights with high grow light efficiency ratings. These numbers show how well the light turns energy into plant-friendly photons.
Here are a few ways to spot an energy-efficient grow light:
- Check the lumens per watt. Higher numbers mean better efficiency.
- Look for lights with a high PAR output and low power draw.
- Read reviews to see how much electricity other gardeners use with the same model.
If you want to save money over time, pick energy-efficient leds. They last longer and use less power, so you spend less on replacements and bills. You also help the environment by reducing your carbon footprint.
🌱 Choosing a grow light with high efficiency means your plants get more light and you keep costs down.
Heat Output
Heat output matters more than you might think. Plants need light, but too much heat can stress them out or even burn their leaves. LED grow lights have a big advantage here. They produce much less heat than old fluorescent or incandescent bulbs.
When you set up your lights, check how warm they get after a few hours. If you notice hot spots, raise the fixture or add a fan. Most energy-efficient leds stay cool, so you can place them closer to your plants. This helps you deliver strong light without risking damage.
Here are some quick tips for managing heat:
- Keep lights 12-30 inches above your plants, depending on the model.
- Use a thermometer to monitor temperatures near the canopy.
- Add ventilation if your grow space feels warm.
If your plants start to wilt or show brown edges, check your heat output first. Cooler lights mean happier, healthier plants.
Build Quality
When you shop for LED grow lights, you want something that lasts. Build quality makes a huge difference in how well your lights perform and how long they stick around. You might think all grow lights look the same, but the details set the best ones apart.
Start by checking the materials. High-quality LED grow lights use sturdy metals like aluminum for the frame and heat sinks. Aluminum pulls heat away from the LEDs, so your lights stay cool and last longer. Cheap plastic parts can crack or warp over time, especially if you run your lights for hours every day.
Next, look at the wiring and connectors. Good build quality means tight, secure connections. Loose wires or flimsy plugs can cause flickering or even stop your full-spectrum light from working. You want to see thick, well-insulated cords and solid switches. If you plan to move your lights around, strong mounting brackets and adjustable hangers make your setup easier and safer.
Pay attention to the LED chips themselves. Reliable brands use high-grade chips that deliver consistent brightness and color. These chips help your plants get the most from a full spectrum of light. If you see uneven color or dim spots, the build quality might not be up to par.
Water resistance is another feature you should consider. Indoor gardens can get humid or messy. A grow light with a water-resistant rating (like IP65) keeps moisture out and protects the electronics. This is especially important if you use your full-spectrum grow light in a tent or near misting systems.
Here’s a quick checklist to help you spot great build quality:
- Sturdy metal frame and heat sinks
- Thick, insulated wiring and secure connectors
- High-quality LED chips for even full-spectrum coverage
- Water-resistant or waterproof rating (IP65 or higher)
- Strong mounting hardware and adjustable hangers
Tip: A well-built full-spectrum light saves you money in the long run. You won’t have to replace it as often, and your plants get steady, reliable light for every stage of growth.
If you want your home garden to thrive, don’t overlook build quality. A solid, well-made LED grow light gives you peace of mind and helps your plants get the full spectrum they need. You’ll notice fewer problems, less downtime, and better results from seedling to harvest.
Installation and Placement
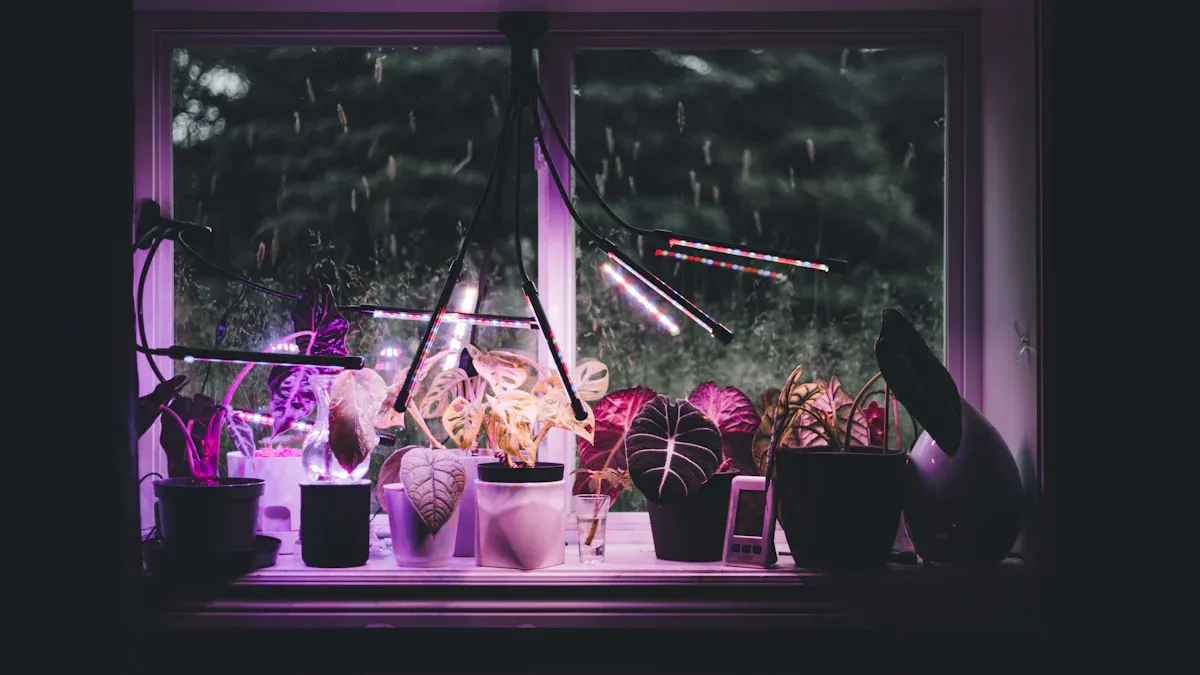
Getting your LED grow lights set up the right way can make a huge difference in your plant’s health and growth. Let’s walk through some practical grow light placement tips, mounting options, and easy maintenance steps to keep your setup running smoothly.
Positioning Grow Lights
Height Above Plants
You want your plants to get just the right amount of light—not too much, not too little. Here’s how you can nail the perfect placement:
- Start with your LED grow lights about 12 to 24 inches above your plants. This distance works well for most home gardens.
- For seedlings, move the lights closer—around 6 to 12 inches. This helps prevent stretching and gives young plants the energy they need.
- As your plants grow taller, gradually raise the lights to keep the distance steady. This avoids light burn and keeps growth even.
- Watch your plants closely. If you see leaves turning pale or crispy, raise the lights. If your plants look leggy or reach for the light, lower them a bit.
- During flowering or fruiting, you might need to increase light intensity. Move the lights a little closer or extend the lighting period.
- Always check the heat coming from your LEDs. If things feel too warm, lift the lights higher or add a fan.
- Follow the manufacturer’s instructions for your specific model. Some lights need to be closer or farther away.
🌱 Pro Tip: Use a light meter if you have one. This tool helps you measure light intensity and fine-tune your setup for every stage of growth.
Mounting Options
When you’re setting up an indoor plant growing area, you’ll find two main ways to mount your LED grow lights. Each has its own perks:
|
Mounting Option |
Description |
Pros |
Cons |
|---|---|---|---|
|
Hanging |
Suspend lights from hooks, chains, or s-hooks above your plants |
Easy to adjust height as plants grow; flexible placement |
None significant |
|
Fixed Mounting |
Attach lights under shelves or in a set position |
Very stable and secure |
Hard to adjust height; less flexible |
Most home gardeners prefer hanging their lights. You can quickly raise or lower them as your plants get bigger. Fixed mounting works well if you want a tidy, permanent setup, but you lose the ability to adjust the height easily.
If you want the most flexibility, go with hanging mounts. You’ll find it much easier to tweak your setup as your plants change.
Maintenance
Keeping your LED grow lights clean and in good shape helps them last longer and shine brighter. Here’s a simple routine you can follow:
- Always turn off and unplug your lights before cleaning.
- Let the lights cool down so you don’t burn yourself.
- Wipe the frame with a dry cloth to remove dust.
- Gently clean the lenses with a soft cloth. For stubborn spots, use a little rubbing alcohol on a nonabrasive towel.
- Dry everything with a microfiber cloth to keep moisture away.
- Check for any signs of damage or wear while you clean. Catching problems early can save you money and hassle.
- Make sure your lights have good ventilation. Use fans or open vents to prevent overheating.
- Store extra lights in a cool, dry place when not in use.
Regular cleaning and quick inspections keep your lights working their best. You’ll notice brighter light and healthier plants with just a little effort.
With the right placement, mounting, and maintenance, your LED grow lights will help your indoor garden thrive for years.
Mistakes to Avoid
Overpowering Plants
It’s easy to think that more light always means better growth, but that’s not true for indoor gardening. If you give your plants too much light, you can actually stress them out. Overpowering your plants with high-intensity LED grow lights can cause leaf burn, faded colors, or even stunted growth. Some gardeners notice crispy leaf edges or pale spots when the lights are too close or too strong.
You might also run into heat problems. LEDs run cooler than old bulbs, but they still produce some heat. If you don’t have good ventilation or if you place your lights too close, your plants can overheat. This stress slows down growth and can shorten the lifespan of your lights. Always start with the recommended distance from the manufacturer and watch your plants for signs of stress.
Here are some common signs you’re giving your plants too much light:
- Leaves curl up or turn brown at the edges.
- Plants look faded or bleached.
- Growth slows down, even with plenty of water and nutrients.
- The area under the light feels warm to the touch.
Tip: If you see these symptoms, raise your lights a few inches or reduce the intensity. Your plants will thank you!
Poor Coverage
Another mistake many home gardeners make is not giving their plants even coverage. If you use just one fixture for a large area, you might see bright spots in the middle and shadows at the edges. This uneven light leads to patchy growth. Some plants may stretch toward the light, while others stay small and weak.
You can avoid poor coverage by measuring your grow area and using enough fixtures to cover every plant. Arrange your lights so their beams overlap a little. This setup helps every plant get the same amount of light, which means healthier, more uniform growth.
Here’s a quick checklist to help you spot and fix poor coverage:
- Some plants look much taller or leggier than others.
- Leaves on the edges of your garden look pale or droopy.
- You notice dark corners or uneven shadows on the canopy.
- Plants lean or stretch toward the center light.
Using multiple lights or adjustable fixtures helps you avoid these problems and keeps your whole garden thriving.
Ignoring Spectrum
Not all light is created equal. Plants need different colors of light at different stages. If you ignore the light spectrum, your plants might grow slowly, become leggy, or fail to flower. For example, using only blue light during flowering can stop your plants from making buds. On the other hand, too much red light during the vegetative stage can make plants tall and weak.
Check out this table to see how the wrong spectrum affects plant growth:
|
Light Spectrum |
Growth Stage Impact |
Effect of Using Wrong Spectrum |
|---|---|---|
|
Blue Light (420-470nm) |
Promotes bushy growth in vegetative stage |
Lack of blue = weak, leggy plants |
|
Red Light (660-680nm) |
Crucial for flowering and fruiting |
Lack of red = poor blooms, low yield |
|
Far-Red Light (700-780nm) |
Triggers flowering and day-length responses |
Missing far-red = delayed or no flowering |
|
Green Light (500-565nm) |
Supports lower leaf health and photosynthesis |
Lack of green = reduced yield, hard to monitor |
If you want strong, healthy plants, match your light spectrum to each growth stage. Use full-spectrum LEDs or lights that let you switch between blue and red. This way, you support every phase of your plant’s life.
Remember: The right spectrum at the right time makes all the difference for indoor gardening success.
Neglecting Maintenance
You might think your LED grow lights will keep shining bright without any extra effort. In reality, skipping maintenance can lead to dimmer lights, weaker plants, and even costly repairs. Your plants depend on consistent, high-quality light. Dust, dirt, and moisture can block the LEDs and reduce their output. Over time, you may notice your garden struggling, even if you picked the perfect light.
Let’s talk about what happens when you neglect maintenance. Dust builds up on the light’s surface. This layer blocks light and lowers efficiency. Your plants get less energy, so they grow slower and look less vibrant. Moisture can sneak into the fixture, especially in humid rooms or near misting systems. Water damage can cause flickering, short circuits, or even total failure. Loose wires or worn-out connectors can make your lights unreliable. You might see them turn off unexpectedly or lose brightness.
Regular cleaning and quick inspections help you avoid these problems. You don’t need fancy tools or hours of work. Just a few simple steps keep your lights working their best. Here’s a checklist you can follow:
- Turn off and unplug your lights before cleaning.
- Let the lights cool down.
- Wipe the frame and lenses with a soft, dry cloth.
- Use a little rubbing alcohol for stubborn spots.
- Check for loose wires, cracked parts, or signs of water damage.
- Make sure your lights have good airflow. Use fans or open vents if needed.
- Store extra lights in a cool, dry place.
Tip: Set a reminder to clean your lights every month. You’ll notice brighter light and healthier plants.
Here’s a quick table to show what regular maintenance can do for your garden:
|
Maintenance Task |
Benefit |
How Often |
|---|---|---|
|
Dusting lenses |
Brighter light output |
Monthly |
|
Checking wires |
Prevents flickering |
Every 2 months |
|
Inspecting for water |
Avoids short circuits |
Monthly |
|
Cleaning frame |
Longer lifespan |
Monthly |
Neglecting maintenance doesn’t just hurt your plants. It can shorten the life of your LED grow lights and cost you more money in the long run. You want your indoor garden to thrive, so make maintenance part of your routine. A few minutes each month keeps your lights shining strong and your plants growing happy. 🌱
Choosing the Best Grow Lights
When you want your indoor garden to thrive, picking the best grow lights can feel overwhelming. There are so many brands, models, and features out there. You want to make sure you get the right led grow light for your plants, your space, and your budget. Let’s break down how you can compare options, read reviews, and find an affordable solution that delivers real value.
Comparing LED Grow Light Options
You don’t have to be a tech expert to compare led grow lights. You just need to focus on what matters most for your home garden. Here’s a simple checklist to help you weigh your options:
- Size of Your Grow Area: Make sure the light covers your entire plant canopy. If you have a bigger space, you might need more than one led grow light.
- Type of Plants: Different plants need different spectrums. Leafy greens love blue light, while flowering plants need more red. Some of the best grow lights let you adjust the spectrum for each stage.
- Growth Phases: Look for lights that allow you to change the spectrum or intensity. Adjustable features help you support seedlings, vegetative growth, and flowering—all with one fixture.
- Energy Efficiency and Cost: Check how much electricity the light uses. Energy-efficient models save you money over time.
- Durability and Warranty: A longer warranty and sturdy build mean you won’t have to replace your grow lights as often.
- User Reviews and Experiences: Other gardeners can tell you how a led grow light performs in real life, not just on paper.
Tip: Matching the spectrum, brightness, and efficiency to your plants’ needs helps you maximize yield and quality while keeping costs down.
Here’s a quick table to help you compare key technical features:
|
Feature |
Why It Matters |
What to Look For |
|---|---|---|
|
Spectrum Quality |
Supports all growth stages |
Full or adjustable spectrum |
|
PPF (Light Output) |
Measures usable light for photosynthesis |
High PPF for your plant type |
|
Energy Efficiency |
Lowers electricity bills |
High lumens per watt, low power draw |
|
Price and Value |
Balances cost with performance |
Affordable upfront, saves long-term |
|
Durability/Warranty |
Reduces replacement and repair costs |
At least 2-year warranty, solid build |
You’ll also want to keep up with new features like dimming, smart controls, and modular designs. These can make your setup easier to manage and more flexible as your garden grows.
Reading Reviews
You can learn a lot from other gardeners who have used the same led grow light you’re considering. Reviews give you real-world insights that you won’t find in product specs. Here’s how to get the most out of reviews:
- Look for feedback on light coverage and intensity. Does the light reach every corner of the grow area?
- Check comments about energy use. Do users notice lower electricity bills with these grow lights?
- See what people say about build quality and reliability. Are there complaints about flickering, overheating, or early failures?
- Pay attention to how easy the light is to install and adjust. Some models are simple to set up, while others can be tricky.
- Notice if reviewers mention plant health and yield. Are their plants thriving under this led grow light?
🌱 Pro Tip: Don’t just read the five-star reviews. Check the lower ratings to spot any recurring issues.
User experiences can reveal if a light is truly affordable in the long run or if hidden problems might cost you more later. You’ll also find out if the best grow lights live up to their claims.
Budget and Value
You want the best grow lights for your money, but you also want something affordable. High-quality led grow lights cost more upfront than older systems, but they save you money over time. Energy-efficient models use less power, which means lower electricity bills every month.
Take a look at this chart comparing annual electricity costs for different types of grow lights:
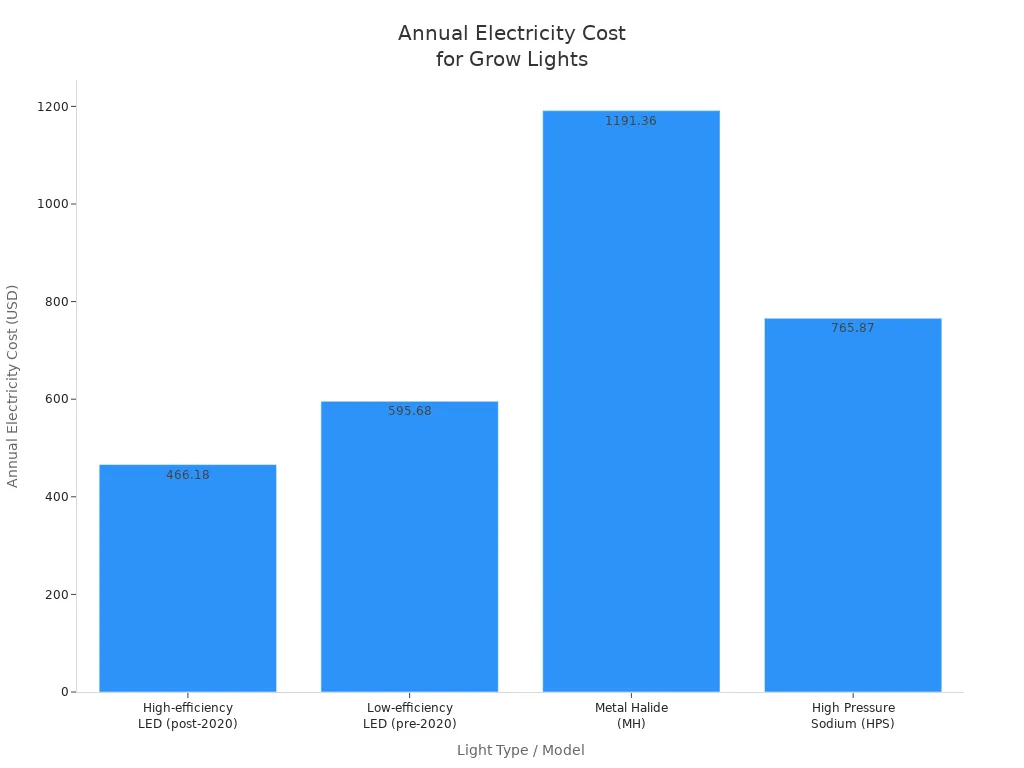
For example, a 500W high-efficiency led grow light costs about $466 per year to run, while a metal halide system can cost over $1,191. That’s a huge difference! The payback period for switching to efficient led grow lights is usually around 18 months, just from energy savings. You’ll save even more by avoiding frequent bulb replacements and cutting down on air conditioning costs, since LEDs produce less heat.
Here’s a table to help you see how budget and value stack up:
|
Benefit/Factor |
Description |
Budget/Value Consideration |
|---|---|---|
|
Energy Efficiency |
Uses less power, saves money on bills |
Worth the higher initial price |
|
Simple Setup |
Easy to install and adjust |
Saves time and possible installation costs |
|
Long Lifespan |
Lasts for years, fewer replacements |
Increases long-term value |
|
Adjustable Spectrum |
Supports all plant stages |
Maximizes yield, justifies cost |
|
Environmental Friendly |
No mercury, safe disposal |
Adds value for eco-conscious gardeners |
|
Plant Requirements |
Matches light to plant type and stage |
Avoids buying unsuitable or overpowered lights |
|
Growing Area Size |
Choose lights based on area and plant count |
Prevents overspending or under-lighting |
You can find affordable led grow lights in a range of prices, from about $180 for a quality 300W panel to $730 for a high-end 1000W model. The best grow lights give you the features you need without breaking the bank. Always balance the upfront price with long-term savings and plant health.
Note: Buying a cheap light might seem like a good deal, but it can cost you more in the long run if it uses more power or needs frequent replacement.
If you want to get the most value, look for a led grow light that matches your plant needs, fits your space, and offers energy savings. You’ll enjoy healthier plants, lower bills, and a setup that lasts for years.
Choosing the right led grow light for your indoor garden is simple when you follow a few key steps:
- Assess your plant needs and growth stages.
- Measure your space for proper coverage.
- Pick the best type of led grow light for your setup.
- Check features like spectrum, wattage, and build quality.
- Plan your installation and avoid common mistakes.
When you match light spectrum and intensity to your plants, you’ll see stronger growth and healthier results. Trust your choices and enjoy a thriving indoor garden all year long!
FAQ
What is the best color spectrum for most indoor plants?
You get the best results with a full-spectrum LED grow light. This type covers both blue and red wavelengths. Your plants will grow strong leaves and produce more flowers or fruit.
How close should I place LED grow lights to my plants?
Start with your lights about 12 to 24 inches above the plant canopy. Move them closer for seedlings or farther away if you see leaf burn. Always check your plants for signs of stress.
Do LED grow lights use a lot of electricity?
LED grow lights use much less electricity than traditional bulbs. You save money on your energy bill. They also last longer, so you replace them less often.
Can I leave my LED grow lights on all day?
Plants need a rest period. Most indoor plants do best with 12 to 16 hours of light each day. Use a timer to keep a regular schedule and avoid stressing your plants.
How do I know if my plants are getting enough light?
Look for healthy, green leaves and steady growth. If your plants look leggy, pale, or lean toward the light, they probably need more light. Adjust your setup as needed.
Do LED grow lights get hot?
LED grow lights stay much cooler than other types. You can place them closer to your plants without burning the leaves. Still, check for heat buildup in small spaces.