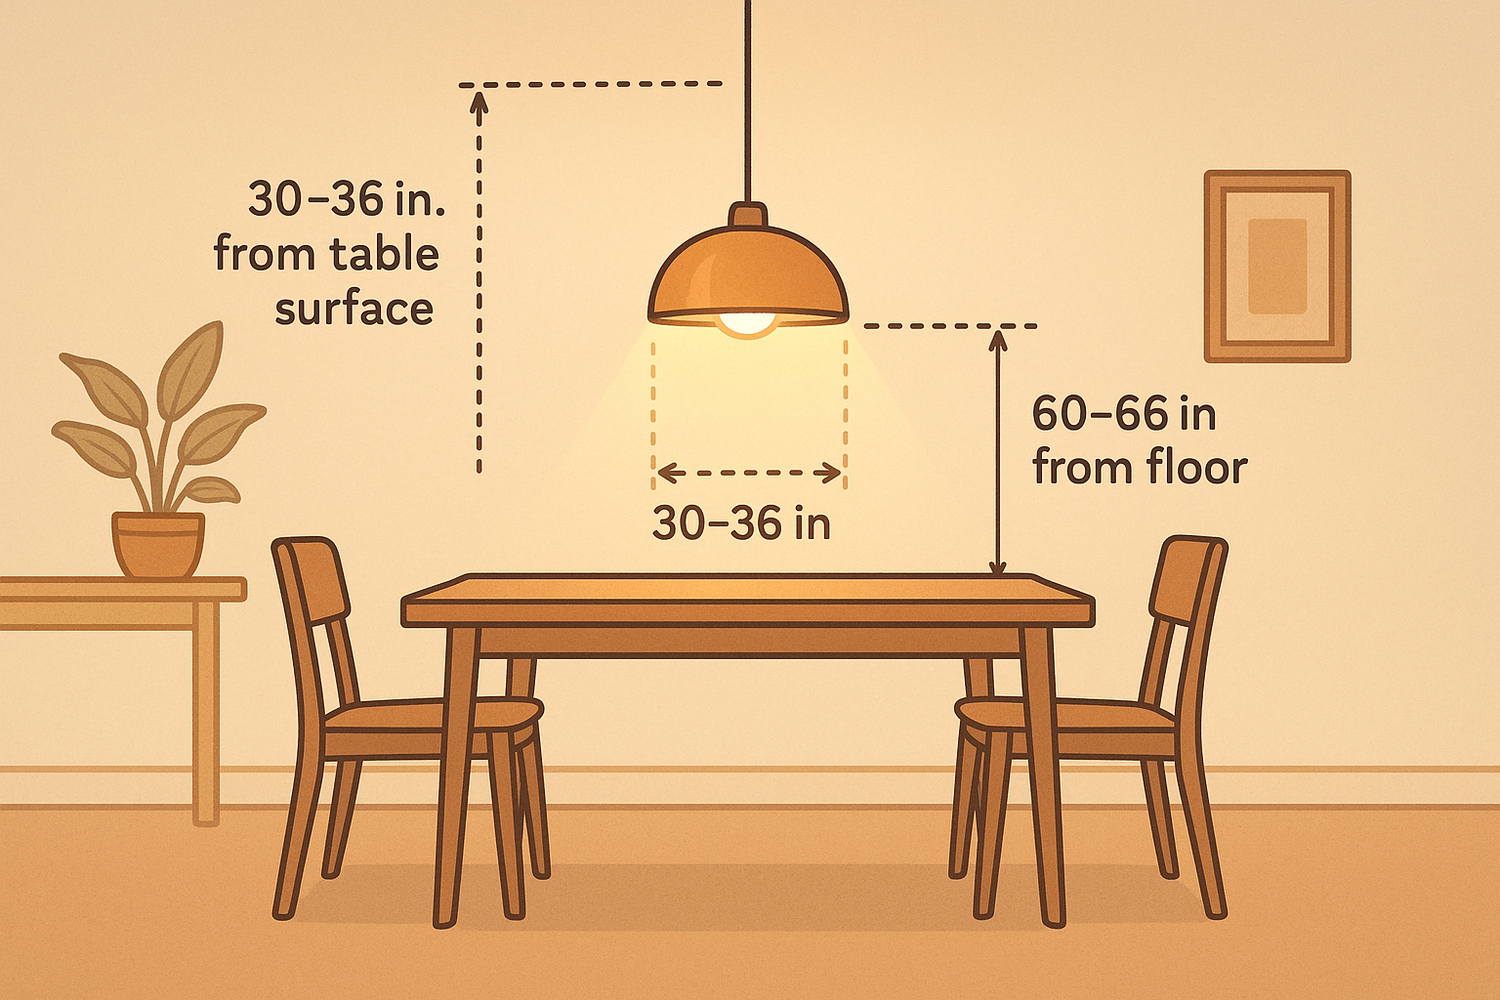
Wondering how far above a table you should hang your dining pendant? Most lighting experts agree that a dining pendant height between 28 and 36 inches above the table works best for almost every dining space. This sweet spot creates a cozy vibe in your dining room and gives you focused light for meals or gatherings. You avoid bumping your head or blocking views across the dining area. Every dining room is different, though. You might need to tweak the dining pendant height if your ceiling is extra high, your table is oversized, or your pendant has a unique style. Just remember, a few simple rules can help your dining area look and feel just right.
Key Takeaways
- Hang your dining pendant light 30 to 36 inches above the table for the best balance of light and comfort.
- Adjust the height if your ceiling is higher than 8 feet by adding 2 to 3 inches for each extra foot.
- Choose a pendant size about half to two-thirds the width of your table to keep the look balanced.
- Space multiple pendants evenly, about 24 to 30 inches apart, to spread light well and avoid crowding.
- Use dimmable bulbs with warm light (2700K to 3000K) to create a cozy and inviting dining atmosphere.
- Test the pendant’s height and placement before installation by holding it at different levels to find what feels right.
- Keep at least 7 feet of clearance from the floor to the bottom of the pendant to ensure safety and comfort.
- Always turn off power before installation and follow safety steps or call a professional if unsure.
Dining Pendant Height
Standard Range
When you start thinking about how far above a table your pendant should hang, you will see one guideline pop up everywhere. Most designers and lighting experts recommend a dining pendant height between 28 and 36 inches from the tabletop to the bottom of the fixture. This range works for almost every dining room and helps you avoid common problems like glare or blocked views.
Some designers suggest going a bit lower, around 24 to 31 inches, if you want a more intimate feel. This lower hanging height can make your dining space feel cozy and inviting, especially if you have a large room or a long table.
Here’s a quick reference for the standard range:
- Hang the bottom of your pendant light about 30 inches above the table surface.
- If you use more than one pendant, keep them about 24 to 30 inches apart.
- Leave at least 6 inches from the edge of the table to the side of the pendant.
These simple numbers give you a great starting point for finding the optimal height for your dining room light.
Why Height Matters
You might wonder why the height of the lamp makes such a big difference. The answer is simple: the right dining pendant height affects both how your room looks and how it feels. Studies show that the ideal height—usually 30 to 34 inches above the table—creates a comfortable atmosphere and helps everyone see each other easily. When you get the height right, your pendant becomes a beautiful focal point and gives you enough light for eating, working, or chatting.
Proper hanging height also keeps your space safe and practical. If you hang your pendant too low, it can block your view or even become a hazard. Too high, and you lose the cozy feeling and the light may not reach the table well. The right height spreads light evenly, avoids glare, and makes your dining area feel balanced and welcoming. Good lighting can even boost your mood and make meals more enjoyable.
Common Mistakes
It’s easy to make mistakes when you install a pendant light, but knowing what to avoid can save you time and frustration. Here are some of the most common issues people run into:
- Hanging the pendant too low, which blocks sight lines and makes it hard to move around the table.
- Placing the pendant too high, which reduces lighting effectiveness and makes the room feel less inviting.
- Choosing a fixture that is too big or too small for your table or room.
- Ignoring the need for layered lighting, which can leave your dining area too dim or too harsh.
- Spacing multiple pendants incorrectly—ideally, keep them 24 to 30 inches apart.
- Overlooking how natural light enters the room, which can cause glare or uneven lighting.
- Forgetting about lighting controls like dimmers, which help you set the mood and save energy.
Tip: Always double-check the height before you install your pendant. Use a measuring tape and ask someone to hold the fixture at different heights so you can see what looks and feels best.
Getting the dining pendant height right means you avoid poor illumination, inconvenience, and an unbalanced look. Take your time with this step, and your dining room will feel just right.
Hanging Height and Ceiling
Low Ceilings
Low ceilings can make pendant lighting tricky, but you can still get a stylish look without losing comfort. The most important rule is to keep at least 7 feet of clearance from the floor to the bottom of your pendant. This keeps the light out of your way and prevents any accidental bumps. If your ceiling is lower than 8 feet, you may need to raise the fixture a bit higher than the standard range. Try to avoid large or bulky pendants in these spaces. Slim or compact designs work best and help the room feel open.
- Keep at least 7 feet between the floor and the bottom of the pendant.
- Choose smaller fixtures for a less crowded look.
- Make sure the light spreads evenly across the table.
Tip: If your dining area is close to walkways or open spaces, double-check the clearance so everyone can move around safely.
High Ceilings
High ceilings give you more flexibility with your hanging height. For ceilings above 8 feet, you should add about 2 to 3 inches to the hanging height for every extra foot of ceiling height. This adjustment helps keep the pendant at the optimal height for both style and function. For example, if your ceiling is 10 feet high, hang your pendant about 36 inches above the table instead of 30. Larger pendants often look better in rooms with tall ceilings, but you should hang them a bit higher to avoid overwhelming the space.
- For standard 8-foot ceilings, hang the pendant 30 inches above the table.
- For each foot above 8 feet, add 2 to 3 inches to the hanging height.
- Adjust based on the size of your fixture and the look you want.
Note: Always check that the light still provides enough illumination for your table, especially if you hang it higher.
Sloped Ceilings
Sloped or vaulted ceilings add character to a room, but they can make pendant installation a bit more complex. You want your pendant to hang straight down, even if the ceiling is at an angle. Many fixtures come with special canopies or adjustable rods designed for sloped ceilings. Chain-hung pendants work well because you can easily adjust the length and keep the bottom of the light level with the table.
- Use a sloped ceiling canopy or adjustable rod to keep the pendant straight.
- For multiple pendants, adjust each chain or rod so the bottoms line up evenly.
- Add extra chain near the canopy for a balanced look.
Tip: Always measure from the tabletop to the bottom of the pendant to keep a consistent hanging height, no matter the ceiling angle.
Pendant Lights Above the Table
Single vs. Multiple Pendants
When you think about pendant lights above the table, you have two main choices: a single pendant or multiple pendants. Each option brings its own style and function to your dining space.
- A single pendant works best for small tables or cozy dining nooks. It gives you focused light and keeps things simple.
- Multiple pendants or a cluster of lights create a dramatic look and spread light more evenly across larger tables.
- If you want a bold statement or need more light, go for multiple lamps above the dining table.
- Adjusting the height and placement is important for both styles. You want to avoid blocking anyone’s view or making the space feel crowded.
- Keep in mind that installing several pendants can be a bit more complicated and may require extra care during cleaning.
Here’s a quick comparison to help you decide:
|
Aspect |
Single Pendant Advantages |
Single Pendant Disadvantages |
Multiple Pendants Advantages |
Multiple Pendants Disadvantages |
|---|---|---|---|---|
|
Lighting Coverage |
Focused illumination for small spaces |
Limited coverage for large tables |
Even lighting for bigger tables |
More complex installation and upkeep |
|
Aesthetic Appeal |
Simple and subtle style |
May lack dramatic impact |
Creates a striking, dynamic look |
Can look busy if not spaced well |
|
Installation & Maintenance |
Easy to install and maintain |
Height can block views if not set right |
Great for large spaces and visual interest |
Needs careful placement and cleaning |
|
Versatility |
Perfect for accent lighting and small tables |
Not ideal for big dining areas |
Works well for dramatic effects and large tables |
Placement and height need extra attention |
Tip: If you want a cozy, intimate feel, stick with a single pendant. For a modern, eye-catching look, try multiple pendants.
Spacing Tips
Getting the spacing right is key for optimal pendant light placement. You want your dining area to feel balanced and well-lit.
- Space your pendants evenly along the length of the table. Divide the table length by the number of pendants to find the right intervals.
- Use an odd number of pendants for a more harmonious and visually pleasing effect.
- Each pendant should be about half to two-thirds the width of your table. This keeps the look balanced and prevents the lights from overpowering the space.
- For very large tables, two medium-sized pendants spaced evenly often work better than one oversized fixture.
- If you like a bit of creativity, try hanging lights at different heights. Just make sure your table is long enough and there’s enough clearance.
Note: Even spacing helps you avoid dark spots and makes sure everyone at the table gets enough light.
Centering and Alignment
You want your pendant lights to look great from every angle. Centering and alignment play a big role in creating a polished dining space.
- Always center the main fixture over the dining table, not the room. Sometimes tables sit off-center in a room, so focus on the table itself.
- For round tables, a single pendant centered above the table creates a perfect focal point and spreads light evenly.
- Rectangular tables look best with linear pendants or multiple lights spaced evenly along the table’s length.
- Choose a pendant that’s about half to two-thirds the width of your table for the best proportion.
- Keep the bottom of the pendant 30 to 36 inches above the table surface. This height gives you good light and keeps sight lines clear.
Pro tip: Stand back and check your alignment before you finish installing. A well-centered pendant makes your whole dining area feel more inviting.
Table and Size of the Pendant Lights
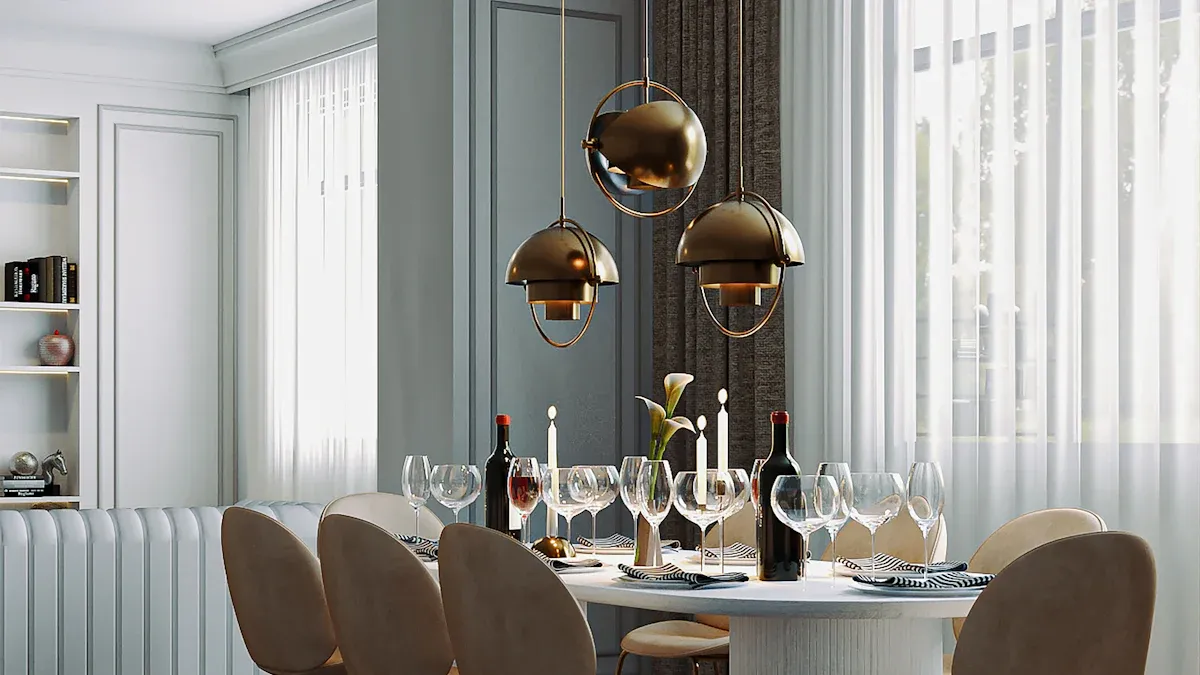
Table Size and Shape
When you pick a pendant light for your dining table, start by looking at the table’s size and shape. You want the light to feel balanced, not too big or too small. Here’s a simple way to figure out what works best:
- Measure your table’s width. The pendant light should be about one-third to two-thirds of that width. For example, if your table is 36 inches wide, look for a pendant between 18 and 24 inches in diameter.
- For smaller tables (4 to 6 feet long), hang the pendant a bit lower—around 30 to 33 inches above the table. This brings the light closer and makes the space feel cozy.
- For larger tables (6 to 8 feet long), you can hang the pendant slightly higher, about 33 to 36 inches above the table. This helps spread the light across the whole surface.
- The table’s shape matters, too. Rectangular or oval tables look great with linear pendants or a row of smaller pendants. Round or square tables work best with a single, centered pendant.
Tip: If you have a long table, try using two or three matching pendants spaced evenly. This keeps the look balanced and gives everyone enough light.
Pendant Proportion
Getting the right proportion between your table and the pendant makes a big difference. You want the fixture to stand out, but not take over the room. Here are some easy rules to follow:
- For round tables, choose a pendant with a diameter about half to two-thirds the width of the table. If your table is 36 inches wide, a pendant between 18 and 24 inches works well.
- For rectangular tables, look for a linear pendant that is about 12 inches shorter than the table length. This keeps the fixture from hanging over the edges.
- If you use multiple pendants, make sure the combined width follows the same rule—about half to two-thirds the width of the table.
- The bottom of the pendant should hang 30 to 36 inches above the table. This height gives you enough space for centerpieces and keeps sight lines clear.
A quick table for reference:
|
Table Shape |
Pendant Style |
Ideal Pendant Size |
|---|---|---|
|
Round/Square |
Single, centered |
1/2 to 2/3 table width |
|
Rectangular/Oval |
Linear or multiple |
Linear: table length minus 12 in. |
Light Spread
The size of the pendant lights affects how much light reaches your table. You want enough light for meals, homework, or game night, but not so much that it feels harsh.
- Larger pendants or clusters of smaller pendants give you more light and cover bigger tables well.
- Smaller pendants work best for small tables or when you want a more intimate feel.
- For rectangular tables, a row of pendants or a long linear fixture spreads light evenly. For round tables, a single pendant focuses light right where you need it.
- Adjustable height lets you control how wide the light spreads. Hanging the pendant lower creates a cozy pool of light, while a higher placement spreads light farther.
- Dimmable pendants let you change the mood. Brighten things up for family dinners or dim the lights for a relaxed evening.
Note: Lampshades can help soften the light and reduce glare, making your dining area more comfortable.
How to Hang a Dining Light
Measuring and Marking
Getting the right height starts with careful measuring and marking. You want your pendant to look great and work well for everyone at the table. Here’s a simple way to get it right:
- Measure the height of your dining table. Most tables are about 30 to 31 inches tall.
- Plan to hang your pendant so the bottom sits 30 to 36 inches above the table surface. This range gives you enough clearance for most people and keeps the light at a comfortable level.
- If you or your family members are taller than average, aim for the higher end of that range or even a bit above 36 inches.
- Use a pencil to mark the spot on the ceiling where you want the fixture to hang. This mark will guide you during installation.
- For more than one pendant, divide the table length by the number of fixtures to space them evenly. Mark each spot on the ceiling.
- Always consider your ceiling height and the size of your room. A higher ceiling may need you to adjust the height upward for balance.
Tip: Double-check your measurements before you drill or install anything. A little extra time here saves a lot of hassle later.
Testing Placement
Before you commit to drilling holes or making permanent changes, test the placement of your pendant light. This step helps you see how the fixture will look and feel in your space.
- Grab a measuring tape and check the height from the table to your ceiling mark.
- Ask a friend or family member to hold the light fixture at your marked spot. Step back and look at the height and position from different angles.
- If your pendant hangs from a chain or cord, adjust the length to see what works best. Use pliers or a chain opener if you need to change the links.
- For extra safety, use a volt detector to make sure the power is off before you handle any wires.
- If you want to get creative, try using a temporary hook or even a piece of string to hang the fixture at your chosen height. This trick lets you move the light up or down until it feels just right.
- Once you’re happy with the placement, turn the power on briefly to check the light’s effect on your table and room.
Note: Testing the placement first helps you avoid mistakes and gives you confidence before the final install.
Headroom and Sight Lines
You want your dining area to feel open and comfortable. The right pendant height keeps sight lines clear and gives everyone enough headroom.
- Hang your pendant about 30 to 36 inches above the table. This height usually puts the bottom of the fixture at 66 to 76 inches from the floor, which works for most people.
- Make sure the fixture’s width is about half to two-thirds the width of your table. This keeps the light in proportion and avoids blocking anyone’s view.
- For multiple pendants, space them 24 to 30 inches apart. This spacing prevents the lights from looking crowded and keeps the room balanced.
- Leave at least 6 inches between the edge of the table and the side of the pendant. This gap helps you avoid bumping the fixture and keeps the look neat.
- Always check that everyone can see across the table without the light getting in the way.
Pro tip: If you ever feel unsure, sit at the table and look around. If the pendant doesn’t block your view or feel too close, you’ve found the perfect spot to hang a dining light.
Safety Tips
When you install a dining pendant, safety should always come first. You want your new light to look great, but you also want to protect yourself and your home. Here’s a step-by-step guide to help you stay safe during installation:
-
Turn Off the Power
Always start by switching off the power at the circuit breaker. Don’t just flip the wall switch—make sure the power is completely off. Use a voltage tester to double-check that no electricity flows to the wires. -
Gather the Right Tools
Before you climb the ladder, collect everything you need. Grab wire cutters, wire strippers, an electric screwdriver, a voltage tester, and a sturdy ladder. Having your tools ready makes the job smoother and safer. -
Wear Safety Gear
Protect your eyes with safety goggles and put on gloves. You never know when a wire might snap or a bit of dust could fall. Gloves also help you grip wires and tools better. -
Prepare the Wiring
Remove the old fixture only after you confirm the power is off. Expose the wiring carefully. If you see any frayed or damaged wires, stop and call a professional. -
Connect Wires Correctly
Match the wires by color—black to black, white to white. Use wire nuts to secure the connections. Tug gently on each wire to make sure it’s tight. -
Mount the Pendant Securely
Use the hardware that comes with your light. Make sure the fixture feels stable and doesn’t wobble. If your pendant sways or seems loose, reinforce the mounting point or add a support brace. -
Test the Light
Once you finish, turn the power back on. Flip the switch and check if the light works. If it flickers or doesn’t turn on, turn the power off again and inspect your connections. -
Troubleshoot Issues
If you run into problems like flickering or no light, use your voltage tester to check for power. Double-check all wire connections. Sometimes a loose wire nut or a missed connection causes trouble. -
Know When to Call a Pro
If you suspect faulty wiring or run into anything that feels over your head, don’t risk it. Call a licensed electrician. It’s always better to be safe than sorry.
Tip: Never rush electrical work. Take your time, follow each step, and ask for help if you need it. Your safety matters more than finishing quickly.
By following these safety tips, you can hang your dining pendant with confidence. You’ll enjoy your new light knowing you did the job right—and safely!
Visual Balance
Focal Point
When you walk into a dining space, your eyes often go straight to the lighting above the table. Pendant lights naturally become the focal point in your dining area. You can use this to your advantage by choosing a fixture that stands out and fits your style.
- Pick a pendant with a diameter about half to two-thirds the width of your table. This keeps everything balanced and pleasing to the eye.
- For rectangular tables, try multiple pendants or a long fixture. This creates a sense of expansion and draws attention across the whole table.
- Hang your pendant 30 to 36 inches above the table. If your ceiling is higher than 8 feet, raise the fixture a bit more.
- Space multiple pendants 24 to 30 inches apart for a balanced look.
- Mix pendant styles, shades, or finishes if you want to add personality. Artistic designs or bold finishes can turn your light into a true centerpiece.
Hanging pendants at different heights adds visual interest and gives your dining space an eclectic vibe. Just make sure the lights don’t block anyone’s view or get in the way during meals.
Room Ambiance
Lighting your dining space isn’t just about brightness. The right pendant lights set the mood and make your dining room feel warm and inviting. You can create a cozy atmosphere by hanging pendants 28 to 34 inches above the table. This brings the light closer and makes the space feel more intimate.
- Use dimmable pendants so you can adjust the brightness for different occasions.
- Choose warm bulbs (2700K to 3000K) for a soft, welcoming glow.
- Layer your lighting by adding wall sconces or table lamps. This balances function and mood.
- Pick pendant materials and finishes that match the style you want—glass for a soft glow, metal for a modern touch, or wood for warmth.
Central alignment with the table and room entrance helps maintain harmony and balance in your dining area.
Coordinating Fixtures
You want your dining space to feel unified, not cluttered. Coordinating your pendant lights with other fixtures in the room helps everything flow together. You don’t have to match every piece exactly, but look for a common thread.
- Match finishes between fixtures in connected spaces, like the kitchen or living room, to create cohesion.
- Mix shapes or styles, but keep a unifying element such as color or finish.
- Use texture or color variation to add depth, but make sure fixtures still complement each other.
- Balance the size of your pendants with the scale of your dining room and furniture. Oversized lights can overwhelm a small space, while tiny fixtures might get lost in a large room.
- Hang pendants 30 to 36 inches above the table for the best effect.
Try pairing a brass chandelier with bronze pendants or mixing pale wood finishes in different shapes. This keeps your dining area interesting but still coordinated.
Quick Checklist
Step-by-Step Guide
Ready to hang your dining pendant? Here’s a simple checklist to help you get it right the first time. Grab your tools, take a deep breath, and follow these steps:
-
Turn Off the Power
Head to your circuit breaker and switch off the power to your dining area. Use a voltage tester to double-check that the wires are safe to touch. -
Remove the Old Fixture
Carefully take down any existing light. Disconnect the wires and set the old fixture aside. -
Check the Ceiling Box
Make sure the electrical box is secure and can handle the weight of your new pendant. Reinforce it if needed. -
Assemble the Pendant
Follow the manufacturer’s instructions to put your new fixture together. Adjust the cord or chain so the bottom of the pendant will hang about 30 to 36 inches above your table. For ceilings higher than 8 feet, add 3 to 4 inches for each extra foot. -
Test the Height and Placement
Use a temporary hook, rope, or chain to hang the pendant before final installation. Step back and check the height, light spread, and how it looks with your table and room. -
Connect the Wires
Match black to black, white to white, and green or bare copper to ground. Secure each connection with wire nuts and electrical tape. -
Mount the Fixture
Attach the canopy to the ceiling and make sure everything feels tight and flush. -
Install the Bulb
Choose a bulb with a warm color temperature (2700K to 3000K) for a cozy dining vibe. If possible, use a dimmable bulb and install a dimmer switch. -
Restore Power and Test
Flip the breaker back on and test your new light. Adjust the fixture if needed.
Tip: If your pendant is large or the wiring looks tricky, don’t hesitate to call a professional for help.
Final Checks
Before you call the job done, run through these quick checks to make sure your pendant looks great and works perfectly:
- Measure from the tabletop to the lowest point of the pendant. You want 30 to 36 inches of clearance for standard ceilings.
- For high ceilings, remember to add about 3 inches for every extra foot above 8 feet.
- Check that the fixture is centered over your table, not just the room.
- Make sure the pendant’s size fits your table—ideally, the diameter should be about half to two-thirds the width of your table.
- If you have multiple pendants, space them evenly (about 24 to 30 inches apart) for symmetry and balanced lighting.
- Look for even light spread across the table. Adjust the height if you see harsh shadows or glare.
- Confirm all wires are secure and tucked safely into the ceiling box.
- Test the dimmer switch and bulb brightness to set the perfect mood.
- Step back and see how the pendant fits with your room’s style and scale.
Safety first: Always turn off the power before making any adjustments. If you feel unsure at any point, reach out to a licensed electrician.
With this checklist, you can hang your dining pendant with confidence and enjoy a space that feels both stylish and welcoming.
You now know how to find the perfect pendant height for your dining area.
- Hang your light 30 to 36 inches above the table for most dining rooms.
- Adjust the height if your ceiling is higher than 8 feet or your table is extra large.
- Make sure your pendant fits the table’s width and keeps sightlines clear.
- Test the placement before final installation for the best results.
Use the checklist to feel confident. The right pendant height brings out the best in your dining area—both in style and function. Try these tips and enjoy a brighter, more welcoming dining room!
FAQ
How high should I hang a pendant light above my dining table?
Most experts suggest 30 to 36 inches from the tabletop to the bottom of the pendant. This range gives you enough headroom and keeps the light focused on your table.
Can I hang a pendant light on a sloped ceiling?
Yes, you can! Look for pendants with adjustable rods or special sloped ceiling canopies. These features help your light hang straight, even if your ceiling is angled.
What size pendant works best for my table?
Choose a pendant that is about half to two-thirds the width of your table. For long tables, try a linear fixture or use multiple smaller pendants for balanced lighting.
Do I need a dimmer switch for my dining pendant?
A dimmer switch is a great idea. You can easily adjust the brightness for different moods or occasions. Dimmers also help save energy and extend bulb life.
How do I center my pendant over the table?
Always center the pendant over the table, not the room. Use a measuring tape to find the middle of your table and mark the spot on the ceiling before you install the fixture.
What if my ceiling is higher than 8 feet?
Add 2 to 3 inches to the hanging height for every foot above 8 feet. This adjustment keeps your pendant at the right level for both style and function.
Can I use more than one pendant above my table?
Absolutely! Multiple pendants look great over long or rectangular tables. Space them evenly—about 24 to 30 inches apart—for a balanced look and even light.
What type of bulb should I use in my dining pendant?
Pick a warm white bulb (2700K to 3000K) for a cozy feel. Dimmable LED bulbs work well and help you set the perfect mood for any meal.