You've got the route planned, the playlist queued, and a camera ready to roll. The only thing standing between you and cinematic road trip content is one frustrating problem: shaky, unwatchable footage every time you hit a bump or merge onto the highway.
If you've ever watched your own driving footage back and felt your stomach drop at the jello-cam effect, you already know the pain. Road vibrations are relentless. Engine hum, road texture, wind buffeting — they all add up to footage that looks like it was shot during an earthquake. And no amount of post-production stabilization fully fixes footage that was shaky from the start.
This guide is for solo travel creators who want to fix that problem once and for all. We're talking about the right mounting hardware, the right angles, and a compact creator kit you can throw in a backpack and take anywhere. Let's get into it.
The Rise of Road Trip Content — Why Creators Are Hitting the Highway
Road trip vlogs have quietly become one of the most-watched content formats on YouTube, TikTok, and Instagram Reels. There's something deeply satisfying about watching someone drive through open landscapes, narrate their thoughts, and capture the world rolling by at 70 mph. It feels real. It feels free. And audiences are hungry for it.
The numbers back this up. Search volume for terms like "solo road trip vlog" and "van life content" has grown steadily year over year. Creators who nail the in-car filming setup — steady shots, clean audio, good angles — consistently outperform those who don't, even when the destination itself is less dramatic.
The barrier to entry is low. You don't need a film crew or a $5,000 camera rig. A modern smartphone shoots 4K at 60fps. A mirrorless camera fits in a jacket pocket. What you do need is a reliable way to mount that camera so it stays put, stays level, and doesn't vibrate itself into oblivion every time you hit a pothole.
That's where the right car mount changes everything.
Why Vibrations Ruin Your Shots (And Why It's Worse Than You Think)
Here's something most beginner creators don't realize until they've already wasted hours of footage: the vibrations that ruin car video aren't the big ones. It's not the speed bump or the railroad crossing. Those you can edit around.
The footage killers are the micro-vibrations — the constant, low-frequency hum from your engine, the subtle shimmy from road texture, the tiny oscillations from your car's suspension doing its job. These frequencies are almost imperceptible when you're driving. But your camera sensor picks them up faithfully, and the result is footage that looks unstable even when nothing dramatic is happening.
Cheap suction cup mounts make this dramatically worse. Here's why:
- Weak suction = micro-movement. A mount that isn't truly locked to the glass will flex and shift with every vibration, amplifying the problem instead of absorbing it.
- Plastic arms flex. Long, lightweight plastic arms act like springs — they absorb vibration energy and then release it, creating that characteristic bouncy, jello-like footage.
- Poor ball joints slip. A ball-and-socket joint that isn't properly tensioned will slowly drift from your set angle over a long drive, meaning you arrive at your destination to find your camera has been pointing at the headliner for the last two hours.
The solution isn't just "a better suction cup." It's a fundamentally different approach to how the mount attaches to your car — and how it holds your camera once it's there.
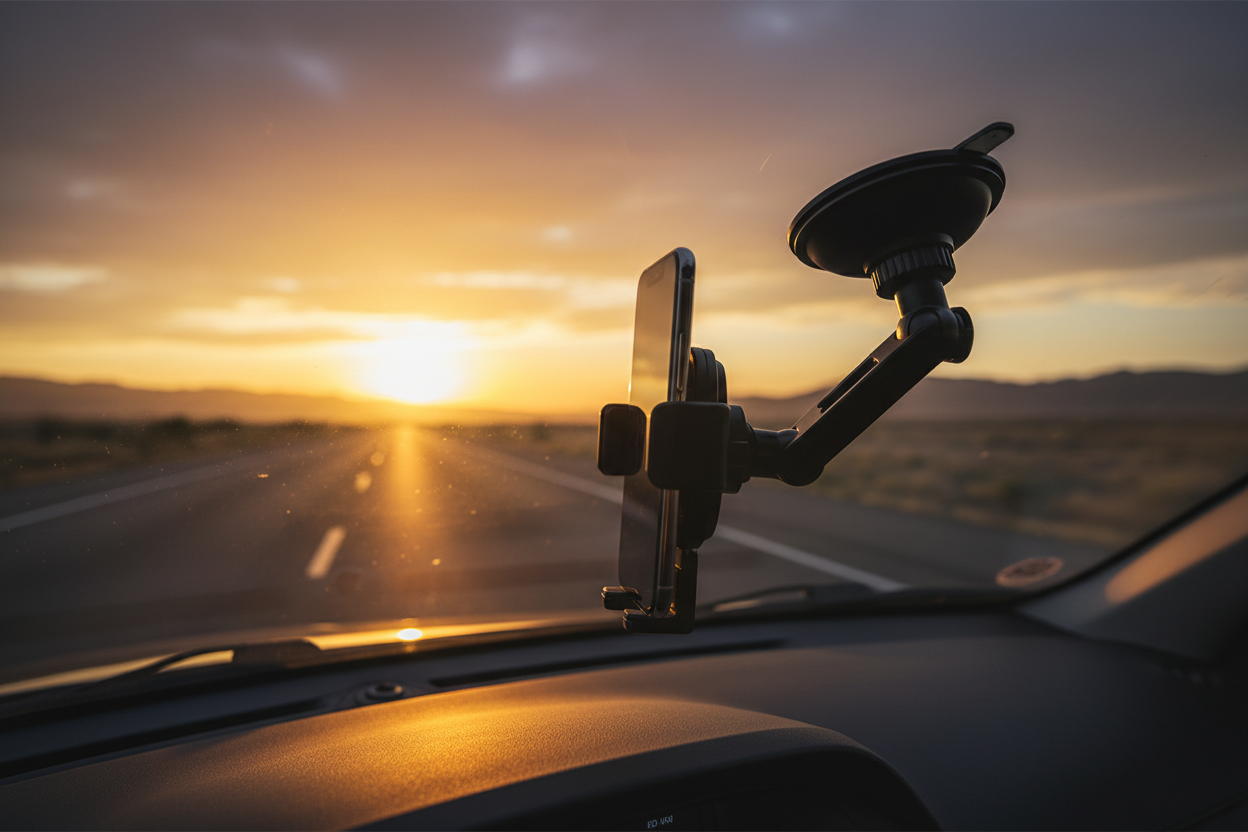
Unshakeable Stability: How Hybrid Vacuum Technology Changes the Game
The Rackora Vacuum-Enhanced Car Phone Holder takes a different approach to the suction problem, and once you understand how it works, you'll never go back to a standard suction cup mount.
Standard suction cups work by creating a partial vacuum when you press them against a surface. The problem is that this vacuum degrades over time — especially in a hot car. Heat causes the rubber to soften and the seal to weaken. On a summer road trip, you might start the day with a solid mount and end it with your camera on the floor.
Rackora's hybrid active vacuum system is different. Instead of relying solely on passive suction, it uses an active vacuum mechanism that maintains consistent holding force regardless of temperature changes. The result is a mount that grips your windshield or side glass with the kind of confidence you'd expect from professional film equipment — not a $15 gas station accessory.

Rackora Vacuum-Enhanced Car Phone Holder — $99.00
This is the anchor of any serious in-car creator setup. Here's what makes it worth the investment:
- Hybrid active vacuum technology — maintains holding force in heat, cold, and everything in between
- Dual mounting positions — works on the windshield for forward-facing road shots, or on the passenger side glass for a more cinematic side-angle view
- Magnetic snap integration — compatible with MagSafe and magnetic phone cases for tool-free phone attachment and removal
- Heavy-duty construction — built to hold smartphones, action cameras, and small mirrorless cameras without flex or drift
Infinite Angle Customization: Getting the Shot You Actually Want
Stability is only half the equation. The other half is getting your camera pointed at the right thing — and being able to change that quickly when the shot changes.
Road trip content typically requires at least two distinct camera angles:
- The road-forward shot — camera pointed through the windshield, capturing the highway, the landscape, the destination approaching. This is your establishing shot, your time-lapse material, your "we're really doing this" footage.
- The driver-talk shot — camera angled toward the driver's face, capturing reactions, narration, and the personality that makes viewers subscribe. This is where your audience connects with you.
Switching between these two angles mid-drive used to mean stopping the car, fiddling with a stiff ball joint, and hoping you got the angle right before pulling back onto the road. Not ideal.
The Rackora mount's multi-angle folding arm and precision ball-and-socket joint solve this. The arm folds and extends to position your camera exactly where you need it, and the ball joint locks firmly at any angle with a single adjustment. Switching from road-forward to driver-talk takes about five seconds — safely doable at a red light.
The joint also doesn't drift. Once you set your angle, it stays there for the entire drive. No more arriving at your destination to find your camera has slowly rotated to face the ceiling.
Your Phone Case Is Part of the Setup
If you're shooting on a smartphone — and most solo creators are, at least for some of their content — your phone case is actually a critical piece of your mounting system. A bulky case can interfere with magnetic attachment. A slippery case can make quick swaps awkward. The right case makes your entire setup faster and more reliable.
Here are three Rackora cases worth considering for travel creators:
1. Rackora Black Hole Plus 518 Carbon Fiber Phone Case with Magnetic Stand — $76.00

Built from aircraft-grade carbon fiber, this case is genuinely lightweight while being tougher than most plastic alternatives. The integrated magnetic stand means your phone can prop itself up on a desk, dashboard, or any flat surface — useful when you're reviewing footage at a rest stop or setting up a static shot outside the car. MagSafe-compatible for seamless attachment to the Rackora car mount.
2. Rackora Z118 Metal Magnetic Phone Case — $49.99

The Z118 features a metal frame construction that doubles as a grip — useful when you're shooting handheld outside the car. The magnetic attachment is strong enough that you can mount and dismount your phone one-handed, which matters when you're trying to capture a spontaneous moment without fumbling. A solid mid-range option for creators who want durability without the premium carbon fiber price tag.
3. Rackora Geometric S-Shaped Aluminum Alloy Phone Holder Case — $46.99

The S-shaped aluminum alloy design gives this case a distinctive look that stands out in content — it photographs well, which matters when you're also shooting flat-lays of your gear. The built-in holder function means it can stand independently on any surface, and the aluminum construction dissipates heat better than plastic, which is a real consideration when your phone is running a camera app for hours in a hot car.
The Creator's Mobile Setup: Everything That Fits in a Backpack
One of the best things about being a solo travel creator in 2024 is that a genuinely professional setup fits in a 20-liter daypack. Here's the complete kit, organized by category:
Mounting & Stabilization
- Rackora Vacuum-Enhanced Car Phone Holder ($99.00) — your primary in-car mount for windshield and side-glass shots
- Compact travel tripod — for static shots outside the car, sunrise/sunset footage, and self-filming at destinations
- Flexible gorilla-style mini tripod — wraps around railings, perches on rocks, attaches to fences; invaluable for solo creators
Audio
- Wireless lavalier mic — clip to your shirt for clean driver-talk audio; road noise is the enemy of good in-car audio
- Compact shotgun mic — for outdoor narration and ambient sound capture at stops
- Windscreen/deadcat — essential for any outdoor recording; wind noise is as bad as road noise
Lighting
- Small LED panel (pocket-sized) — for dawn/dusk driving segments and tunnel shots where natural light disappears
- Magnetic ring light — attaches to your phone for quick selfie-style driver shots; fits in a jacket pocket
Power & Storage
- 20,000mAh power bank — running camera apps drains batteries fast; don't rely on your car charger alone
- Multi-port car charger — keep your phone, camera, and audio gear topped up while driving
- High-speed SD cards (multiple) — 4K footage fills cards faster than you expect; bring more than you think you need
Phone Case & Accessories
- Rackora Black Hole Plus 518 Carbon Fiber Case ($76.00) or Z118 Metal Magnetic Case ($49.99) — magnetic compatibility makes mounting and dismounting seamless
- Screen protector — you're going to be handling your phone constantly; protect the display
Total weight for this entire kit: under 4 lbs. It fits in a single backpack compartment with room to spare. That's the beauty of the modern solo creator setup — you're not hauling a production van's worth of gear. You're traveling light and shooting smart.
Mounting Positions: Which One to Use and When
The Rackora mount works on both the windshield and the passenger side glass, and each position gives you a fundamentally different shot. Here's how to think about which to use:
Windshield Mount (Center or Driver-Side)
Best for: Road-forward footage, time-lapses, destination arrival shots, highway driving sequences
Angle tips: Mount slightly above the dashboard line so you capture the road ahead without the hood eating into the bottom of the frame. Tilt slightly downward to include the road surface — this gives a sense of speed and movement that a horizon-only shot lacks.
Watch out for: Glare from the windshield in direct sunlight. A circular polarizer filter on your camera lens can help dramatically. Also check local laws — some states have restrictions on windshield-mounted devices.
Passenger Side Glass Mount
Best for: Driver-talk shots, reaction footage, interview-style narration, close-up face shots
Angle tips: Position the camera at roughly eye level with the driver. Angle it slightly toward the driver's face rather than straight-on — a slight offset looks more natural and cinematic than a dead-center shot. Leave some headroom above the driver's head.
Watch out for: Background distractions through the passenger window. Sometimes a busy roadside background is great; sometimes it's distracting. Adjust your camera's aperture (or use portrait mode) to blur the background if needed.
Dual-Camera Setup
If you're serious about production value, run two cameras simultaneously — one on the windshield for road footage, one on the side glass for driver footage. You can sync them in post and cut between angles for a much more dynamic edit. The Rackora mount's stability means both cameras will hold their positions for hours without adjustment.
Practical Tips for Better In-Car Footage
Hardware is only part of the equation. Here are the shooting habits that separate good road trip content from great road trip content:
Shoot in Log or Flat Profile
If your camera supports it, shoot in a flat or log color profile. This preserves more dynamic range — important when you're dealing with the extreme contrast between a bright sky and a dark car interior. You'll grade the color in post, but you'll have much more to work with.
Use a Higher Frame Rate for B-Roll
Shoot your road-forward footage at 60fps or higher, then slow it down to 24fps in post. Even subtle slow-motion on highway footage looks cinematic. Save 24fps for your driver-talk shots where you want natural motion.
Record Audio Separately
Your camera's built-in mic will pick up road noise, engine hum, and HVAC noise. A wireless lav mic clipped to your shirt, feeding into a separate recorder or directly into your camera, will give you dramatically cleaner audio. Clean audio makes your content feel more professional than almost any visual upgrade.
Plan Your Talking Points
Solo creators often struggle with driver-talk footage because they're trying to drive, think, and perform simultaneously. Jot down three to five bullet points before you start driving — not a script, just anchors. You'll sound more natural and cover what you actually wanted to say.
Capture the Mundane
Gas station stops, map checks, snack breaks — these "nothing" moments are often what audiences connect with most. They make the trip feel real. Don't only roll camera for the scenic highlights.
Check Your Mount Before Every Drive
Even with a high-quality vacuum mount, make it a habit to verify the suction before you start rolling. Press the mount firmly against the glass, activate the vacuum lock, and give it a gentle tug. If it holds firm, you're good. This takes five seconds and saves you from discovering mid-drive that your camera has been sitting in the footwell for the last hour.
The Magnetic Snap Advantage: Why It Matters for Creators
One feature that doesn't get enough attention in car mount discussions is magnetic snap compatibility — and for creators, it's genuinely transformative.
Here's the scenario: you're driving, you spot something worth filming handheld, you pull over. With a traditional mount, dismounting your phone means unscrewing a clamp, carefully extracting your phone, and then reversing the process when you get back in the car. It's slow, it's fiddly, and by the time you've done it, the moment has passed.
With a magnetic snap system, you pull your phone off the mount in one motion — literally one second. You shoot your handheld footage. You get back in the car and snap your phone back onto the mount in another second. The magnet aligns it perfectly every time.
For solo creators who are constantly switching between mounted and handheld shooting, this is a workflow improvement that compounds over the course of a long road trip. Less friction means more shots captured, more spontaneous moments preserved, and less time fumbling with gear when you should be filming.
The Rackora Vacuum-Enhanced Car Phone Holder's magnetic snap system is designed with exactly this workflow in mind. Pair it with a MagSafe-compatible Rackora case and the transition between mounted and handheld becomes genuinely seamless.
Get the Rackora Car Mount — $99.00 →
Choosing the Right Mount for Your Camera
Not all creators shoot on smartphones. Here's a quick guide to matching the Rackora mount to your specific camera setup:
Smartphone (iPhone, Samsung, Pixel)
The most common setup and the one the Rackora mount is optimized for. Use a MagSafe-compatible Rackora case for magnetic snap attachment. The mount handles the weight of any current flagship smartphone without issue.
Action Camera (GoPro, DJI Osmo Action)
Action cameras are lightweight and compact — the Rackora mount handles them easily. You'll need a cold shoe adapter or action camera mount adapter to attach the camera to the mount's head. Most action cameras come with these adapters in the box.
Mirrorless Camera (Sony ZV-E10, Fujifilm X-S10, etc.)
Compact mirrorless cameras are increasingly popular with travel creators for their image quality and versatility. The Rackora mount can handle the weight of a compact mirrorless body with a kit lens. For heavier setups (full-frame bodies, large lenses), consider a dedicated camera car mount with a more robust arm.
Dual-Camera Setup
Running a smartphone on the Rackora mount for driver-talk footage while a separate action camera handles road-forward footage is a popular setup. The action camera can be mounted to the dashboard, the rearview mirror mount, or a separate suction cup mount on the windshield.
Packing Your Creator Kit: A Checklist
Before you hit the road, run through this checklist to make sure you're not leaving anything behind:
Mounting Hardware
- ☐ Rackora Vacuum-Enhanced Car Phone Holder
- ☐ Travel tripod
- ☐ Mini flexible tripod
- ☐ Cold shoe adapters (if using action camera)
Camera & Phone
- ☐ Primary camera (smartphone or dedicated camera)
- ☐ Backup camera or action camera
- ☐ Rackora magnetic phone case
- ☐ Extra batteries / battery grip
- ☐ Lens cleaning cloth
Audio
- ☐ Wireless lav mic + receiver
- ☐ Compact shotgun mic
- ☐ Windscreen
- ☐ Audio cables / adapters
Power
- ☐ 20,000mAh power bank
- ☐ Multi-port car charger
- ☐ USB-C and Lightning cables
- ☐ Camera battery charger
Storage
- ☐ SD cards (minimum 3 × 128GB for a multi-day trip)
- ☐ Portable SSD for daily backups
- ☐ Card reader
Miscellaneous
- ☐ Lens filters (ND, polarizer)
- ☐ Gaffer tape (fixes everything)
- ☐ Cable ties / velcro straps
- ☐ Small LED panel
Real Talk: What to Expect on Your First Road Trip Vlog
Let's be honest about something: your first road trip vlog probably won't look like the polished content you've been watching for inspiration. That's completely normal, and it's not a reason to wait until you have "better gear" or "more experience." The creators whose road trip content you admire have hundreds of hours of driving footage behind them. They've made every mistake you're about to make, and they learned from it.
Here's what to actually expect:
You'll forget to hit record. Multiple times. You'll have a great conversation with yourself, look down, and realize the camera has been off the whole time. It happens to everyone. The fix is to develop a habit: every time you get in the car, check that the camera is recording before you pull out of the parking lot.
Your audio will be worse than you expected. Road noise is relentless. Even with a good lav mic, you'll have segments where the audio is rough. That's what background music is for. Don't let imperfect audio stop you from publishing.
You'll have way more footage than you can use. A full day of driving might generate 6-8 hours of raw footage. Your final video will be 15-20 minutes. The editing is where the real work happens. Budget time for it.
The mount will be the best decision you made. Seriously. The difference between shaky, unusable footage and smooth, stable footage is almost entirely about the mount. Get this right first, and everything else is fixable in post.
Why Rackora for Your Creator Setup
There are a lot of car mounts on the market. Most of them are fine for navigation. Very few of them are designed with the demands of content creation in mind — hours of continuous use, repeated mounting and dismounting, the need for precise angle control, and the absolute requirement that the mount doesn't fail mid-drive.
Rackora's approach is different. The vacuum-enhanced technology isn't a marketing term — it's a genuine engineering solution to the problem of suction degradation in hot cars. The magnetic snap system isn't a gimmick — it's a workflow tool that makes the difference between capturing a moment and missing it. The multi-angle arm and precision ball joint aren't just features — they're the reason your camera stays exactly where you put it for the entire drive.
For solo travel creators who are serious about their content, this is the setup that makes the difference.
Shop the Rackora Car Mount — $99.00 →
Frequently Asked Questions
Q: Will the vacuum mount work on a tinted windshield?
A: Yes. The Rackora vacuum-enhanced mount works on both clear and tinted glass. The vacuum mechanism creates a seal against the glass surface itself, not the tint film, so tinting doesn't affect holding strength. That said, avoid mounting on cracked or chipped glass — the seal requires a smooth, unbroken surface.
Q: Is it legal to mount a phone or camera on my windshield?
A: Laws vary by state. In most US states, windshield-mounted devices are legal as long as they don't obstruct the driver's view. California, for example, restricts mounts to a small area in the lower corner of the windshield. Check your state's specific regulations before mounting. The passenger side glass is generally less restricted and is a good alternative if you're unsure.
Q: How long will the vacuum hold before I need to re-engage it?
A: With the Rackora hybrid active vacuum system, the hold is significantly more durable than passive suction cups. Under normal conditions (no extreme temperature swings, smooth glass surface), the mount can hold for many hours without re-engagement. As a best practice, check and re-engage the vacuum at each stop — it takes five seconds and gives you peace of mind.
Q: Can I use this mount with a camera heavier than a smartphone?
A: The Rackora mount is designed primarily for smartphones and compact action cameras. It can handle the weight of most action cameras (GoPro, DJI Osmo Action) without issue. For compact mirrorless cameras with kit lenses, it will work but test it thoroughly before relying on it for a long drive. For heavier camera setups, a dedicated camera car mount with a more robust arm is recommended.
Q: What's the best camera angle for road trip vlogs?
A: There's no single "best" angle — the most engaging road trip content uses multiple angles. A windshield-mounted forward-facing shot captures the journey; a side-glass driver-facing shot captures your personality and narration. If you can only use one angle, the driver-facing shot tends to perform better for audience connection, while the road-forward shot is better for cinematic B-roll.
Q: How do I reduce road noise in my in-car audio?
A: The most effective solution is a wireless lavalier mic clipped close to your mouth — this puts the microphone near the sound source (your voice) and far from the noise source (the road). Additionally, closing your windows while recording, reducing HVAC fan speed, and using noise reduction in post-production (tools like Adobe Audition or DaVinci Resolve's Fairlight) can all help. Background music also masks residual road noise effectively.
Q: Will the magnetic snap work with my existing phone case?
A: The magnetic snap system works with MagSafe-compatible cases and cases that have a built-in magnetic ring. If your current case isn't magnetic, you can add a thin magnetic ring adhesive to the back of your case — these are inexpensive and widely available. For the best experience, Rackora's own magnetic cases are designed to work seamlessly with the mount's snap system.
Q: How do I keep my phone from overheating during long recording sessions?
A: Phone overheating during extended camera use is a real issue, especially in a hot car. A few strategies: keep your car's AC running and direct a vent toward your phone, use a case with good heat dissipation (the Rackora aluminum alloy cases help here), close background apps before recording, and reduce screen brightness. If your phone does overheat and throttle, give it 10-15 minutes to cool down before continuing.
Q: What's the difference between the windshield mount and a dashboard mount?
A: Windshield mounts (like the Rackora) attach to the glass via suction or vacuum, giving you a stable, vibration-dampened mount point. Dashboard mounts typically use adhesive pads and sit on the dashboard surface — they're lower profile but can be harder to position for good camera angles and may pick up more dashboard vibration. For video quality, windshield mounts generally produce better results.
Q: Can I use the Rackora mount for navigation at the same time as filming?
A: If you're using your phone as both your camera and your navigation device, you'll need to choose one or the other — you can't run a camera app and navigation simultaneously on most phones without significant battery drain and potential overheating. The better solution is to use a dedicated GPS device or a second phone for navigation, leaving your primary phone free for filming.
Ready to Upgrade Your Road Trip Setup?
Summer road trips don't wait. The footage you capture this season is the content that builds your channel, grows your audience, and documents the adventures you'll want to remember. Don't let a shaky, unreliable mount be the reason your best moments end up in the trash folder.
The Rackora Vacuum-Enhanced Car Phone Holder is the foundation of a serious in-car creator setup. Pair it with a Rackora magnetic case, add your audio and lighting gear, and you've got a professional-grade mobile studio that fits in a backpack.
Hit the road. Roll camera. Make something worth watching.