Building a strong foundation for solar street lights requires you to assess soil conditions, select high-quality materials, and use reliable installation techniques. You often face unexpected challenges, such as rocky terrain or unstable soil, which demand adaptable solutions and thorough geotechnical investigations. When you choose eco-friendly and sustainable solutions like Rackora’s T-7 Integrated Solar Street Light, you gain efficient lighting, reliable performance, and reduced energy costs. These sustainable street lighting solutions use renewable energy, making them ideal for outdoor environments. Portable solar street lights offer flexibility for different sites and ensure safe, long-lasting installations.
For durable, energy-efficient lighting, you need reliable solar solutions that balance sustainability and performance.
Key Takeaways
- Start every project with a thorough soil assessment to ensure a stable foundation.
- Choose the right foundation type—concrete, screw piles, or precast bases—based on soil and site conditions.
- Use high-quality, corrosion-resistant materials like hot-dip galvanized steel to extend foundation life.
- Follow proper installation steps, including correct excavation depth and soil compaction, for strong support.
- Avoid common mistakes such as shallow foundations, poor compaction, and using substandard materials.
- Perform regular inspections twice a year to check for cracks, shifts, and corrosion to maintain safety.
- Select integrated solar street lights like Rackora’s T-7 for faster installation and reliable, efficient lighting.
- Always secure necessary permits and follow local codes to ensure legal compliance and project success.
Foundation Factors
Soil Assessment
Soil Type
You need to start every solar street light project with a thorough soil assessment. The stability and longevity of your installation depend on understanding the ground beneath each pole. Collect and test soil samples to determine properties like bearing capacity and how the soil behaves under load. Field and laboratory tests—such as the Standard Penetration Test or Cone Penetration Test—give you critical data about soil strength and stability. These tests help you identify whether the soil is firm, sandy, rocky, or soft. If you find soft soils or shallow rock, you can plan mitigation strategies early. This approach ensures your solar street lights will stand strong against environmental stresses and support the weight of high-efficiency solar panels, batteries, and other components.
Site Prep
Once you know the soil type, you must prepare the site for installation. Clear the area of debris, vegetation, and obstacles that could interfere with the foundation. Make sure the site has no shading that could reduce the performance of your solar panels. Check the elevation and review local weather conditions, including sunlight hours, rainfall, and wind. These factors influence the type of foundation you choose and the long-term performance of your solar street lights. Proper site preparation helps you avoid future issues and ensures your sustainable lighting solutions deliver optimal energy output.
Foundation Types
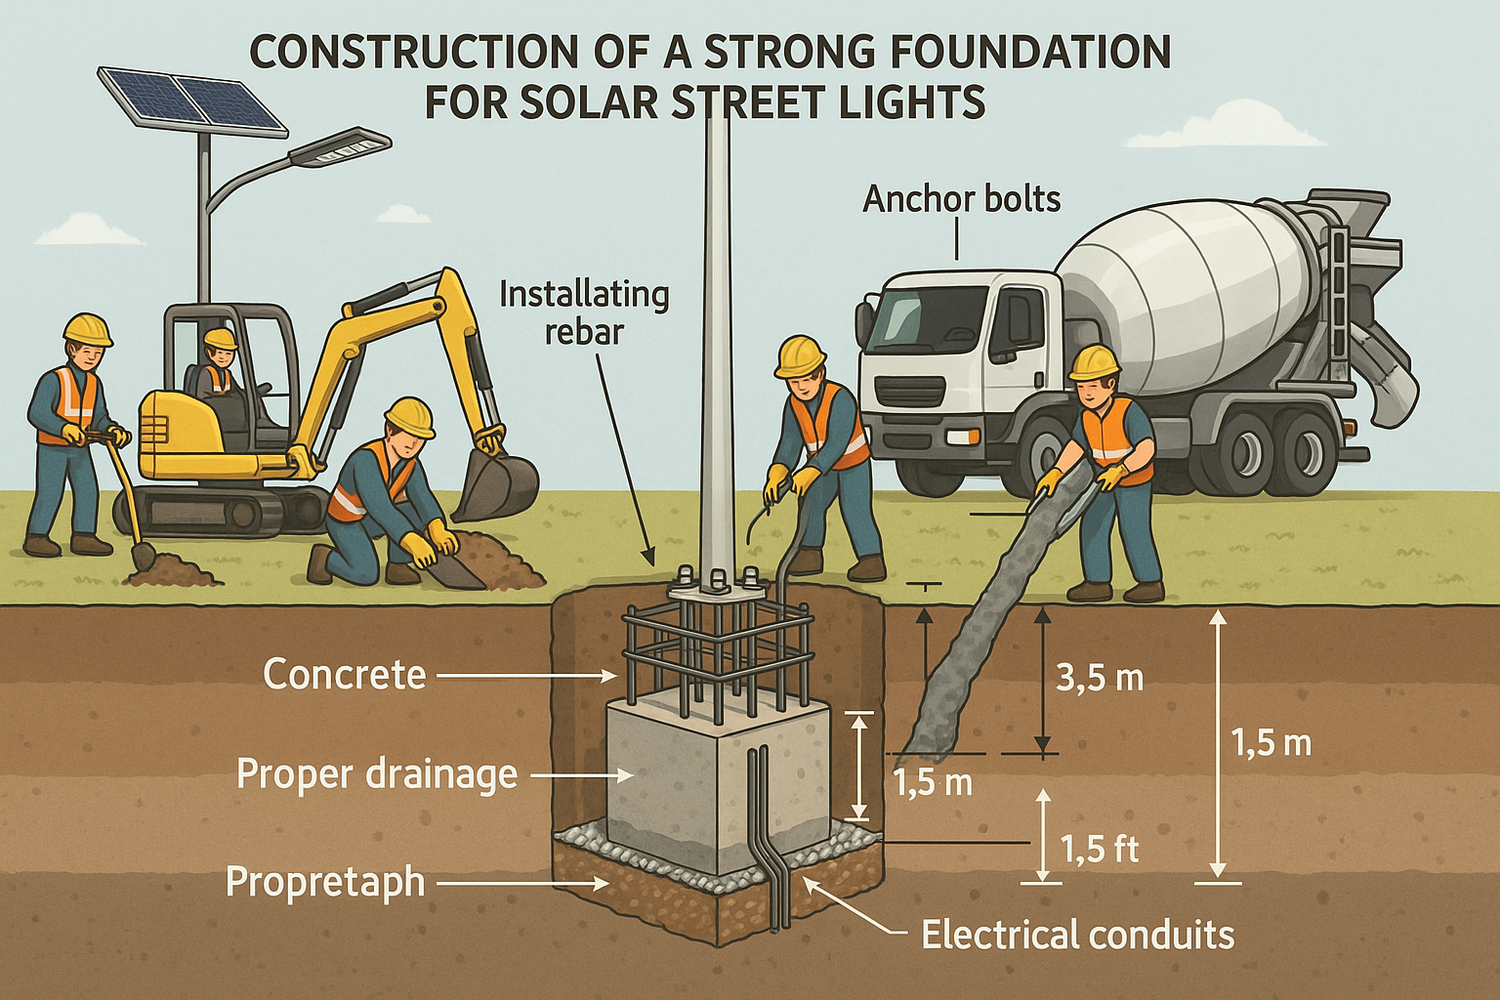
Concrete
Concrete foundations remain the most common and reliable choice for solar street lights. You dig a pit at the installation site and pour concrete to create a solid base. This method offers excellent stability and durability, especially for tall poles or areas with soft soil. Concrete foundations allow you to customize the depth and width to match the specific load and soil conditions. However, you need to account for curing time, which can delay installation. Weather conditions may also affect the process. Despite these challenges, concrete bases provide a robust solution for supporting solar panels and ensuring consistent energy delivery.
Screw Piles
Screw piles, also known as helical piles, offer a modern alternative for solar street light foundations. You install these by screwing them directly into the ground, which provides immediate load-bearing capacity. Screw piles work well in a variety of soil types, including sand, mud, and fill. They allow for quick installation and minimal site disturbance. Although screw piles can be more expensive, their high stability and versatility make them ideal for projects where speed and adaptability matter. You can use them in sustainable projects that require minimal environmental impact, as they reduce the need for heavy excavation.
Precast Bases
Precast concrete bases provide another efficient solution for solar street light installations. Manufacturers produce these bases in controlled environments, ensuring consistent quality and strength. You simply drop the precast base into a prepared hole, level it, and bolt the pole in place. This method speeds up installation and reduces labor costs. Precast bases perform well in most soil types, including dry, rocky, wet, or clay soils. However, you must select from standard shapes and sizes, which may limit customization. For many sustainable projects, precast bases offer a balance between performance, cost, and environmental impact.
Tip:
Use the table below to compare the main foundation types for solar street lights and choose the best fit for your site conditions and project goals.
|
Foundation Type |
Advantages |
Disadvantages |
|---|---|---|
|
Poured-in-place Concrete |
Customizable for soil and load conditions; deep or wide bases possible; durable and stable |
Requires curing time; weather-dependent; more labor-intensive |
|
Precast Concrete Bases |
Fast installation; reduced labor costs; good for most soil types; quality controlled |
Limited flexibility for custom shapes or sizes |
|
Screw Piles (Helical) |
High stability; immediate load-bearing; versatile across soil types; minimal site disturbance |
Generally more expensive |
Materials
Quality Standards
You must select materials that meet strict quality standards to ensure the long-term performance of your solar street lights. High-quality materials support the weight of solar panels, batteries, and sensors while resisting environmental loads like wind and rain. Rackora’s commitment to quality and design means you receive products that balance aesthetics with robust engineering. When you choose premium solutions, you reduce maintenance needs and extend the operational life of your lighting system. Always verify that your materials comply with industry standards for strength, durability, and safety.
Corrosion Resistance
Corrosion resistance plays a critical role in the lifespan of solar street lights. Poles and foundation components face constant exposure to humidity, rain, and sometimes coastal conditions. Materials like hot-dip galvanized steel form a protective zinc layer that prevents rust and maintains structural integrity. This protection ensures your solar street lights continue to deliver reliable energy and illumination for years. If you use inferior coatings or untreated metals, you risk premature failure and increased maintenance costs. By prioritizing corrosion-resistant materials, you minimize environmental impact and maximize the sustainability of your lighting solutions.
Solar Street Light Solutions
When you choose a solar street light solution, you want a process that ensures safety, durability, and efficient lighting. Rackora’s T-7 Integrated Solar Street Light stands out as a recommended solution for reliable, sustainable, and easy-to-install outdoor lighting. Its integrated design simplifies installation and reduces foundation complexity, making it ideal for both urban and rural environments.
Installation Steps
Excavation
Start by selecting a location with maximum sunlight exposure throughout the day. Clear the area of obstacles and ensure no underground utilities are present. Mark the foundation spot and dig a hole according to the pole height and local regulations. For most solar street lights, a depth of at least 1.5 meters provides stability against wind and environmental loads. The hole should have straight sides and a flat base to support the foundation.
Base Prep
After excavation, compact the soil at the bottom of the hole to achieve a minimum 95% compaction rate. This step prevents future settling and keeps your lighting system stable. Place a PVC conduit or wiring tube in the foundation to allow safe passage for battery and control cables. If you use a concrete base, position the anchor bolts or embedded parts centrally and ensure they extend above ground level for pole attachment. Always check that the base is level using a hand level or laser tool.
Tip:
Wear protective equipment such as gloves and safety goggles during all installation steps to prevent injuries.
Techniques
Concrete Pouring
For concrete foundations, use reinforced concrete with a minimum strength of 3000 PSI. Pour the concrete into the prepared hole, ensuring it surrounds the anchor bolts or embedded cage. Vibrate the concrete to remove air pockets and achieve a dense, solid base. Allow the concrete to cure for 7–14 days before proceeding with pole installation. This curing period ensures the foundation can support the weight and wind loads of your solar street light.
Screw Pile Install
If you opt for screw piles, drive the helical pile into the ground using specialized equipment. This method provides immediate load-bearing capacity and minimizes site disturbance. Screw piles work well in sandy, muddy, or filled soils. After installation, check that the pile is vertical and secure. Attach the pole mounting flange to the top of the pile, ensuring a tight fit for the lighting system.
Precast Placement
Precast concrete bases offer a fast and efficient solution for solar street light installation. Lower the precast base into the prepared hole using a crane or lifting device. Level the base and backfill around it with compacted soil or gravel. Align the anchor bolts with the pole flange and secure them tightly. This method reduces labor time and ensures consistent quality for your lighting solution.
Anchoring
Alignment
Proper installation of the pole requires precise alignment. Use a hand level or laser measurement tool to ensure the pole stands perfectly vertical. Align the flange holes with the embedded anchor bolts or screw pile mount. For multiple lights, check that all poles are in a straight line for a professional appearance and uniform lighting coverage.
Bolt Securing
Once aligned, place washers and hex nuts on the anchor bolts. Tighten each nut gradually in a crisscross pattern using a torque wrench. This method distributes pressure evenly and prevents tilting. Confirm that all bolts meet the manufacturer’s specifications for tightness. Secure anchoring prevents movement during strong winds and ensures the long-term reliability of your solar street lights.
Note:
Always follow grounding and earthing protocols for safety. Connect the pole to a grounding rod and use weatherproof, UV-resistant cables. This step protects your lighting system from lightning strikes and electrical faults, ensuring reliable operation.
Why Choose Rackora’s T-7 Integrated Solar Street Light?
The T-7 Integrated Solar Street Light simplifies the installation process. Its all-in-one design eliminates the need for trenching, external wiring, or separate battery boxes. You only need a simple pole foundation, which reduces labor and speeds up deployment. The T-7 model delivers efficient energy use, high luminosity, and robust weather resistance, making it a reliable solution for any outdoor lighting project.
|
Feature |
T-7 Integrated Solar Street Light |
Traditional Solar Street Light |
|---|---|---|
|
Foundation Requirements |
Simple pole foundation, minimal work |
More substantial, requires trenching |
|
Installation Complexity |
Fast, no electrical background needed |
Complex, multiple components |
|
Installation Time |
Within 10 minutes |
30–60 minutes or more |
|
Additional Components |
None external, all-in-one design |
Battery boxes, brackets, cables needed |
Choosing an integrated solution like the T-7 not only streamlines installation but also ensures efficient, reliable, and sustainable lighting for your community or business.
Common Mistakes
When you build foundations for solar street lights, you must avoid several common mistakes that can compromise safety, durability, and performance. Addressing these issues early ensures your street lighting system remains reliable and cost-effective.
Depth Issues
Shallow Foundations
Many installations fail because the foundation does not reach the recommended depth. If you set the base too shallow, the pole loses anchoring strength. Poles with insufficient burial depth often collapse during storms or under heavy loads. You should always follow the guideline of making the foundation at least 10% of the pole height. For example, a 10-meter pole requires a foundation pit of at least 1 meter deep. Ignoring this standard can lead to serious safety hazards, including pole collapse and electrical risks.
Compaction
Proper compaction of the soil at the base of the foundation is essential. If you skip this step, the ground may settle unevenly, causing the pole to tilt or shift. You need to compact the soil to at least 95% density before placing the base. This step prevents future instability, especially in soft or loose soils. After installation, always check the pole’s vertical alignment and stability by gently shaking it.
Tip:
Never rush the compaction process. A stable base ensures your solar street lights withstand wind and environmental stress.
Material Quality
Substandard Choices
Using low-quality or non-corrosion-resistant materials in your foundation can lead to early failures. Substandard materials weaken the structure, making it unable to handle wind loads or environmental stresses. You might save money upfront, but you risk higher costs later due to repairs or replacements. Always select materials that meet manufacturer specifications and local standards.
Durability Risks
If you ignore durability, you expose your street lighting system to premature wear. Materials that lack proper coatings or reinforcement will corrode or degrade quickly, especially in harsh climates. This not only shortens the lifespan of your solar street lights but also increases the risk of equipment damage and safety incidents. Reliable foundations require adherence to recommended concrete mixes, curing times, and reinforcement methods.
Environmental Factors
Weather
You must consider local weather conditions when planning your foundation. Heavy rainfall, flooding, or high winds can undermine poorly designed bases. If you do not account for these factors, your street lights may fail during extreme weather events. Always evaluate the site for flood risk and wind exposure before construction.
Local Codes
Ignoring local building codes and regulations can result in costly mistakes. Each region may have specific requirements for foundation depth, material quality, and installation methods. Failing to comply can lead to legal issues, fines, or forced removal of your solar street lights. Always consult local authorities and follow all guidelines to ensure compliance and minimize environmental impact.
Common Mistakes Checklist:
-
Inadequate anchoring of the foundation
-
Insufficient foundation depth
-
Use of subpar or non-corrosion-resistant materials
-
Skipping proper site assessment
-
Not following manufacturer installation guidelines
-
Lack of reinforcement in high-wind areas
-
Neglecting professional engineering advice for complex projects
By recognizing and avoiding these mistakes, you ensure your street lighting project delivers safe, long-lasting, and sustainable results.
Maintenance Solutions
Keeping your solar street lights in top condition requires a proactive approach to maintenance. You need to schedule regular maintenance to ensure the foundation and pole remain stable and corrosion-free. By following a structured maintenance plan, you can achieve a longer life of solar street lights and reduce unexpected repair costs.
Inspections
Routine inspections form the backbone of effective maintenance. You should inspect each solar street light foundation at least twice a year. This process helps you spot early signs of damage and address them before they escalate.
Cracks
Cracks in concrete foundations can compromise structural integrity and expose internal steel reinforcement to moisture. During regular maintenance, check for visible cracks or spalling. Use a flashlight to inspect the base, especially after heavy rain or freeze-thaw cycles. If you find any cracks, seal them promptly with a high-quality concrete repair compound. Sealing prevents water infiltration and corrosion, supporting a longer life of solar street lights.
Tip:
Document all cracks and repairs in a maintenance log. This record helps you track recurring issues and plan future inspections.
Shifts
Foundation shifts can cause poles to lean or become unstable. You should check for any movement by gently pushing the pole and observing its response. Look for gaps between the base and surrounding soil or concrete. If you notice any shifts, recompact the soil or adjust the base as needed. Addressing shifts during regular maintenance prevents tilting and ensures the safety of your lighting system.
Corrosion Prevention
Corrosion is a leading cause of foundation failure in solar street lights. You must implement effective corrosion prevention strategies to protect steel and concrete components.
Coatings
Applying protective coatings is essential for maintenance and durability. Hot-dip galvanization provides a robust zinc layer that chemically bonds with steel, offering over 20 years of corrosion resistance. Powder coating adds an extra environmentally friendly barrier, extending the longer life of solar street lights. Inspect poles for flaking paint or exposed steel during regular maintenance. Touch up any damaged areas with zinc-rich paint or reapply powder coating as needed.
- Hot-dip galvanization protects both inside and outside surfaces.
- Powder coating offers a long-lasting finish.
- Touch-up paint repairs minor damage and prevents rust.
|
Coating Type |
Protection Level |
Maintenance Frequency |
Notes |
|---|---|---|---|
|
Hot-dip Galvanizing |
High |
Every 5 years |
Best for steel poles |
|
Powder Coating |
Medium-High |
Every 3 years |
Eco-friendly, aesthetic |
|
Zinc-rich Paint |
Medium |
Annually |
For touch-ups |
Drainage
Proper drainage is vital for maintenance and corrosion prevention. Water accumulation at the base increases the risk of rust and concrete degradation. You should inspect drain holes and base covers during regular maintenance. Clear any blockages and ensure water flows away from the foundation. For concrete bases, check for pooling water and improve site grading if necessary. Good drainage supports a longer life of solar street lights and reduces corrosion risk.
Alert:
Neglecting drainage can lead to rapid deterioration of both steel and concrete foundations. Always include drainage checks in your maintenance routine.
By prioritizing regular maintenance, thorough inspections, and effective corrosion prevention, you ensure your solar street lights remain safe, efficient, and reliable for years.
Rackora Case Study
Kenya Project
Community Impact
When you look at the transformation in Ngoma Village, Kenya, you see the true value of a well-designed solar lighting system. The local council faced challenges with unreliable power and high costs from diesel generators. By choosing an off-grid solar power solution, the community gained access to consistent lighting for the first time. You notice that the new street lights allow residents to walk safely at night, support local businesses, and extend community activities after sunset. The high-efficiency solar panels capture sunlight throughout the day, storing energy for reliable illumination each night. This project demonstrates how solar technology can deliver a reliable energy supply and improve the quality of life in rural areas.
The Kenya project shows that solar lighting does more than brighten streets—it empowers communities and supports sustainable growth.
Safety Results
You can measure the impact of the new lighting system by the drop in nighttime accidents. After installing the solar street light solution, Ngoma Village saw a 45% reduction in accidents on its main road. The reliable lighting system helps drivers and pedestrians see hazards clearly, reducing risks and improving overall safety. The community no longer depends on expensive, polluting generators. Instead, you benefit from a clean, renewable energy source that keeps the streets well-lit and secure. The project also eliminated diesel costs, saving thousands of dollars each year.
T-7 Integrated Solar Street Light
Product Benefits
When you select the T-7 Integrated Solar Street Light, you invest in a product designed for performance and durability. The T-7 uses advanced LED technology and high-efficiency solar panels to deliver bright, even lighting across wide areas. Its smart control system adjusts brightness based on the time of night, optimizing energy use and extending battery life. The all-in-one design simplifies installation and reduces maintenance. You get a lighting solution that withstands harsh weather, resists corrosion, and provides reliable operation year-round. The T-7 supports both urban and rural projects, making it a versatile choice for any street lighting need.
|
Feature |
Benefit |
|---|---|
|
High-efficiency panels |
Maximum energy capture and storage |
|
Smart control system |
Optimized energy use and longer battery life |
|
Durable construction |
Reliable performance in all environments |
|
All-in-one design |
Fast, simple installation |
Customer Feedback
You hear positive feedback from communities and project managers who use the T-7 Integrated Solar Street Light. In Kenya, local leaders praise the system for its reliable performance and low maintenance needs. Councilor Amina Wanjiku described the lighting as a perfect fit for Ngoma Village, highlighting the automatic brightness adjustment and energy savings. Residents appreciate the improved safety and the ability to enjoy outdoor activities after dark. When you choose the T-7, you join a growing number of satisfied users who trust Rackora for dependable, sustainable lighting solutions.
Compliance & Cost
Codes
Permits
You must secure the right permits before starting any solar street light foundation project. Local authorities often require you to submit detailed plans that show the foundation type, installation depth, and safety measures. These permits help ensure your project meets zoning laws and environmental guidelines. If you skip this step, you risk fines or forced removal of your installation. Always check with your city or county office for the latest requirements. Permits also protect you from liability in case of accidents or disputes.
Standards
You need to follow industry standards to guarantee the safety and durability of your solar street light foundations. Standards cover everything from concrete strength to corrosion protection and electrical grounding. For example, you may need to use concrete with a minimum compressive strength or steel poles with certified galvanization. These standards help you avoid structural failures and ensure your installation lasts for years. Following recognized codes also makes it easier to pass inspections and receive approval from local authorities.
Tip:
Always keep copies of your permits and inspection reports. These documents prove compliance and help resolve any future issues.
Budget
Material Costs
Material selection plays a major role in your overall budget. You must balance initial costs with long-term durability and maintenance. For most projects, foundation materials and construction cost around $300 per unit. The choice of material affects both upfront and lifecycle expenses.
|
Material Type |
Initial Cost Impact |
Durability / Service Life |
Maintenance Cost Impact |
Environmental Suitability |
|---|---|---|---|---|
|
Q235B Steel (Hot-dip galvanized) |
Cost-effective; balanced price and strength |
20-25 years |
Low if galvanized |
Most environments except extreme corrosion |
|
Stainless Steel |
30-50% more expensive |
Superior corrosion resistance |
Very low |
Coastal or advanced projects |
|
Cold-dip Galvanized Steel |
10-15% cheaper upfront |
Rusts within 5-10 years |
High maintenance/replacement |
Not for humid/coastal areas |
|
Aluminum |
Higher initial cost |
Corrosion resistant |
Low; offsets upfront cost |
Humid/coastal; lightweight |
|
Fiberglass |
Higher initial cost |
Corrosion resistant; flexible |
Very low |
Harsh weather/electrical safety zones |
Steel poles offer high strength and a lower price, but you need to maintain them to prevent rust. Aluminum and fiberglass cost more at first, but their corrosion resistance and low maintenance can save money over time, especially in harsh climates. If you have a tight budget, hot-dip galvanized steel provides a good balance between cost and durability.
Labor
Labor costs add another layer to your budget planning. For each solar street light, you can expect to pay around $100 for foundation and installation labor. The total installation cost per lamp, including both labor and materials, usually ranges from $150 to $300. Foundation pouring and cable routing often account for 30% to 40% of your total installation fees. If you work in challenging environments like mountains or wetlands, these costs can rise by 20% to 50% due to extra labor and materials.
|
Cost Component |
Typical Cost per Unit |
|---|---|
|
Foundation materials and construction |
Around $300 |
|
Labor costs for foundation/install |
Around $100 |
|
Total installation cost per lamp |
$150 - $300 |
Note:
Investing in quality materials and skilled labor reduces long-term costs by minimizing repairs and replacements. Always factor in environmental conditions and local wage rates when planning your budget.
You build strong, sustainable solar street lights by following best practices: analyze wind loads, select the right foundation depth, use corrosion-resistant materials, and ensure proper installation. Choosing eco-friendly solutions like Rackora’s T-7 Integrated Solar Street Light delivers reliable energy, reduces environmental impact, and supports longer life of solar street lights. Portable solar street lights offer flexibility for diverse projects. For sustainable results, consult professionals or explore Rackora’s website to maximize safety, efficiency, and street lighting performance.
FAQ
How deep should you set the foundation for a solar street light?
You should set the foundation at least 10% of the pole height. For a 10-meter pole, dig a minimum 1-meter deep hole. This depth provides stability against wind and environmental loads.
What materials work best for solar street light foundations?
Hot-dip galvanized steel and reinforced concrete offer excellent durability and corrosion resistance. You can also use aluminum or fiberglass for harsh climates. Always choose materials that meet industry standards for strength and longevity.
Can you install solar street lights in areas with poor soil?
Yes, you can use screw piles or precast bases for unstable or soft soils. These foundation types provide immediate load-bearing capacity and minimize site disturbance. Soil assessment helps you select the best solution.
How long does it take to install Rackora’s T-7 Integrated Solar Street Light?
You can complete installation in about 10 minutes per unit. The all-in-one design eliminates complex wiring and trenching, making the process fast and straightforward.
Do you need special permits for solar street light installation?
Most locations require permits for foundation work and electrical connections. You should check with local authorities before starting your project. Permits ensure compliance with safety and zoning regulations.
How often should you inspect solar street light foundations?
You should inspect foundations at least twice a year. Look for cracks, shifts, and signs of corrosion. Regular inspections help you catch problems early and extend the life of your lighting system.
What maintenance does the T-7 Integrated Solar Street Light require?
You need to clean the solar panel and check for loose bolts or corrosion. The T-7’s durable construction minimizes maintenance. Routine inspections and cleaning keep your system operating efficiently.