You can install solar landscape spotlights in your yard with ease. Solar-powered lighting brings energy efficiency, environmental friendliness, and cost-effectiveness to your outdoor space. You don’t need wiring or special skills—just place and enjoy. Rackora’s Solar Waterproof Lawn Lights offer warm illumination, simple setup, and stylish design. Homeowners often ask if solar lights work on cloudy days or in winter, and you’ll find these lights perform well in most conditions. Get ready to transform your yard quickly and enjoy lasting results.
Key Takeaways
- Solar landscape spotlights are easy to install without wiring or special skills. Just place them in sunny spots and enjoy.
- Gather simple tools like a small shovel, measuring tape, and gardening gloves to prepare for installation.
- Choose Rackora’s Solar Waterproof Lawn Lights for their stylish design, long battery life, and high waterproof rating.
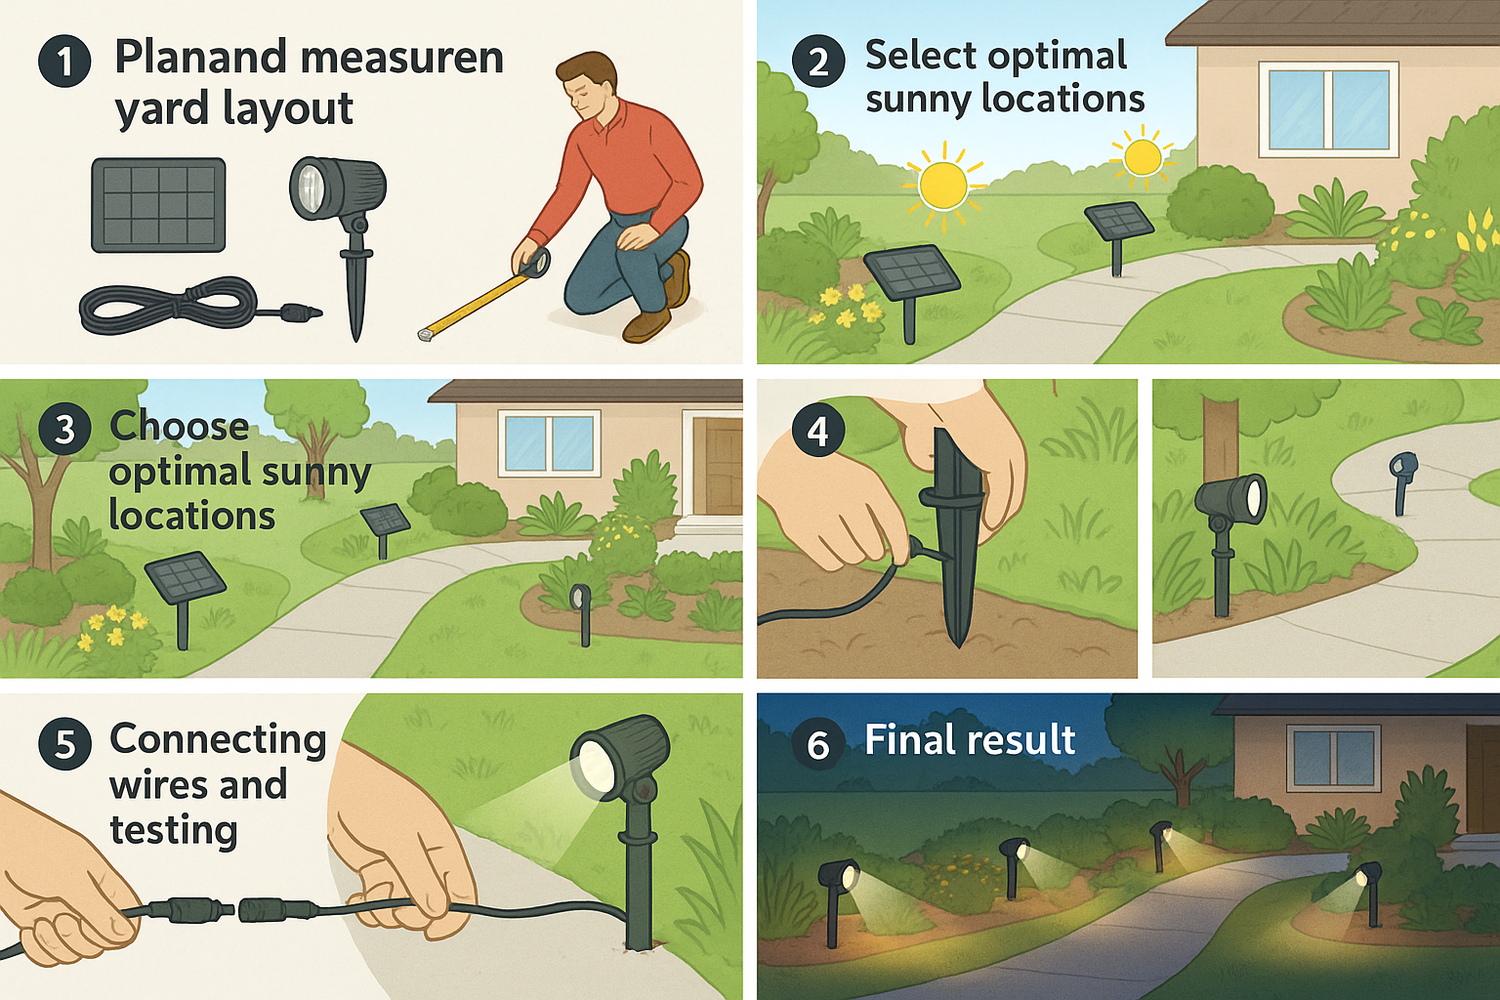
- Plan your layout by assessing your yard during the day. Highlight features like trees or pathways for the best effect.
- Ensure solar lights receive at least six hours of direct sunlight daily for optimal performance.
- Follow simple steps to install: unpack, assemble, pick a sunny spot, insert the stake, and turn on the light.
- Regular maintenance includes cleaning solar panels and checking batteries to keep your lights shining bright.
- Enjoy the benefits of energy-efficient lighting that enhances your yard's beauty while saving on electricity costs.
Tools & Materials
What You Need
Before you start installing solar landscape spotlights, gather a few simple tools and materials. You don’t need anything fancy or expensive. Most items are probably already in your garage or shed. Here’s what you’ll want to have on hand:
- Solar landscape spotlights (like Rackora’s Solar Waterproof Lawn Lights)
- Stakes (usually included with the lights)
- Small shovel or hand trowel (for loosening soil)
- Gardening gloves (to protect your hands)
- Measuring tape (for spacing lights evenly)
- Soft cloth (for cleaning the solar panels)
- Marker flags or sticks (to mark placement spots)
Tip: If your soil is rocky or compacted, a sturdy hand trowel makes the job much easier. You can also use a rubber mallet to gently tap stakes into the ground if needed.

You don’t need any wiring, power tools, or electrical knowledge. Solar spotlights are designed for easy, stress-free installation. You can finish the job in less than an afternoon.
Why Choose Rackora
When you pick solar spotlights for your yard, you want something reliable, stylish, and built to last. Rackora’s Solar Waterproof Lawn Lights stand out from the crowd. These lights combine modern design with advanced technology, making them a top choice for homeowners who care about both looks and performance.
Let’s see how Rackora’s lights compare to other leading brands:
|
Feature |
Other Leading Brands |
|
|---|---|---|
|
Color Temperature |
3000K (warm white) |
Varies (often cooler tones) |
|
Battery Type |
LiFePO4 |
NiMH or NiCd |
|
Battery Life |
Up to 24 hours |
1-5 years depending on type |
|
Waterproof Rating |
IP66 |
Varies (often IP44 or IP65) |
|
Solar Panel Type |
Monocrystalline |
Varies (often polycrystalline) |
|
Durability |
Corrosion-resistant housing |
Varies (often less durable) |
You get a warm, inviting glow with Rackora’s 3000K color temperature. The LiFePO4 battery lasts longer and charges efficiently. The IP66 waterproof rating means these lights handle rain, snow, and sprinklers without a problem. The monocrystalline solar panel grabs more sunlight, so your lights stay bright all night.
Rackora also makes things easy for you after your purchase. You get a solid warranty that covers defects, so you’re protected if anything goes wrong. The return policy is hassle-free, letting you shop with confidence. If you have questions, customer support is just an email away at service@rackorapro.com.
Note: Rackora’s Solar Waterproof Lawn Lights don’t just look good—they’re built for real life. You can count on them to work night after night, season after season.
With the right tools and a premium product like Rackora’s, you’re ready to light up your yard and enjoy beautiful, worry-free evenings outdoors.
Layout Planning
Assessing Your Yard
Start by taking a walk around your yard during the day. Look at the areas you want to highlight or make safer. Maybe you have a beautiful tree, a winding pathway, or a cozy patio that could use some extra glow. Notice where people walk most often and where you want to draw attention after dark.
Think about the features that stand out. Spotlights work best when you use them to showcase something special. For example, angling a light upward at a tree trunk or placing two lights on either side of a garden sculpture can create dramatic shadows and make your landscape pop. If you have steps or uneven ground, consider adding pathway lighting for safety and guidance.
Tip: Take photos of your yard at different times of the day. This helps you remember which spots get the most sun and which areas you want to highlight at night.
Sunlight & Placement
Solar lights need sunlight to work their magic. Check how much direct sun each area receives. Some regions, like California or Arizona, get plenty of sunshine, so your solar spotlights will charge quickly and shine brightly. If you live in a place with more clouds or shorter days, like the Pacific Northwest, you might need to pick spots that get the most daylight or choose solar lights designed for low-light conditions.
Place your Rackora Solar Waterproof Lawn Lights where they can soak up the sun for at least six hours a day. Avoid putting them under thick tree canopies or near tall fences that cast heavy shadows. Remember, the more sunlight the solar panel gets, the longer and brighter your lights will shine at night.
Note: Seasonal changes affect sunlight. In summer, your lights will charge faster and stay on longer. In winter, you may notice shorter lighting times, but Rackora’s efficient panels help maximize performance year-round.
Design Tips
You can create a stunning outdoor look with a few simple design tricks. Try layering your lighting by mixing ambient, task, and accent lights. This gives your yard depth and balance. Use spotlights to highlight trees, flower beds, or architectural features. Uplighting and downlighting can make your home’s exterior look even more impressive.
Here are some popular trends and ideas for 2024:
- Choose energy-efficient LED fixtures for longer life and less heat.
- Use solar-powered lights for pathways and garden accents to save energy and money.
- Combine modern spotlights with LED patio string lights for a cozy, stylish vibe.
- Match the style and material of your lights to your home and landscape for a cohesive look.
- Think about the environment—minimize light pollution and pick weather-resistant fixtures like Rackora’s IP65-rated lights.
A well-planned layout not only makes your yard safer but also boosts its beauty and value. Take your time, experiment with placement, and enjoy the creative process. Your outdoor space will thank you!
Assembly
Unboxing Rackora Lights
Opening your new Rackora Solar Waterproof Lawn Lights feels a bit like unwrapping a gift for your yard. Inside the box, you’ll find everything you need to get started. Each light comes with a sturdy stake, a solar panel already attached, and a user-friendly instruction sheet. You don’t need to hunt for extra parts or worry about missing pieces. Rackora packs each component securely, so nothing gets damaged during shipping.
Take a moment to lay out all the parts on a flat surface. This helps you see what you have and makes the next steps easier. You’ll notice the lights have a sleek, modern look. The materials feel solid in your hands. The ABS and PC construction means these lights can handle outdoor life, rain or shine.
Tip: Keep the packaging until you finish installing the lights. If you need to move or store them later, the box comes in handy.
Setup Steps
You don’t need to be an expert to assemble these solar spotlights. Rackora designed them for quick, hassle-free setup. You won’t need any tools or extra hardware. Just follow these simple steps, and you’ll have your lights ready in minutes:
- Unpack your solar lights. Check that you have all the parts: the light, the stake, and the solar panel.
- Assemble the light. Attach the stake to the bottom of the light. The pieces snap together with a satisfying click.
- Pick your spot. Choose a sunny area in your yard. The solar panel needs direct sunlight for the best performance.
- Insert the stake. Push the stake into the ground until it feels secure. If the soil is tough, loosen it with a small shovel first.
- Turn on the switch. Look for the button switch under the solar panel. Press it to activate the light. The built-in sensor will handle the rest, turning the light on at dusk and off at dawn.
That’s it! You’ve just finished the main part of installing solar landscape lights. Rackora’s design means you don’t have to mess with wires or complicated instructions. The lights start charging as soon as you set them up, so you can enjoy a warm, inviting glow by nightfall.
Note: If you want to adjust the angle of the light, you can gently tilt the head before pushing the stake all the way in. This lets you highlight your favorite garden features with ease.
Rackora’s Solar Waterproof Lawn Lights make outdoor lighting simple and enjoyable. You get a premium look and reliable performance without any stress. Now, you’re ready to move on to preparing the ground and placing your lights exactly where you want them.
Ground Prep
Soil & Surface
Getting the ground ready makes installing your solar spotlights much easier. You want each light to sit securely and soak up as much sunlight as possible. Start by checking the area where you plan to place your Rackora Solar Waterproof Lawn Lights. Walk around and look for rocks, roots, or debris that might get in the way. You want a clean spot for each stake.
Here’s a quick checklist to help you prep the soil:
- Remove leaves, sticks, and stones from the installation area.
- Loosen the soil with a small shovel or hand trowel. Soft soil lets you push the stake in without much effort.
- If you find the ground is packed hard, try moistening it with a little water. This trick helps you avoid bending the stake or damaging the light.
- Make sure the spot gets direct sunlight. The solar panel needs a clear view of the sky for the best charging.
Tip: If you’re working in clay or rocky soil, dig a small pilot hole before inserting the stake. This step saves you time and keeps your lights straight.
You don’t need to be a landscaping pro. Just spend a few minutes prepping each spot. Your lights will stay upright and shine brighter all night.
Marking Spots
Now you’re ready to mark where each light will go. Planning the layout helps you get even spacing and a balanced look. Grab some marker flags, sticks, or even small stones. Place them where you want each spotlight to stand. Step back and look at the whole area. Does the arrangement highlight your favorite features? Are the lights spaced evenly along the path or garden bed?
Try these simple steps for marking your spots:
- Walk the area during the day. Notice where sunlight hits and where shadows fall.
- Use a measuring tape to space the lights evenly. Most people like to keep spotlights about 6 to 8 feet apart for a natural look.
- Place a marker at each spot. Adjust as needed until you’re happy with the layout.
- Double-check that each marker sits in a sunny location. Avoid placing lights under thick bushes or behind large rocks.
Note: If you want to create a dramatic effect, stagger the lights or angle them toward trees, sculptures, or flower beds.
Take your time with this step. A little planning now means you’ll love the way your yard looks at night. Once you’ve marked all your spots, you’re ready to move on to installing your Rackora Solar Waterproof Lawn Lights. Your prep work sets the stage for a beautiful, glowing landscape.
Installation
Installing Outdoor Solar Lights
You’ve picked your spots and prepped the ground. Now comes the fun part—installing outdoor solar lights and seeing your yard transform. Rackora’s Solar Waterproof Lawn Lights make this process quick and satisfying. You don’t need any wiring or electrical skills. Just follow these steps and you’ll have a glowing landscape in no time.
- Insert the Stake: Take each light and push the stake into the prepared soil. If the ground feels tough, wiggle the stake gently or use a small shovel to loosen the dirt first. Make sure the light stands upright and feels secure.
- Position the Solar Panel: Angle the solar panel so it faces south. This direction captures the most sunlight during the day, which helps your lights charge fully. Avoid placing the panel under bushes, trees, or anything that casts heavy shade.
- Turn On the Light: Find the button switch under the solar panel. Press it to activate the light. The built-in sensor will handle the rest, turning the light on at dusk and off at dawn.
- Check for Even Spacing: Step back and look at your arrangement. Adjust the spacing if needed to keep things balanced and visually appealing.
- Let Them Charge: Give your outdoor solar lights a full day in the sun before expecting maximum brightness at night. Six to eight hours of sunlight usually does the trick.
Tip: Don’t cluster all your lights in one area. Spread them out to avoid uneven lighting and harsh shadows. Over-lighting can make your yard feel uncomfortable, so aim for a natural, inviting glow.
Rackora’s lights require no wiring at all. You won’t have to worry about tangled cords or finding an outdoor outlet. The IP65 waterproof rating means these lights can handle rain, dust, and even water jets. Here’s how that compares to other common outdoor lighting:
|
IP Rating |
Protection Level |
Best Use Case |
|---|---|---|
|
IP44 |
Splash-resistant |
Covered patios, porches |
|
IP65 |
Water jets, dustproof |
Gardens, pathways, open yards |
|
IP67 |
Temporary submersion |
Poolside, heavy rain areas |
With IP65, you get peace of mind knowing your lights will shine through all seasons.
Adjusting Angles
Getting the right angle makes a big difference in how your yard looks at night. You can highlight trees, sculptures, or flower beds just by tilting the light head. Here’s how to make the most of your outdoor solar lights:
- Angle the light upward at tree trunks to show off their texture and shape.
- Use two lights on a statue or garden feature for balanced shadows and a dramatic effect.
- Point the lights away from windows to reduce glare inside your home.
- Try staggering the angles along a pathway for a layered, professional look.
You can adjust the angle before you push the stake all the way in. Test different positions until you find the one that highlights your favorite features. If you want to change things up later, just pull the stake out, reposition, and set it back in the ground.
Note: Local weather and sunlight patterns can change with the seasons. If you notice your lights aren’t charging as well in winter, try moving the solar panel to a sunnier spot or adjusting the angle for better exposure.
Installing outdoor solar lights is all about experimenting and finding what works best for your space. With Rackora’s easy-to-adjust design, you can refresh your look anytime. Enjoy the process and watch your yard come alive after dark!
Testing
Solar Landscape Spotlights Check
You’ve finished installing your solar flood lights and set up your outdoor lighting. Now it’s time to make sure everything works as expected. Testing your solar landscape spotlights during the day helps you catch any issues early. Start by pressing the power button on each light. Listen for a clear click. If the light doesn’t turn on, cover the solar panel with your hand to simulate nighttime. This should trigger the light sensor.
Sometimes, you might notice a light turns off after a few seconds or doesn’t turn on at all. Don’t worry—these are common issues with solar flood lights. Here’s a quick table to help you troubleshoot:
|
Issue |
Suggested Resolution |
|---|---|
|
Lights turn off after a few seconds |
- The battery may be low. |
- Adjust the lighting duration in the AiDot app under 'Settings'. | | Lights do not turn on | - Check for nearby light sources interfering with the solar panel.
- Charge the light and cover the panel to test.
- Make sure you hear a clear click when pressing the power button. | | App connection issues | - Keep your phone and light within 98 feet in an open area.
- Enable Bluetooth on your phone.
- Long-press the red button for 5 seconds to enter the light cycle.
Tip: If you’re using smart solar flood lights, always check the app settings and keep your devices close together for easy pairing.
Testing your outdoor lighting during the day ensures you get the best results at night. You’ll spot any problems before they affect your evening ambiance.
Nighttime Adjustment
When the sun goes down, your outdoor lighting comes to life. Nighttime is the perfect moment to fine-tune your solar flood lights for maximum effect. Walk around your yard and see how each spotlight illuminates your favorite features. You can adjust the angle and position to create dramatic highlights or soft glows.
Here are some techniques to help you get the most out of your solar flood lights:
- Position adjustable spotlights to highlight trees, statues, or architectural details.
- Direct lights at tall plants or sculptures to draw attention and add charm.
- Move lights away from windows to reduce glare inside your home.
Try these steps for a professional look:
- Angle lights upward at tree trunks to showcase their texture.
- Use two lights on a statue for balanced shadows and a striking effect.
- Position lights so they don’t shine directly into windows or seating areas.
Spotlights work best when they focus on specific features. You’ll notice how outdoor lighting transforms your yard, making it safer and more inviting. Experiment with different angles and placements. You can always adjust your solar flood lights as your landscaping changes or as you add new garden elements.
🌙 Pro Tip: Take a few photos of your yard at night. Compare different lighting setups and choose the one that makes your outdoor space feel magical.
Testing and adjusting your solar flood lights ensures your outdoor lighting looks great every evening. You’ll enjoy a cozy, well-lit yard that shows off your home’s best features.
Maintenance
Keeping your solar landscape lighting in top shape is easy and doesn’t take much time. You want your yard to look great every night, so a little routine care goes a long way. Rackora’s Solar Waterproof Lawn Lights are designed for low-maintenance use, but you can make them last even longer with a few simple habits.
Cleaning Panels
Clean solar panels help your solar landscape lighting shine bright. Dust, pollen, and bird droppings can block sunlight and reduce charging efficiency. You should wipe the panels with a soft cloth every few weeks. If you notice your solar pathway lights looking dim, check for dirt or debris. Avoid harsh chemicals or rough sponges, as these can scratch the surface. A gentle cleaning keeps your solar pathway lights working at their best.
Tip: Clean panels after heavy rain or wind. This helps remove any mud or leaves that might stick to the surface.
Battery Care
The rechargeable batteries in solar landscape lighting usually last between one and two years. You might notice the lights don’t stay on as long or seem less bright. These are signs the battery needs replacing. You can find replacement batteries at most hardware stores. Swap out the old battery for a new one and your solar pathway lights will glow like new.
- Average battery lifespan: 1-2 years
- Signs you need a new battery:
- Shorter runtime at night
- Lower brightness than usual
Rackora’s design makes battery replacement simple. You don’t need special tools or technical skills. Just follow the instructions in the user manual.
Troubleshooting
Sometimes, solar landscape lighting doesn’t work as expected. Maybe a light won’t turn on, or it flickers. You can fix most problems with a few quick checks.
- Check the driver power supply for stable brightness.
- Make sure the voltage is steady. If you have issues, a voltage stabilizer can help.
- Replace the dimmer or check if it matches your spotlight.
- Avoid low-quality LED spotlights. They often cause flickering or dim light.
- Upgrade to a high-frequency drive system for better stability.
If you still have trouble, look at the solar panel and battery. Clean the panel and check the battery connection. Most issues with solar pathway lights come from dirt or old batteries.
Here’s a handy table for seasonal maintenance routines:
|
Season |
Maintenance Task |
|---|---|
|
Spring |
Check for damage from snow, salt, or frost. Clean lenses and adjust fixtures. |
|
Summer |
Protect fixtures from lawn care tools and fertilizer. Adjust timers for longer daylight. |
|
Fall |
Clear away leaves and debris. Prepare for earlier sunsets with timer adjustments. |
|
Winter |
Remove snow and ice gently. Avoid harsh tools to prevent damage. |
You don’t need to spend much time on upkeep. Solar landscape lighting from Rackora is built to last and handle all kinds of weather. With regular cleaning, battery checks, and seasonal care, your solar pathway lights will keep your yard bright and beautiful year-round.
You’ve seen how simple it is to install solar landscape spotlights with just a little planning. When you choose Rackora’s Solar Waterproof Lawn Lights, you get beautiful, hassle-free outdoor lighting that lasts. Solar landscape spotlights save you money and help the planet. Check out the table below to see the long-term value:
|
Lighting Type |
Installation Cost |
Operating Cost |
Long-Term Value |
|---|---|---|---|
|
Solar landscape spotlights |
Low (DIY friendly) |
Zero electricity cost |
High savings over time |
|
Wired Outdoor Lights |
Higher (professional) |
Monthly electricity bill |
Long-term reliability, brighter light |
Enjoy your upgraded yard and the cozy glow every night. When you place solar lights carefully, you maximize their effect. Share your results with friends who want solar lights for your yard. Solar landscape spotlights make your outdoor space shine.
FAQ
How long do Rackora Solar Waterproof Lawn Lights stay on at night?
You can expect up to 12 hours of warm light after a full day of charging. The built-in battery stores enough energy to keep your yard glowing from dusk until dawn.
Do I need to turn the lights on and off every day?
Nope! The smart light sensor does all the work for you. The lights turn on automatically at dusk and switch off at dawn. You just set them up and enjoy.
Will these solar lights work in winter or on cloudy days?
Yes, they still work. The monocrystalline solar panel charges even in low sunlight. You might notice shorter lighting times during long stretches of cloudy weather, but you’ll still get reliable performance.
Can I move the lights after installation?
Absolutely! You can pull up the stakes and reposition the lights anytime. Try new spots or angles to highlight different features as your landscaping changes.
Are the lights safe around kids and pets?
Yes, they’re safe. The lights use low-voltage power and have no exposed wires. The durable ABS+PC housing stands up to bumps, rain, and playful pets.
How do I clean the solar panels?
Just wipe the panels with a soft, damp cloth every few weeks. Avoid harsh cleaners or rough sponges. Clean panels help your lights charge faster and shine brighter.
What should I do if a light stops working?
First, check if the panel is clean and the battery is charged. Try replacing the battery if needed. If you still have trouble, reach out to Rackora’s support at service@rackorapro.com for help.