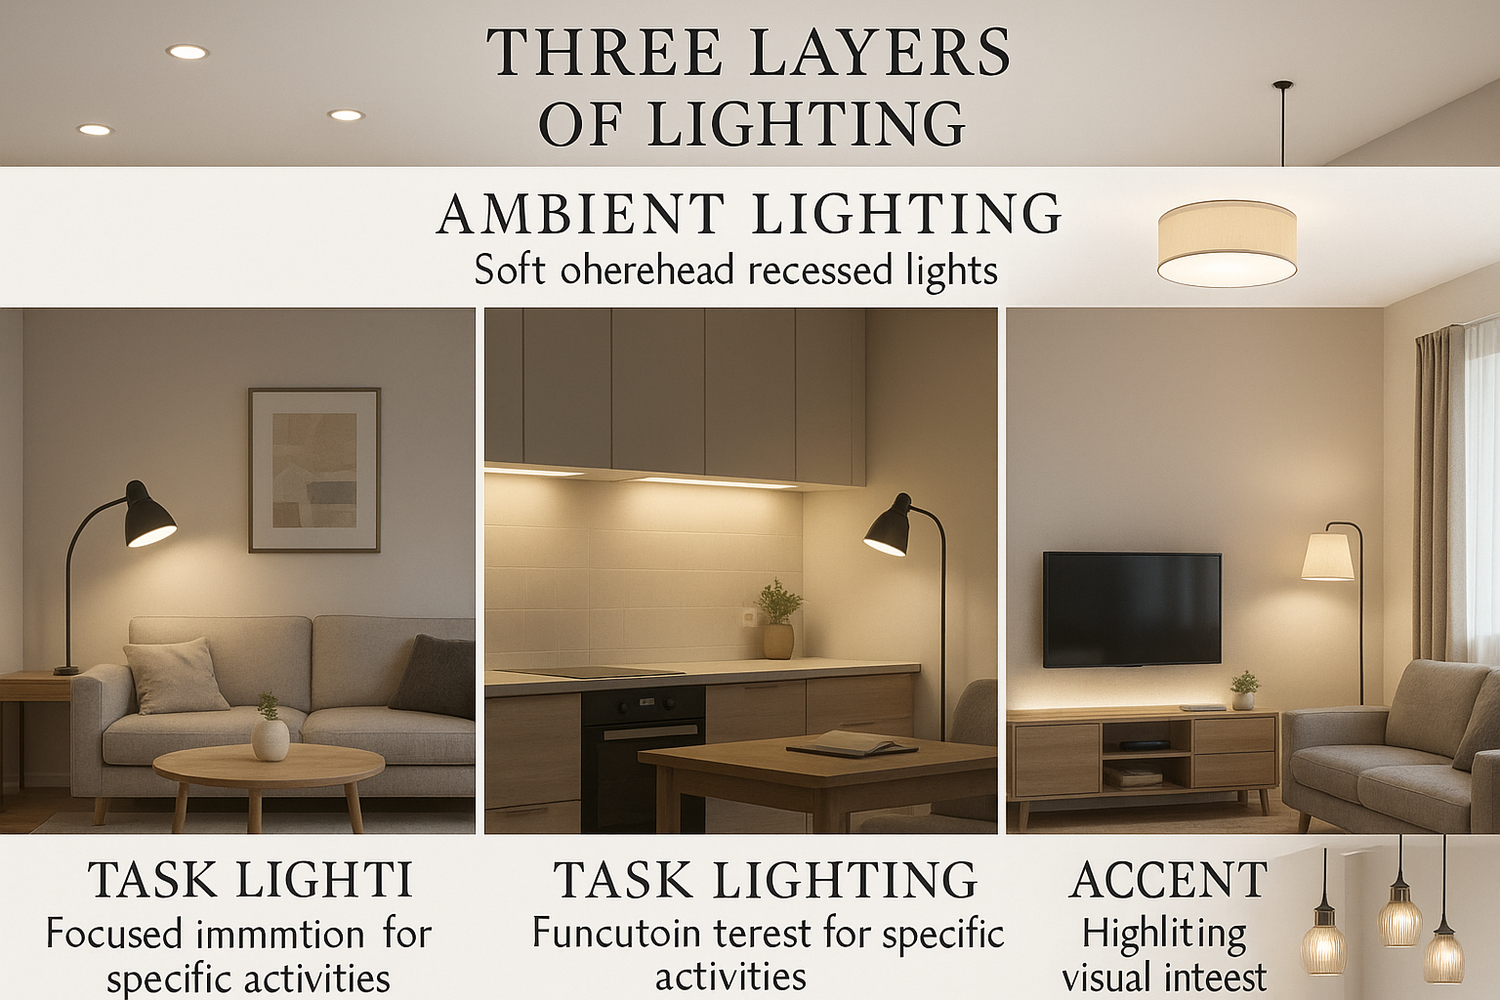
If you want a professional look in any room, start by learning how to layer home lighting. You need three key types: ambient lighting for overall brightness, task lighting for focused activities, and accent lighting to highlight features. Many people think a single chandelier or overhead light is enough, but this often leaves spaces feeling flat or dim. Some common myths about how to layer home lighting include:
- Plug-in lights are unsafe or only for temporary use, but modern options are safe, stylish, and easy to install.
- Layered lighting is only for high-end homes, but it works in any space, even if you rent.
You can create a balanced, beautiful atmosphere by following a few simple steps.
Key Takeaways
- Use three types of lighting—ambient for overall brightness, task for focused activities, and accent to highlight features—to create a balanced and inviting room.
- Apply horizontal, vertical, and depth layering techniques to make your space feel wider, taller, and more dynamic.
- Start your lighting plan by assessing the room’s purpose, activities, and features to choose the right fixtures and placement.
- Plan ambient lighting first to set a comfortable base, then add task lights for work areas, and finish with accent lights to showcase special details.
- Choose bulbs with matching color temperatures in each room to keep lighting consistent and support the room’s mood and function.
- Use dimmer switches and separate circuits to control each lighting layer independently, allowing you to adjust brightness and create different moods.
- Avoid common mistakes like relying only on overhead lights, skipping task or accent lighting, and poor fixture placement to ensure your lighting is effective and attractive.
- Smart controls and dimmers add convenience, save energy, and let you customize your lighting easily for any activity or time of day.
Lighting Layers
When you want to create a professional lighting plan at home, you need to understand the three main layers: ambient, task, and accent. Each layer serves a unique purpose and uses different fixtures. By combining these layers, you can achieve a comfortable, practical, and visually appealing space.
Ambient
Purpose
Ambient lighting gives your room its overall brightness. You use it to set the mood and make sure you can move around safely. This layer creates a base level of light that fills the entire space. You often notice ambient light sources first when you enter a room.
Fixtures
You can choose from several fixtures to provide ambient lighting. Common options include ceiling-mounted lights, chandeliers, flush mounts, and wall sconces. Floor lamps also work well, especially in living rooms or bedrooms.
|
Lighting Type |
Definition |
Purpose |
Typical Location |
Color Temperature |
Common Fixtures |
|---|---|---|---|---|---|
|
Ambient Lighting |
General illumination for the entire space |
Comfortable, glare-free brightness for visibility |
Ceiling, walls, corners |
3000–4000K |
Flush mounts, chandeliers, sconces, floor lamps |
Tip: Use dimmers with ambient lighting to adjust the mood for different times of day.
Task
Purpose
Task lighting helps you see clearly when you need to focus on specific activities. You use it for reading, cooking, studying, or applying makeup. This layer reduces eye strain and makes detailed work easier.
Fixtures
You can add task lighting with desk lamps, under-cabinet lights, pendant lights, or vanity bars. Place these fixtures close to your work areas for the best results.
|
Lighting Type |
Residential Use Cases |
Fixture Examples |
|---|---|---|
|
Task |
Home offices, kitchens, bathrooms |
Desk lamps, under-cabinet lights, pendants, vanity bars |
- Place a desk lamp on your study table for homework.
- Install under-cabinet lights in the kitchen for meal prep.
- Use a vanity bar above your bathroom mirror.
Accent
Purpose
Accent lighting draws attention to special features in your home. You use it to highlight artwork, architectural details, or collections. This layer adds depth and visual interest, making your space feel more dynamic.
Fixtures
You can create accent lighting with track lights, recessed spotlights, wall-mounted spotlights, or LED strip lights. Aim these fixtures at the objects or areas you want to showcase.
|
Lighting Type |
Residential Examples |
Typical Fixtures and Applications |
|---|---|---|
|
Accent |
Highlighting artwork, bookshelves |
Track lighting, spotlights, LED strips |
- Shine a spotlight on a painting or sculpture.
- Use LED strips to outline shelves or cabinets.
- Install recessed lights to wash a feature wall with light.
Note: Accent lighting works best when you use it sparingly to create contrast and highlight what matters most.
A well-designed room uses all three layers. Ambient lighting sets the tone and ensures comfort. Task lighting supports your daily activities and prevents eye strain. Accent lighting adds style and draws the eye to your favorite features. If you rely on only one type, your space may feel flat or impractical. By layering these lights, you create a balanced, functional, and beautiful environment that suits every need.
Layered Lighting Techniques
When you want to master light layering, you need to understand how to use horizontal, vertical, and depth layering. Each technique brings a unique dimension to your space. By combining these methods, you create a room that feels balanced, dynamic, and visually appealing. Let’s break down each approach so you can apply them like a pro.
Horizontal Layering
Horizontal layering focuses on distributing light sources evenly across the width of your room. You achieve this by placing fixtures at similar eye levels, such as wall sconces, track lights, or under-cabinet strips. This method helps you create areas of interest and focal points along the walls or surfaces. For example, you might use track lighting to highlight a gallery wall or install strip lights above kitchen cabinets for a modern touch.
When you use horizontal layering, you make your room feel wider and more open. Placing lights at the same level draws the eye across the space, which visually expands the area. You also ensure even illumination at eye level, which highlights décor and wall textures. Furniture placement plays a big role in how light spreads horizontally. For instance, a floor lamp behind a sofa can create a cozy reading nook, while wall sconces on either side of a mirror add symmetry and balance.
Tip: Try mixing light sources of different intensities and intervals. This approach prevents flatness and adds subtle variation to your layered lighting.
Vertical Layering
Vertical layering involves placing light sources at different heights, from floor to ceiling. This technique adds height and drama to your room. You can use a combination of floor lamps, table lamps, pendant lights, and ceiling fixtures to achieve this effect. By layering lights vertically, you guide the eye upward and downward, making the ceiling feel higher and the space more open.
You can enhance vertical layering by using tall bookshelves, hanging curtains close to the ceiling, or placing plants at various heights. These elements work together with your lighting to create a sense of grandeur. For example, a pendant light above a dining table draws attention upward, while a low-profile sofa emphasizes the space between furniture and ceiling. Hanging artwork higher on the wall or using floor-to-ceiling curtains also boosts the illusion of height.
- Combine sheer curtains with heavier drapes hung near the ceiling to make windows look taller.
- Group décor items in odd numbers and vary their heights for visual rhythm.
- Place plants on the floor, shelves, and tables to add natural layers.
- Use mirrors to reflect light and expand the sense of space.
- Mix materials like wood, metal, and glass for added texture.
Vertical layering not only affects how tall your room feels but also adds depth and interest. When you use light layering at different heights, you create shadows and highlights that bring your space to life.
Depth Layering
Depth layering is the heart of layered lighting. This technique uses a mix of ambient, task, and accent lighting to create a multi-dimensional environment. You start with ambient lighting for overall brightness, add task lighting for specific activities, and finish with accent lighting to highlight features. By combining these layers, you give your room depth, texture, and focus.
To achieve effective depth layering, you need to use multiple light sources. Experts recommend using between 7 and 13 light sources per room. This range includes ceiling lights, wall sconces, table lamps, floor lamps, and accent fixtures. For ambient lighting, aim for about 20 lumens per square foot. In a 250-square-foot living room, you would need around 5,000 lumens, spread across several fixtures. Task and accent lights then supplement this base, adding dimension and visual interest.
Note: Mixing fixture types and placing them at different locations ensures your light layering feels natural and balanced. Avoid clustering all lights in one area. Instead, spread them throughout the room to highlight architectural features, artwork, and functional zones.
When you use depth layering, you create a space that feels inviting and visually rich. The interplay of different light sources supports both function and style. Your room will feel more spacious, comfortable, and tailored to your needs.
Quick Checklist for Layered Lighting:
- Use horizontal layering to widen the room and highlight walls.
- Apply vertical layering to add height and guide the eye.
- Combine ambient, task, and accent lights for depth.
- Mix fixture heights and locations for a balanced look.
- Aim for 7–13 light sources per room for best results.
By mastering these light layering techniques, you transform any space into a well-lit, stylish, and functional environment. Layered lighting is not just for designers—it’s a practical approach you can use in every room of your home.
How to Layer Home Lighting
Assess the Room
Start your layered lighting setup by carefully assessing the room. This step helps you create a lighting design that fits your needs and style. Follow these steps to make sure you cover every detail:
- Think about the main purpose of the room. Do you use it for relaxing, working, cooking, or entertaining?
- List all the activities that take place in each area. For example, you might read in the living room, cook in the kitchen, or study in a bedroom.
- Observe your daily habits. Note when you use the room and how much light you need at different times.
- Decide which features you want to highlight with accent lighting. This could include artwork, textured walls, or architectural details.
- Choose fixture styles and finishes that match your taste. Avoid installing lights you dislike.
- Determine if you are working with new construction or a remodel. This affects your wiring and fixture options.
- Look at the room’s color scheme. Darker colors absorb more light, so you may need brighter fixtures.
- Calculate the total lumens needed. Multiply the room’s square footage by 20 to estimate the ambient lighting requirement.
- Plan fixture placement and electrical needs. Mark where you want outlets, switches, and each type of light.
Tip: Sketch a simple lighting plan. Use symbols for ambient, task, and accent lighting to visualize coverage and avoid dark spots.
Plan Ambient First
Once you know the room’s needs, plan your ambient lighting. This layer forms the foundation of your layered lighting. You want to create even, comfortable brightness throughout the space.
- Assess the room size, purpose, and furniture layout. This helps you choose the right fixture types and locations.
- Check how much natural light enters the room. Notice which areas stay bright during the day and which need extra light at night.
- Select fixtures that provide broad, even illumination. Ceiling-mounted lights, flush mounts, and recessed lights work well for most rooms.
- Use soft, diffused light sources. Frosted glass shades or upward-facing fixtures help reduce harsh shadows and create a welcoming feel.
- Match fixture scale to room size. Large rooms need bigger or multiple fixtures, while small rooms look best with compact options.
- Place switches near entrances and main pathways for convenience.
- Install dimmer switches. These let you adjust the ambient light for different moods and activities.
Note: Integrate ambient lighting with your task and accent lighting layers. This ensures a balanced and flexible lighting design.
Add Task Lighting
After setting up ambient lighting, focus on task lighting. This layer supports specific activities and helps prevent eye strain. Place task lights where you need focused illumination.
- Identify the main work areas in each room. For example, kitchen counters, desks, vanities, or reading chairs.
- Position task lighting directly over these zones. Use under-cabinet lights in kitchens, desk lamps in offices, and vanity lights in bathrooms.
- Adjust the angle and height of each fixture. Aim for a 30-45 degree angle to minimize glare and shadows.
- Choose adjustable fixtures. Swing-arm lamps and flexible desk lights let you direct light exactly where you need it.
- Place lights opposite your dominant hand to avoid casting shadows while working or reading.
- Select bulbs with a color temperature between 4000K and 5000K. This range provides clear, natural light that supports focus.
- Combine task lighting with ambient light for the best results. This mix improves visibility and comfort.
|
Room |
Purpose of Task Lighting |
Recommended Fixtures and Placement Examples |
|---|---|---|
|
Kitchen |
Food prep, cooking, cleaning, reading recipes |
Under-cabinet LED strips, pendant lights over islands, recessed downlights |
|
Home Office |
Reading, writing, computer work |
Adjustable desk lamps, floor lamps, under-shelf lighting |
|
Bathroom |
Grooming, shaving, makeup application |
Vanity lights on mirror sides, overhead shower lights, LED strips around mirror |
|
Living Room |
Reading, hobbies, sewing |
Floor lamps near seating, adjustable table lamps, wall-mounted swing-arm lamps |
|
Bedroom |
Reading in bed, dressing, bedside tasks |
Bedside table lamps, wall-mounted reading lights, desk lamps |
Tip: Proper task lighting improves posture, reduces eye strain, and makes every activity easier.
By following these steps, you build a strong foundation for how to layer home lighting. You ensure each room feels comfortable, functional, and visually appealing. Continue to the next steps to complete your layered lighting design.
Include Accent Lighting
Accent lighting brings your room to life by drawing attention to special features and adding depth. You use accent lights to highlight artwork, architectural details, or collections. This layer creates drama and visual interest, making your space feel unique and inviting.
To include accent lighting in your home, follow these steps:
- Identify focal points. Look for artwork, family photos, textured walls, fireplaces, or decorative arches you want to showcase.
- Select the right fixtures. Choose from track lighting, picture lights, recessed spotlights, LED strip lights, wall-mounted sconces, or even table and floor lamps with decorative shades.
- Position lights for impact. Aim spotlights or track lights directly at artwork or gallery walls. Outline architectural features like arches or fireplaces with LED strips or recessed lighting. Place sconces near mirrors or mantels to add both light and style.
- Layer for ambiance. Combine accent lighting with your ambient and task lights. For example, use a floor lamp with uplighting in a living room corner to create a cozy glow, or add table lamps with warm shades for extra comfort.
- Highlight pathways and safety zones. Install LED strips along stair edges or hallways for both safety and style. Wall sconces can make long hallways feel more inviting.
- Consider outdoor accent lighting. Use stake lights or lanterns to highlight garden paths or patio features. Uplight trees or water features for dramatic nighttime effects.
Tip: Use dimmer switches with accent lights to control the mood and prevent harsh glare. Warm color temperatures (under 3500K) work best for accent lighting, creating a soft, inviting effect.
Accent lighting does more than just highlight objects. It adds layers, creates shadows, and brings out textures in your space. By carefully choosing fixture placement and light direction, you can transform ordinary rooms into visually stunning environments.
Choose Bulbs & Color Temperature
Choosing the right bulbs and color temperature is essential for creating the perfect atmosphere in each room. The color temperature of a bulb, measured in Kelvin (K), affects how warm or cool the light feels.
- Warm light (2700K–3000K): Use in living rooms, bedrooms, and dining rooms. This range creates a cozy, relaxing atmosphere that helps you unwind.
- Neutral to cool light (3000K–4000K): Ideal for bathrooms and areas where you need clarity, such as grooming or getting ready.
- Cool light (4000K–5000K and above): Best for kitchens, home offices, and workspaces. This light mimics daylight, boosts alertness, and helps you focus on tasks.
|
Room |
Recommended Color Temperature (K) |
Purpose / Effect |
|---|---|---|
|
Living Room |
2700K - 3000K |
Warm light for relaxation and coziness |
|
Bedroom |
2700K - 3000K |
Calming atmosphere for unwinding |
|
Home Office |
4000K and above |
Cooler light to boost alertness and productivity |
|
Bathroom |
3000K - 4000K |
Neutral to cool white for clarity and grooming |
|
Kitchen |
4000K - 5000K |
Bright, task-oriented lighting for food prep |
|
Dining Room |
Around 2700K |
Cozy, relaxing ambiance for meals |
Note: Adjust lighting color temperature based on the time of day and your activities. Warmer light in the evening can help you relax and prepare for sleep, while cooler light during the day supports productivity.
When you select bulbs, check both the color temperature and the brightness (measured in lumens). Use LED bulbs for energy efficiency and long life. Avoid mixing bulbs with very different color temperatures in the same room, as this can make the space feel disjointed.
Use Dimmers & Circuits
Dimmers and separate circuits give you full control over your layered lighting. You can adjust brightness, set the mood, and create different lighting scenes for any activity.
- Install dimmer switches for ambient, task, and accent lights. Dimmers let you smoothly transition from bright to soft lighting. You can turn a bright workspace into a cozy movie night setting with a simple adjustment.
- Use separate circuits to zone your lighting. Control each layer—ambient, task, and accent—independently. This zoning allows you to customize lighting for different times of day or activities.
- Combine multiple light sources. Table lamps, wall sconces, and overhead fixtures on different circuits give you flexibility. You can light only the areas you need, saving energy and creating the perfect atmosphere.
Tip: Dimmers and zoning not only enhance comfort but also add depth and dimension to your room. You can easily change the mood from lively to intimate with just a few adjustments.
By using dimmers and separate circuits, you make your lighting system adaptable. You support both function and style, ensuring your home always feels just right for any occasion.
Living Room Lighting
Creating the right living room lighting transforms your space into a comfortable, stylish, and functional area. You need to layer different types of light to achieve the best results. By combining ambient, task, and accent lighting, you can support every activity and highlight your favorite features.
Ambient Options
Start with ambient lighting to set the overall mood. In your living room, you have several effective options:
- Chandeliers: These fixtures serve as a visual centerpiece. Choose a style that matches your décor, from modern to classic. Dimmable chandeliers let you adjust the brightness for movie nights or gatherings.
- Flush and Semi-Flush Mount Lights: These work well if your ceiling is low. They provide even light without taking up much space.
- Recessed Lighting: Install these for a clean look. They spread light across the room and work best when combined with other fixtures for a cozy feel.
- Wall Sconces: Mount these on the walls to add both light and artistic flair. Sconces can project light upward, making your living room feel more spacious.
- Floor and Table Lamps: Place these around the room for soft, intimate light. They are easy to move and come in many styles to match your furniture.
- LED Strip Lights: Use these along ceilings or baseboards for a subtle glow. They can highlight architectural details or add drama to your living room lighting.
Warm light (2700–3000K) creates a relaxing atmosphere. Use dimmers to control the mood and make your living room lighting flexible for any occasion.
Task Ideas
You need task lighting for activities like reading, working, or hobbies. Place lamps near seating areas to provide direct, focused light. Here are some ideas:
- Table Lamps: Set these on side tables next to sofas or chairs. They give you bright, targeted light for reading or crafts.
- Adjustable Floor Lamps: Position these beside armchairs or couches. You can direct the light exactly where you need it.
- Desk Lamps: If you have a workspace in your living room, use a desk lamp with a cool white bulb (above 4000K) to boost focus.
- Independent Controls: Make sure you can turn task lights on or off separately from other lights. This helps you create the right environment for each activity.
Distribute task lights throughout the room to balance brightness and reduce shadows. This approach makes your living room lighting both practical and comfortable.
Accent Choices
Accent lighting adds personality and highlights special features in your living room. Use it to draw attention to artwork, plants, or architectural details.
- Use decorative sconces to frame paintings or mirrors. This creates symmetry and a warm glow.
- Install wall lights above bookshelves or in dark corners to showcase collections.
- Add LED strips under shelves or behind furniture for a modern touch.
- Choose color-changing LEDs to set different moods, from calm to lively.
- Place spotlights to highlight textured walls or unique décor.
- Mix vintage and modern fixtures for a dynamic look.
Place accent lights about 6 to 8 inches from objects and 60 to 66 inches above the floor for the best effect. Combine accent lights with other layers to create depth and make your living room lighting truly stand out.
By layering these options, you create a living room lighting plan that supports every activity, enhances comfort, and expresses your style.
Light Layering in Other Rooms
Kitchen
You use your kitchen for many activities, from cooking and dining to entertaining and working. Each task needs a different type of light. Layered lighting helps you meet these needs and keeps your kitchen both functional and stylish.
Start with ambient lighting to create a welcoming glow. Ceiling-mounted fixtures or recessed lights work well for general illumination. Next, add task lighting over work areas. Place under-cabinet LED strips above countertops and install pendant lights above islands or sinks. These lights help you see clearly when chopping vegetables or reading recipes, making your kitchen safer and more efficient.
Accent lighting brings out the best features in your kitchen. Use LED strips to highlight open shelves or glass-front cabinets. Add spotlights to draw attention to a tile backsplash or a favorite piece of art. Decorative fixtures, such as a statement pendant or chandelier, can add personality and style.
Smart controls and dimmers let you adjust the brightness for cooking, dining, or relaxing. This flexibility helps you create the right mood for any occasion.
|
Lighting Layer |
Purpose |
Example Fixtures |
|---|---|---|
|
Ambient |
General illumination |
Ceiling lights, recessed cans |
|
Task |
Focused work lighting |
Under-cabinet LEDs, pendants |
|
Accent |
Highlight features |
LED strips, spotlights |
Bedroom
Layering light in your bedroom creates a space that feels both restful and practical. Begin with ambient lighting for overall brightness. Choose a ceiling fixture or a pair of wall sconces. Use warm bulbs (2700K–3000K) to make the room feel cozy and inviting.
Add task lighting to support activities like reading or getting dressed. Place table lamps or wall-mounted reading lights next to your bed. These fixtures give you focused light without disturbing the rest of the room. If you have a vanity or desk, use a small lamp or adjustable fixture for extra clarity.
Accent lighting adds depth and highlights special features. Use LED strips behind a headboard or under floating shelves. Place a small spotlight on artwork or a decorative object. Keep fixtures in scale with your room to avoid clutter.
- Combine sheer curtains and mirrors to boost natural light during the day.
- Use smart bulbs to adjust color and brightness for different moods.
- Keep surfaces clear and fixtures clean for the best effect.
A layered approach helps you relax at night and stay productive during the day.
Bathroom
Layered lighting in your bathroom improves both function and style. Start with soft ambient lighting from a ceiling fixture or recessed lights. This fills the room with even light and sets a comfortable tone.
Task lighting is essential around the mirror. Install vertical sconces or a light bar on each side of the mirror. This setup reduces shadows and helps you see clearly for grooming, shaving, or applying makeup. Choose bright, neutral bulbs (around 3000K–4000K) for the best results.
Accent lighting adds elegance and highlights design features. Use LED strips under cabinets or along shelves. Place a small spotlight on a decorative tile wall or a plant. Dimmers let you adjust the light for a relaxing bath or a bright morning routine.
Properly layered lighting makes your bathroom safer, more attractive, and easier to use.
Common Mistakes
Overhead Only
Many people rely only on overhead light sources when lighting a room. This approach creates several problems:
- You often see dark corners and strong shadows because a single ceiling fixture cannot reach every part of the space.
- Rooms feel flat and uninviting without layers of light.
- Overhead lighting alone can make large rooms look uneven, with some areas too bright and others too dim.
- Small spaces like closets or pantries may remain poorly lit if you use only a ceiling light.
When you depend on just one overhead fixture, you lose the chance to create a comfortable and balanced environment. Layered lighting, which combines ambient, task, and accent lights, improves both the appearance and function of your space. You can fix this mistake by adding wall-mounted fixtures, floor lamps, or table lamps. For larger rooms, try spacing recessed lights 6–8 feet apart in a grid. Use dimmers and separate switches to control brightness and set the mood.
Tip: Always consider your room’s layout and activities when placing lights. Multiple sources at different heights help eliminate shadows and make your home feel more welcoming.
Ignoring Task
If you skip task lighting, you make daily activities harder and less comfortable. Task lighting gives you focused illumination for reading, cooking, studying, or grooming. Without it, you may experience eye strain, headaches, and reduced productivity. Spaces without proper task lighting often have harsh shadows or glare, which makes it difficult to see clearly.
You can improve your lighting by identifying where you need extra brightness. Place desk lamps in work areas, install under-cabinet lights in the kitchen, and add vanity lights in the bathroom. Choose adjustable fixtures so you can direct light exactly where you need it. This approach increases comfort, safety, and efficiency in every room.
Note: Task lighting is essential for both function and well-being. It helps you avoid discomfort and makes your home more enjoyable to use.
Skipping Accent
Accent lighting adds depth and highlights your favorite features. If you skip this layer, your rooms may look flat and lack visual interest. Accent lights draw attention to artwork, architectural details, or collections. They also help create a more sophisticated and inviting atmosphere.
Without accent lighting, even a well-designed room can feel incomplete. You miss the chance to showcase your best elements and create emotional impact. To fix this, use spotlights, LED strips, or wall sconces to highlight special areas. Place these fixtures to bring out textures and add drama to your space.
Accent lighting does more than decorate—it completes your lighting plan and makes your home feel unique.
Poor Placement
Poor placement of lighting fixtures can ruin even the best lighting plan. You might choose beautiful fixtures and the right bulbs, but if you put them in the wrong spots, your room will not look or feel right. Many common problems come from where you place your lights and how you angle them.
- Incorrect placement and angling of fixtures often cause harsh shadows and glare. This makes your space uncomfortable and hard to use.
- Mounting lights too high reduces their impact. Task lighting, like reading lamps or under-cabinet lights, loses effectiveness if you install them above eye level.
- Hanging fixtures too low can block sightlines and create glare. You may find it hard to see across the room or enjoy your décor.
- Relying on a single central light source leaves dark corners and strong shadows. Your room will feel uneven and less inviting.
- Uneven spacing of multiple light sources creates areas that are too bright or too dark. This disrupts the balance of your lighting layers.
- Poor placement of task lighting, such as not positioning under-cabinet lights directly above work surfaces, leads to shadows that interfere with cooking or reading.
- Accent lighting needs careful direction and placement at different heights. If you do not aim spotlights or LED strips correctly, you lose the chance to highlight your favorite features.
Tip: Always plan your fixture placement based on your room’s layout and the activities you do there. Think about where you need light most and how you move through the space.
To fix poor placement, start by mapping out your room. Mark where you need ambient, task, and accent lighting. Use multiple light sources spaced out to ensure even coverage. Place task lights close to work areas, and aim accent lights at the objects you want to highlight. Adjust fixture heights so they do not cause glare or block your view. By paying attention to placement, you create a balanced, functional, and attractive lighting scheme.
Mismatched Color
Mismatched color temperatures in your lighting can make your home look disjointed and unprofessional. When you use bulbs with different color temperatures in the same space, you create visual inconsistency. Some areas may appear warm and cozy, while others look cool and stark. This unevenness breaks the flow of your design and distracts from the atmosphere you want to create.
You might notice that fixtures show two distinctly different colors. This can result in lighting that feels uneven and unattractive. For example, a living room with both warm and cool bulbs will not feel cohesive. The space may seem less inviting, and the overall quality of your lighting suffers.
Most lighting designers recommend using bulbs with the same color temperature in each room. This approach keeps your lighting uniform and supports the mood you want. Warm light works best for relaxing spaces like bedrooms and living rooms. Cooler light suits kitchens and work areas where you need clarity and focus.
Note: If you want to experiment with mixed color temperatures, do so with intention. In most cases, sticking to one color temperature per room gives you a more polished and comfortable result.
By choosing bulbs with matching color temperatures, you ensure your lighting looks professional and feels right for every activity. This simple step helps you avoid one of the most common lighting mistakes at home.
Product Picks
Ambient Fixtures
You set the mood of any room with the right ambient lighting. Start by choosing fixtures that match your space and style. Ambient lighting forms the foundation of your lighting plan, so select options that provide even, comfortable brightness.
Here are some of the most effective ambient fixtures for homes:
|
Fixture Type |
Description |
Typical Use / Feature |
|---|---|---|
|
Chandeliers |
Luxurious, elaborate ceiling fixtures designed to be statement pieces |
Provide ambient lighting and visual focal points |
|
Pendants |
Simpler ceiling fixtures offering direct downward illumination |
Used singly or in groups for ambient or task lighting |
|
Flush/Semi-Flush Mounts |
Ceiling fixtures close to the ceiling, suitable for rooms with low ceilings |
Provide accent or general lighting |
|
Recessed Lighting |
Fixtures embedded in the ceiling providing subtle, general illumination |
Ambient lighting with minimal visual intrusion |
|
Indoor Wall Sconces |
Small wall-mounted fixtures for narrow spaces like hallways |
Accent or ambient lighting in corridors or rooms |
|
Floor Lamps |
Freestanding lamps placed in corners or near seating |
General or accent ambient lighting |
You can use chandeliers to create a dramatic focal point in living rooms or dining areas. Pendants work well over kitchen islands or in entryways. Flush and semi-flush mounts fit best in rooms with low ceilings, such as bedrooms or hallways. Recessed lighting gives you a clean look and spreads light evenly across the room. Wall sconces add soft light to corridors or beside beds. Floor lamps offer flexibility and can fill dark corners with a warm glow.
Tip: Always use dimmers with your ambient fixtures. This lets you adjust the brightness for different times of day and activities.
Task Lights
Task lighting helps you see clearly when you need to focus. You use these fixtures for reading, cooking, studying, or working at a desk. Choose task lights that direct light exactly where you need it.
Consider these popular options:
- Desk Lamps: Place these on work tables or study desks. Adjustable arms let you aim the light for reading or writing.
- Under-Cabinet Lights: Install these in kitchens to brighten countertops. LED strips or puck lights work best for meal prep.
- Pendant Lights: Hang these above kitchen islands or workbenches. They provide focused light for cooking or crafts.
- Vanity Bars: Mount these above or beside bathroom mirrors. They help you see clearly for grooming or makeup.
- Swingarm Lamps: Attach these to walls near beds or reading chairs. You can move the arm to direct light where you need it.
You should always position task lights close to your work area. This reduces shadows and eye strain. Choose bulbs with a cooler color temperature (4000K–5000K) for the best clarity.
Accent Lamps
Accent lamps add personality and highlight your favorite features. You use them to draw attention to artwork, shelves, or architectural details. Accent lighting creates depth and makes your space feel unique.
Try these accent lighting ideas:
- Track Lighting: Aim adjustable heads at paintings, sculptures, or gallery walls.
- Spotlights: Use these to highlight a single object or textured wall.
- LED Strip Lights: Place these under shelves, inside cabinets, or along baseboards for a modern effect.
- Decorative Table Lamps: Set these on side tables or consoles to add color and style.
- Picture Lights: Mount these above framed art to make it stand out.
Note: Use accent lamps sparingly. Too many can overwhelm the room. Focus on a few key features you want to showcase.
By choosing the right fixtures for each layer, you create a balanced, beautiful lighting plan that works for every room in your home.
Smart Controls
Smart controls give you the power to manage your home lighting with ease and flexibility. You can adjust brightness, set schedules, and even control lights with your voice or smartphone. Adding smart dimmers and switches to your lighting plan helps you save energy and create the perfect mood for any activity.
Why Choose Smart Dimmers?
Smart dimmers let you fine-tune the brightness of your lights. You can dim the lights for a cozy movie night or brighten them for reading and homework. Many smart dimmers work with LED, incandescent, and halogen bulbs. This flexibility means you can upgrade your lighting without changing all your fixtures.
Smart dimmers help you save energy by reducing electricity use when you lower the brightness. They also extend the life of your bulbs.
Popular Smart Dimmer Features
- Remote and Automated Control: Use your phone or voice assistant to turn lights on or off, adjust brightness, or set schedules.
- Compatibility: Many models, like the Lutron Diva Caseta (LUTRON DVRF-6L-WH) and Lutron Wireless Dimmer Switch (PD-6WCL-WH), work with Amazon Alexa, Google Assistant, and Apple HomeKit.
- Multiple Control Styles: Choose from slide dimmers for manual adjustment, remote-controlled dimmers for convenience, or touch-sensitive dimmers for a modern look.
- Single Pole and Multi-Location Options: Control lights from one switch or several locations in the same room.
- LED Compatibility: Look for dimmers designed for LED bulbs to prevent flickering and ensure smooth performance.
Smart Control Comparison Table
|
Feature |
Benefit |
Example Product |
|---|---|---|
|
Voice/App Control |
Hands-free and remote operation |
Lutron Caseta, Philips Hue |
|
Scheduling |
Automate lights for routines and savings |
Lutron Caseta, Leviton Decora |
|
Dimming |
Adjust brightness for any activity |
Lutron Diva, TP-Link Kasa |
|
Multi-Location Control |
Control from more than one switch |
Lutron Caseta, GE Enbrighten |
Tips for Choosing and Installing Smart Controls
- Check bulb compatibility and wattage limits before buying a dimmer.
- Use LED-compatible dimmers to avoid flickering and maximize energy savings.
- For complex wiring or multi-location setups, consider hiring a professional electrician.
- Choose reputable brands with good warranties for long-term reliability.
Smart controls may cost more upfront, but you gain energy savings, longer bulb life, and a home that adapts to your needs.
By adding smart dimmers and controls, you make your lighting system more flexible and efficient. You can create the right atmosphere for any moment, all with a simple tap or voice command.
You can layer lighting like a pro by following a few simple steps. Start with ambient light, add task lighting for activities, and finish with accent lights to highlight features. Try different fixtures and placements until you find what works best for your space.
Remember: Great lighting transforms any room.
Quick Start Checklist:
- Assess your room’s needs
- Plan ambient lighting first
- Add task lights for work areas
- Include accent lights for style
- Choose matching bulbs and use dimmers
Anyone can create beautiful, layered lighting at home. Experiment and enjoy the results!
FAQ
What is the best order for layering lighting in a room?
You should start with ambient lighting for general brightness. Next, add task lighting for specific activities. Finish with accent lighting to highlight features. This order helps you build a balanced and functional lighting plan.
How many light sources do I need in one room?
Most experts recommend using 7 to 13 light sources per room. This includes ceiling lights, lamps, sconces, and accent fixtures. Multiple sources help you avoid shadows and create a comfortable atmosphere.
Can I mix different bulb types in the same room?
You can mix bulb types, but keep the color temperature consistent. For example, use all warm white bulbs or all cool white bulbs. This approach gives your room a unified and professional look.
Do I need an electrician to install layered lighting?
You can install plug-in lamps and some smart bulbs yourself. For hardwired fixtures or new circuits, hire a licensed electrician. This ensures safety and meets local building codes.
How do I choose the right color temperature for each room?
Use warm light (2700K–3000K) in living rooms and bedrooms for a cozy feel. Choose cooler light (4000K+) in kitchens and workspaces for better focus. Match the color temperature to the room’s purpose.
What is the main purpose of accent lighting?
Accent lighting draws attention to special features like artwork, shelves, or architectural details. You use it to add depth, highlight textures, and create visual interest in your space.
Can I use smart controls with any light fixture?
Most smart controls work with standard fixtures and bulbs. Check compatibility before buying. Some older fixtures may need an upgrade for full smart features.
Tip: Always read product instructions and check compatibility charts before installing smart controls.