When you troubleshoot problems with solar street lights, start by observing what happens at night. You can often fix issues with simple steps. Check the solar panel for dirt or shading, inspect the wiring, and look at the lights. Most solar street lights need only basic tools and regular maintenance to keep working. Stay safe by turning off the power and using the right equipment before you troubleshoot problems.
Key Takeaways
- Always prioritize safety by turning off power and using protective gear before troubleshooting solar street lights.
- Regularly clean solar panels and check for dirt, shading, or damage to keep charging efficient.
- Inspect wiring and connections for looseness, corrosion, or damage to prevent flickering and power loss.
- Test battery health often; replace batteries every 3 to 5 years to avoid unexpected failures.
- Adjust controller settings and manage power draw to extend lighting time and improve performance.
- Keep detailed records of inspections and repairs to track issues and help with future troubleshooting.
- Perform seasonal maintenance like adjusting panel angles and cleaning to maintain system efficiency year-round.
- Seek professional help for major faults, persistent problems, or when unsure about repairs to ensure safety and system reliability.
Troubleshooting Steps
Safety First
Before you begin any troubleshooting, always put safety first. You should power off the solar street light system and use insulated tools. Wear personal protective equipment such as insulated gloves and safety goggles. Make sure the area around the light is stable and free from hazards. Check for any visible damage or exposed wires before you touch anything.
Tip: Always follow the manufacturer’s safety guidelines and local electrical safety standards. This helps prevent accidents and keeps you compliant with regulations.
You should also inspect the grounding system. Look at grounding rods, cables, and clamps to ensure they work properly. Good grounding prevents voltage fluctuations and protects you from electrical shocks.
Here are some recommended safety protocols for troubleshooting solar street lights:
- Conduct a daily visual inspection for loose connections, flickering lights, or system warnings.
- Use a calibrated multimeter weekly to test battery voltage and circuit output.
- Schedule monthly comprehensive inspections by a certified technician.
- Increase inspection frequency in harsh environments, such as dusty or coastal areas.
- Gather all necessary PPE and confirm the unit is powered off before testing.
- Inspect the grounding system regularly.
- Keep a logbook or digital record of all inspections and voltage readings.
- Always follow manufacturer guidelines and electrical safety standards.
Initial Checks
Start your troubleshooting steps with a thorough visual inspection. Look at the solar panel frames and surfaces for cracks, corrosion, or physical damage. Check the wiring for signs of wear, weather exposure, or loose connections. Examine the panels for burn marks, discoloration, or hotspots. Inspect the mounting hardware to make sure it is secure and undamaged. Listen for any unusual noises or vibrations from the inverter.
- Check for dirt, debris, or obstructions on the solar panel surface.
- Make sure all wiring connections are tight and free from corrosion.
- Look for any signs of water damage or rust on the components.
- Confirm that the light fixture and pole are stable and upright.
These initial checks help you spot common issues quickly. Many problems with solar street lights come from simple causes like dirty panels or loose wires. By following these troubleshooting methods, you can often fix the issue without advanced tools.
Record Observations
As you go through the troubleshooting process, record everything you notice. Write down any unusual signs, such as flickering lights, dim output, or error messages on the controller. Note the condition of the panels, wiring, and batteries. Take voltage readings and compare them to the manufacturer’s specifications.
Note: Keeping a detailed log helps you track changes over time. This makes it easier to identify patterns and prevent future problems.
You should also document every step you take during troubleshooting. This record helps you or a technician review what has been done if the problem returns. Good documentation is a key part of effective troubleshooting methods.
By following these troubleshooting steps, you can identify and resolve most issues with solar street lights. Regular inspections and careful observation make the process easier and help extend the life of your lighting system.
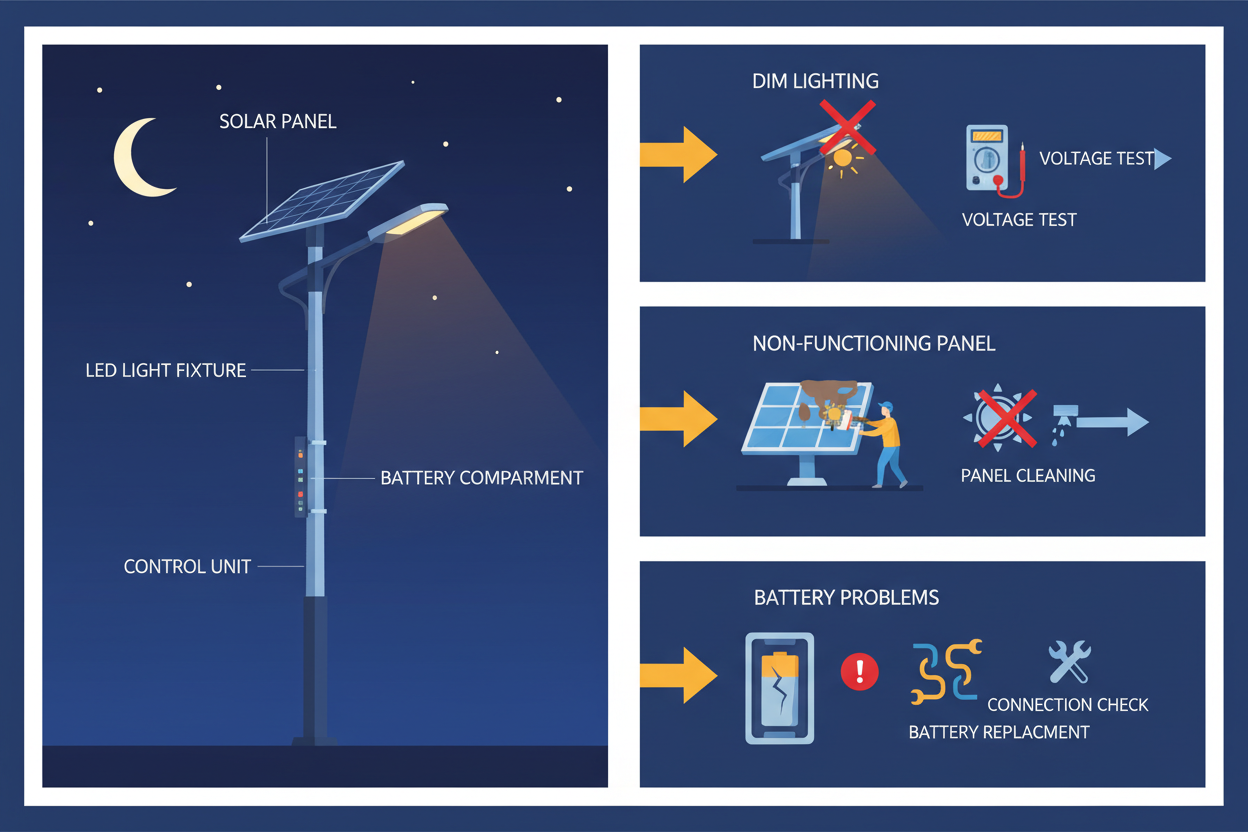
Light Not Working
Obstructions
When your solar street lights do not turn on at night, obstructions often cause the problem. Dirt, dust, and debris can build up on the solar panels. This layer blocks sunlight and reduces the panel’s ability to charge the battery. If the battery does not receive enough energy during the day, you may notice no lighting at night or the lights may appear dim.
- Dust and dirt on the solar panel block sunlight, lowering charging efficiency.
- Debris can cause the lights to flicker or run for a shorter time.
- Regular cleaning with a soft, damp cloth helps maintain the panel’s performance.
- Use mild detergent if needed, but avoid harsh chemicals.
- Place panels where they get maximum sunlight and away from trees or buildings that cast shadows.
You should check the panels every few weeks. Wipe them clean and make sure nothing blocks the sunlight. Maintenance routines that include cleaning will help your lights last longer and work better.
Sensor Issues
Solar street lights rely on sensors to detect when it gets dark. If the sensor malfunctions, the lights may not turn on at the right time. Sometimes, the sensor gets covered by dust or insects. This can confuse the system and cause the lights to stay off or turn on at the wrong time.
Check the sensor for any dirt or obstructions. Clean it gently with a soft cloth. Make sure the sensor faces the open sky and is not blocked by nearby objects. If you notice the lights do not respond to changes in daylight, you may need to optimize light sensor settings. Adjust the sensor angle or sensitivity according to the manufacturer’s instructions. This step ensures proper light sensor operation and helps the lights turn on and off at the correct times.
Wiring
Loose or damaged wiring can also cause your solar street lights to stop working. Inspect all visible wires for signs of wear, corrosion, or animal damage. Look for disconnected or frayed wires near the battery, panel, and LED fixture. Secure any loose connections and replace damaged wires.
If you find exposed wires, cover them with electrical tape or replace them. Use insulated tools to avoid electric shock. Good wiring ensures the LED receives enough power and works reliably. If you still have issues after checking the wiring, consider testing the circuit with a multimeter to find any hidden faults.
Tip: Always turn off the power before handling wires to prevent injury.
By checking for obstructions, sensor issues, and wiring problems, you can solve most cases where the lights do not work at night. Regular inspection and cleaning keep your solar street lights reliable and bright.
LED or Bulb
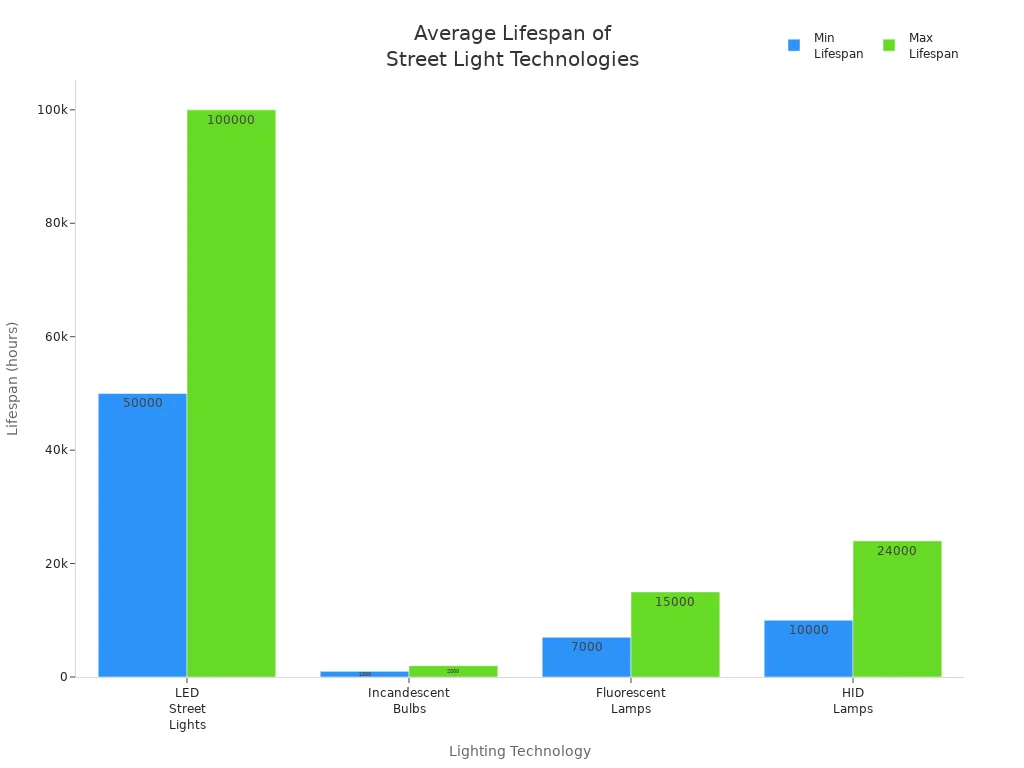
If you have checked the panels, sensors, and wiring but still see no lighting at night, you should inspect the LED or bulb. LEDs are the most common light source in modern solar street lights. They offer high efficiency and long service life. For example, Westinghouse LED bulbs can last up to 25,000 hours, which means you may not need to replace them for over 20 years. Many LED street lights have an even longer lifespan, often between 50,000 and 100,000 hours. This durability makes LEDs a reliable choice for outdoor lighting.
|
Lighting Technology |
Average Lifespan (hours) |
Notes |
|---|---|---|
|
LED Street Lights |
50,000 - 100,000 |
Slow lumen depreciation; reliable for many years |
|
Incandescent Bulbs |
1,000 - 2,000 |
Frequent replacements needed |
|
Fluorescent Lamps |
7,000 - 15,000 |
Moderate maintenance required |
|
High-Intensity Discharge (HID) Lamps |
10,000 - 24,000 |
Bulb and ballast replacements add to maintenance |
You should check the LED or bulb for visible damage, such as dark spots or broken filaments. If the LED does not light up when power is supplied, it may have failed. Sometimes, LEDs can become dim over time due to lumen depreciation. If you notice the lights are much dimmer than before, consider replacing the LED module. Always use a replacement that matches the original specifications for voltage and wattage. This step ensures the system works safely and efficiently.
Tip: Handle LEDs and bulbs with care. Oils from your fingers can reduce their lifespan. Use gloves or a clean cloth when installing new lights.
Circuit Breaker
If the LED or bulb appears fine but the system still does not work, check the circuit breaker. The circuit breaker protects your solar street light system from electrical faults. It interrupts the current flow if it detects unsafe conditions. Common causes for a tripped breaker include arc faults, ground faults, blown fuses, or loose terminals. You may also find that someone has switched off the breaker by mistake.
- Arc fault protection may activate and trip the breaker.
- Blown fuses can cause the breaker to trip.
- Loose terminals in the wiring may lead to trips.
- Ground faults are another possible cause.
- Human interference, such as someone switching off the breaker, can also result in no lighting at night.
You should reset the breaker if it has tripped. If it trips again, inspect the wiring for loose connections or signs of damage. Tighten any loose terminals and replace damaged wires. Regular checks help prevent overheating, wiring burns, or even fires. If the breaker continues to trip, consult a qualified technician to avoid further damage.
Note: Never bypass a circuit breaker. It is a critical safety device that protects your solar street light system.
Charging Problems
Dirty Panel
When you notice your solar street light is not charging well, start by checking the surface of the panels. Dirt, dust, bird droppings, and leaves can collect on the panel and block sunlight. Even a thin layer of grime can reduce how much energy the solar panels collect during the day. If you see any buildup, clean the solar panels with a soft cloth and water. Avoid using harsh chemicals, as these can damage the surface. You should clean the solar panels at least once a month, or more often if you live in a dusty area. Regular cleaning helps keep the panels working at their best and ensures your solar street light charges efficiently.
Panel Angle
The angle of your solar panels plays a big role in how much sunlight they receive. If the panels are too flat or too steep, they will not collect as much energy. For most locations, a tilt angle between 30 and 45 degrees works best. This angle allows the panels to face the sun directly for most of the day. When you install your solar street light, make sure the panel angle matches your local latitude. Adjust the angle seasonally if possible. Proper placement and angle help maximize charging and keep your lights running longer at night.
Shading
Shading is one of the most common reasons for poor charging in solar street lights. When trees, buildings, or even a small object cast a shadow on the solar panels, the amount of electricity produced drops sharply. Even partial shading on just one cell can reduce the current output of the entire panel. This leads to slower charging and shorter lighting times at night.
You should always check the placement of your solar street light. Make sure nothing blocks the panels during the day. Move branches or trim trees if they cast shadows on the panels. If you notice that your solar street light is not charging well, look for new sources of shade that may have appeared since installation. Sometimes, new construction or growing trees can change the amount of sunlight your panels receive.
Proper placement is key to avoiding shading problems. Place your solar panels in an open area where they get direct sunlight from morning to evening. Avoid installing them near tall buildings or under trees. If you must install the light in a spot with some shade, try to position the panels so they face the sun for as many hours as possible. Clean the solar panels regularly to prevent dirt from adding to the shading effect.
Tip: Always check your solar panels at different times of the day. Shadows move as the sun changes position, so a spot that looks sunny in the morning might be shaded in the afternoon.
By focusing on proper placement and keeping your panels clean and free from shade, you can solve many charging problems and keep your solar street lights working efficiently.
Panel Output
You need to check the output of your solar panels if your solar street light is not working as expected. The output tells you how much electricity the panels produce during the day. Most solar panels used in street lighting have a power rating between 100 and 365 Watts. Manufacturers test these panels under standard conditions to measure their DC output power. You can find this rating on the label or in the product manual.
To measure the actual output, you can use a multimeter. Set the multimeter to measure DC voltage and current. Connect the probes to the positive and negative terminals of the panel. Do this test during peak sunlight hours for the most accurate results. Compare your readings to the panel’s rated output. If the numbers are much lower, your panels may not be working efficiently.
Tip: Always test your solar panels when the sky is clear. Clouds or shade can lower the output and give you false results.
Solar panels produce electricity by converting sunlight into direct current (DC). The performance of your panels depends on sunlight, cleanliness, and the angle of installation. If you see a drop in output, check for dirt or debris on the surface. Clean panels work better and help your system reach its full capacity.
You should also look at the current versus voltage (I–V) curve for your panels. This curve shows how the panel performs under different conditions. Technicians use I–V curve tests to find the maximum power point (MPP). The MPP is the spot where the panel produces the most power. Some solar street lights use maximum power point tracking (MPPT) technology. MPPT helps the system get the best possible output from the panels, even if sunlight changes during the day.
Here is a simple table to help you understand what to look for when checking panel output:
|
Checkpoint |
What to Do |
What It Means |
|---|---|---|
|
Voltage Output |
Measure with a multimeter |
Should match panel rating |
|
Current Output |
Measure with a multimeter |
Should be close to rated value |
|
I–V Curve (if available) |
Review with technician |
Shows panel health and efficiency |
|
MPPT Controller Status |
Check display or indicator lights |
Confirms optimal charging |
If your solar panels show low output, you may need to clean them, adjust their angle, or move them to a sunnier spot. Sometimes, panels wear out over time and need replacement. Regular checks help you catch problems early and keep your solar street lights running smoothly.
Note: Always follow safety steps when testing your panels. Turn off the system before connecting or disconnecting wires.
By understanding and monitoring panel output, you make sure your solar street light gets enough energy for reliable charging and nighttime operation.
Battery Issues
Battery Failure
You may notice your solar street light does not stay on as long as it should. This often points to battery failure. Over time, batteries lose their ability to hold a charge. You might see the lights dim quickly after sunset or not turn on at all. Extreme temperatures, deep discharges, and old age can all cause batteries to fail. Most solar street lights use either lithium-ion or lead-acid batteries. Each type has a limited number of charge and discharge cycles. When you reach this limit, the battery cannot store enough energy for nighttime use.
You should check for signs of swelling, leaking, or unusual odors. These signs mean the battery has failed and needs replacement. If you ignore these warning signs, you risk damaging other parts of the system. Always handle failed batteries with care. Some chemicals inside can be harmful.
Tip: Replace batteries every 3 to 5 years to avoid unexpected failures and keep your solar street lights working reliably.
Voltage Test
A voltage test helps you confirm if the battery is still healthy. You need a digital multimeter for this task. First, turn off the solar street light system. Then, disconnect the battery from the circuit. Set your multimeter to measure DC voltage. Place the probes on the battery terminals. Compare the reading to the rated voltage printed on the battery label.
- For a 12V battery, a healthy reading should be between 12.6V and 13.7V when fully charged.
- If the voltage drops below 11.8V, the battery may be weak or near failure.
- For lithium-ion batteries, check the manufacturer’s recommended voltage range.
If your test shows a low voltage, try charging the battery fully and test again. If the voltage does not improve, you likely have a failing battery. Regular voltage tests help you catch issues early and prevent sudden lighting failures.
Corrosion
Corrosion is a common problem with batteries in outdoor solar street lights. Moisture, rain, and humidity can cause the battery terminals to corrode. You might see a white or greenish powder on the terminals. Corrosion blocks the flow of electricity and reduces charging efficiency. If you let corrosion build up, your batteries will not charge or discharge properly.
To fix this, disconnect the battery and clean the terminals with a mixture of baking soda and water. Use a small brush to scrub away the corrosion. Dry the terminals before reconnecting the battery. Apply a thin layer of petroleum jelly to protect the terminals from future corrosion.
|
Symptom |
What It Means |
What To Do |
|---|---|---|
|
White powder |
Corroded terminals |
Clean and protect |
|
Dim lights |
Poor battery connection |
Check and clean terminals |
|
No charging |
Severe corrosion |
Replace battery if needed |
Note: Regularly inspect your batteries for corrosion, especially after heavy rain or in humid climates. Clean terminals help your solar street lights run smoothly.
By understanding battery failure, performing voltage tests, and preventing corrosion, you can solve many common issues with solar street light batteries. Regular checks and maintenance keep your system reliable and extend the life of your batteries.
Replacement
You need to know when and how to replace the batteries in your solar street lights. Over time, batteries lose their ability to store energy. This leads to shorter lighting times and unreliable performance. If you notice that your lights do not stay on as long as before, or if they fail to turn on at all, you should consider replacing the batteries.
Manufacturers recommend that you replace the batteries in solar street lights every 8 to 10 years. This interval helps maintain the best performance and extends the life of your lighting system. Following this guideline ensures that your solar street lights continue to work efficiently and provide reliable illumination.
When you decide to replace old batteries, you should first identify the correct battery type. Most solar street lights use either lithium-ion or lead-acid batteries. Check the specifications in your user manual or on the battery label. Always choose a replacement with the same voltage and capacity as the original. Using the wrong type can damage your system or reduce its efficiency.
Here is a simple step-by-step guide to help you replace the batteries safely:
- Turn off the solar street light system.
- Wear safety gloves and goggles to protect yourself.
- Open the battery compartment. You may need a screwdriver for this step.
- Disconnect the old batteries from the terminals. Take note of the wiring order.
- Remove the old batteries carefully. Avoid touching any leaking material.
- Clean the battery compartment and terminals. Remove any corrosion or debris.
- Insert the new batteries, matching the correct polarity.
- Reconnect the wiring as it was before.
- Close the compartment and secure it tightly.
- Turn the system back on and check if the lights operate normally.
Tip: Dispose of old batteries at a certified recycling center. Do not throw them in the trash. Proper disposal protects the environment and follows local regulations.
You should test the new batteries after installation. Use a multimeter to check the voltage. Make sure the reading matches the battery’s rated value. If you see any issues, double-check the connections and battery orientation.
Regularly replacing batteries keeps your solar street lights bright and dependable. By following the recommended replacement schedule, you avoid unexpected failures and costly repairs. Good battery maintenance ensures your outdoor lighting system works well for many years.
Short Lighting Time
Controller Settings
Controller settings play a major role in how long your solar street lights stay on each night. The controller acts as the brain of the system. It manages when the lights turn on and off, how bright they shine, and how much energy they use. You can adjust these settings to match your lighting needs and save energy.
The controller uses light sensors to detect when it gets dark. It then turns on the lights automatically. Some controllers also use timers to set how long the lights stay on. You might notice that your lights shine at full brightness early in the night and then dim later. This feature helps you balance safety and energy savings.
You can also set the controller to lower the brightness during late hours. This adjustment reduces power use and helps the battery last longer. Smart controllers may include motion sensors. These sensors increase brightness only when someone passes by. This way, you get bright light when needed and save energy the rest of the time.
Tip: Check your controller settings if your lights do not last through the night. Adjusting the brightness or timing can improve battery performance and extend lighting hours.
Proper controller settings prevent overcharging and protect the battery. They also help you get the most out of your solar street lights. If you notice short lighting times, review your controller’s manual and make sure the settings match your needs.
Power Draw
Power draw refers to how much electricity your solar street light uses when it operates. You can think of it as the amount of energy the LED fixture needs to produce light. If your light uses more power, it will drain the battery faster. This means the light will not stay on as long during the night.
The wattage of your LED fixture plays a big role in power draw. Higher wattage LEDs shine brighter, but they also use more energy. For example, a 30-watt LED will use up the battery much faster than a 10-watt LED. If you notice your solar street light turns off early, you might have a fixture that draws too much power for the battery size.
Tip: Always match the LED wattage to your battery capacity. This helps you get the longest lighting time possible.
You should also consider the operational modes of your solar street light. Many modern systems let you adjust brightness or use motion sensors. When you set the light to full brightness all night, it will use more energy. If you use a dimming mode or motion sensor, the light only shines bright when needed. This saves power and extends battery life.
Here is a simple table to show how different settings affect power draw and lighting time:
|
Setting |
Power Draw |
Battery Life Impact |
|---|---|---|
|
Full brightness |
High |
Shorter lighting time |
|
Dim mode |
Low |
Longer lighting time |
|
Motion sensor enabled |
Variable |
Longest lighting time |
If you want your solar street light to last all night, you need to balance brightness and power use. Lowering the brightness or using smart features can help you get more hours of light from the same battery.
You should also check for extra features that might use power. Some solar street lights have Wi-Fi, cameras, or other electronics. These add-ons increase the total power draw. If your system has many features, make sure the battery and solar panel can support them.
When you troubleshoot short lighting times, always look at the total power draw. Start by checking the LED wattage. Review the settings on your controller. Make sure you use energy-saving modes when possible. If you still have problems, you may need a larger battery or a lower wattage LED.
Note: The power draw of your solar street light determines how quickly the battery runs out. Higher wattage means shorter runtime, while energy-saving settings help your light last longer.
By understanding and managing power draw, you can keep your solar street lights shining bright all night. Regular checks and smart settings make a big difference in performance and reliability.
Flickering or Dim Light
Loose Connections
Loose electrical connections often cause flickering or dim light in solar street lights. You may notice the light turns on and off quickly or shines with unstable brightness. This problem usually happens when the wiring inside the light or at the connection points becomes loose or corroded. Over time, exposure to weather, vibration, or even small animals can loosen these connections.
- Loose connections interrupt the flow of electricity, which leads to flickering.
- Corrosion at the terminals or connectors can make the contact unstable.
- Moisture can get into the wiring and make the problem worse.
- Poor insulation allows water and dust to reach the wires, causing erratic lighting.
- Regular inspection helps you find and fix these issues before they affect the light’s functionality.
You should check all wiring and connectors if you see flickering. Tighten any loose screws or terminals. Clean away any corrosion with a brush and make sure the wires are dry. Use electrical tape or heat-shrink tubing to insulate exposed wires. This simple maintenance step can restore proper functionality and prevent future problems.
LED Failure
LEDs are the main light source in most solar street lights. When you see dim or flickering lights, the LED itself may have failed. LEDs can last for many years, but they are not immune to damage. High temperatures, electrical surges, or manufacturing defects can cause the LED to stop working correctly.
You might notice the light is much dimmer than before or only part of the LED array lights up. Sometimes, the LED will flicker because it cannot maintain a steady current. If you suspect LED failure, you should inspect the light for dark spots or discoloration. Replacing the faulty LED module usually restores full led functionality.
Tip: Always use replacement LEDs that match the original specifications. This ensures safe operation and the best performance.
Battery Health
The health of your battery plays a big role in how well your solar street light works. A weak or old battery cannot supply enough power to keep the light steady. You may see the light flicker or become dim soon after turning on. Extreme temperatures, deep discharges, or long-term use can reduce battery capacity.
To check battery health, use a multimeter to measure the voltage. Compare the reading to the recommended range in your manual. If the voltage is low, try charging the battery fully and test again. If the problem continues, you may need to replace the battery. Good battery health ensures your solar street light maintains consistent brightness and reliable functionality.
Controller
The controller in your solar street light system acts as the brain of the operation. It manages when the light turns on and off, how much power flows to the LED, and how the battery charges. If you notice flickering or dim light, you should check the controller for possible issues. A faulty controller can disrupt the flow of electricity and affect the overall functionality of your lighting system.
Start by looking at the controller’s indicator lights or display panel. Many controllers have built-in LEDs that show the system’s status. A green light usually means normal operation. A red or blinking light often signals a problem. If you see an error code, check your user manual for its meaning.
You should also inspect the controller for physical damage. Look for signs of water intrusion, burnt components, or loose connectors. Moisture can cause short circuits inside the controller. Burn marks or a burnt smell indicate overheating or electrical faults. If you find any of these signs, you may need to replace the controller.
Controllers sometimes lose their settings after a power surge or battery failure. You can try resetting the controller to its default settings. Most controllers have a reset button or a specific sequence you can follow. After resetting, reprogram the controller according to your lighting needs. Make sure you set the correct time, brightness levels, and operating modes.
Tip: Always disconnect the power before working on the controller. This step keeps you safe and prevents accidental damage.
If your controller uses a firmware system, check if an update is available. Manufacturers sometimes release firmware updates to fix bugs or improve performance. Follow the instructions in your manual to update the firmware safely.
Here is a quick checklist for troubleshooting controller issues:
- Check indicator lights or display for error codes.
- Inspect for physical damage or water intrusion.
- Reset the controller and reprogram settings.
- Update firmware if available.
- Replace the controller if problems persist.
A healthy controller ensures your solar street light works reliably. Regular checks and prompt action help you avoid flickering or dim light caused by controller faults.
Controller Problems
Error Indicators
You can often spot controller problems by looking at the error indicators. Most solar street light controllers have LED lights or small screens that show the system’s status. These indicators help you find out what is wrong without opening the controller.
- A green light usually means the system works well.
- A red or blinking light often signals a problem.
- Some controllers display error codes or symbols.
You should check your controller’s manual to learn what each indicator means. Manufacturers use different colors and codes. If you see a red light or an error code, look it up in the manual. This step helps you know if the problem comes from the battery, the panel, or the controller itself.
Tip: Write down any error codes or warning lights you see. This record helps you or a technician fix the problem faster.
Here is a simple table to help you understand common error indicators:
|
Indicator Light |
Meaning |
What You Should Do |
|---|---|---|
|
Green |
Normal operation |
No action needed |
|
Red |
Fault detected |
Check manual for solution |
|
Blinking |
Warning or error |
Inspect system components |
|
No light |
Power off or failure |
Check power supply |
Reset
Sometimes, you can fix controller problems by performing a reset. A reset clears temporary errors and restores the controller to its default settings. You should always try this step before replacing any parts.
To reset your controller, follow these steps:
- Turn off the solar street light system.
- Wait for about 30 seconds.
- Press the reset button on the controller. If there is no button, disconnect and reconnect the power.
- Turn the system back on.
After the reset, check if the error indicators have cleared. If the problem remains, you may need to adjust the settings or check for deeper issues.
Note: Always read the user manual before resetting. Some controllers need a special sequence to reset properly.
A reset can solve many minor glitches. It also helps after a power surge or battery replacement.
Firmware
Firmware controls how your solar street light controller works. Manufacturers sometimes release firmware updates to fix bugs or add new features. You should check if your controller has the latest firmware, especially if you notice repeated errors.
To update the firmware, follow these steps:
- Visit the manufacturer’s website and download the latest firmware file.
- Connect your controller to a computer using the recommended cable.
- Follow the update instructions in the manual.
Updating firmware can improve system stability and fix known problems. Always use official firmware from the manufacturer. Unofficial updates can damage your controller.
Alert: Never interrupt the update process. If you lose power during an update, the controller may stop working.
By checking error indicators, performing resets, and keeping firmware up to date, you can solve many controller problems. These steps help your solar street lights work reliably and efficiently.
Replacement
Sometimes, you cannot fix a faulty controller with resets or firmware updates. In these cases, you need to replace the controller to restore your solar street light’s performance. Knowing when and how to replace the controller helps you keep your lighting system reliable and safe.
When Should You Replace the Controller?
You should consider replacement if you notice these signs:
- The controller does not respond after a reset.
- Error indicators stay on even after troubleshooting.
- The controller shows physical damage, such as burn marks or melted parts.
- The system fails to charge or operate, and you have ruled out other causes.
- The controller is outdated and does not support your current battery or panel.
Tip: Always check your warranty before buying a new controller. Some manufacturers offer free replacements within the warranty period.
How to Replace a Solar Street Light Controller
You can follow these steps to replace the controller safely:
- Turn off the entire solar street light system. Disconnect the battery and solar panel to prevent electric shock.
- Wear insulated gloves and safety goggles for protection.
- Locate the controller, usually inside the pole or a weatherproof box.
- Take a clear photo of the wiring connections. This helps you reconnect wires correctly.
- Use a screwdriver to loosen the terminal screws. Remove all wires from the old controller.
- Take out the faulty controller. Set it aside for recycling or proper disposal.
- Install the new controller in the same position. Secure it with screws if needed.
- Reconnect the wires according to your photo or the wiring diagram in the manual.
- Double-check all connections for tightness and correct polarity.
- Reconnect the battery and solar panel. Turn on the system and test the lights.
Alert: Never attempt replacement while the system is powered. Always disconnect all power sources first.
Choosing the Right Replacement Controller
You need to select a controller that matches your system’s voltage and current ratings. Check the specifications for your solar panel, battery, and LED fixture. Look for features such as waterproofing, overcharge protection, and compatibility with your battery type (lithium-ion or lead-acid).
|
Feature |
Why It Matters |
|---|---|
|
Voltage/Current Rating |
Prevents overload and system failure |
|
Waterproof Design |
Protects against rain and dust |
|
Battery Compatibility |
Ensures safe charging and discharging |
|
Overcharge Protection |
Extends battery life |
Note: If you feel unsure about replacing the controller, contact a qualified technician. Professional help ensures safety and proper installation.
By replacing a faulty controller, you restore your solar street light’s reliability. Regular checks and timely replacements keep your outdoor lighting system working for years.
Troubleshoot Problems in Solar Street Lights
Step-by-Step Guide
You can troubleshoot problems in solar street lights by following a clear, step-by-step process. Start by observing the light’s behavior at night and during the day. Take note of any unusual signs, such as flickering, dimming, or complete failure to turn on. Use a systematic approach to identify the source of the issue.
-
Check the Power Switch
Make sure the manual ON/OFF switch is in the ON position. Sometimes, the switch gets turned off by mistake. -
Inspect the Solar Panel
Look for dirt, dust, or debris on the panel. Clean the surface with a soft cloth and water. Remove any bird droppings or leaves that block sunlight. -
Examine the Wiring
Check all wiring connections for looseness, corrosion, or reversed polarity. Secure any loose wires and clean corroded terminals. -
Test the Battery Voltage
Use a multimeter to measure the battery voltage. For a 12V system, a healthy battery should read above 11 volts. If the voltage is low, the battery may be drained or faulty. -
Review the Controller
Look at the charge controller’s indicator lights or display. If you see error codes or warning lights, consult the manual for troubleshooting steps. -
Assess the Lighting Components
Inspect the LED lamp or driver for visible damage. Replace faulty components if cleaning and wiring checks do not solve the problem. -
Check for Shading
Make sure no trees, buildings, or other objects cast shadows on the solar panel during the day. -
Confirm System Settings
Verify that the timer and dusk-to-dawn settings match your needs. Incorrect settings can cause the light to turn off too early or not operate at all. -
Replace Faulty Parts
If you find a faulty battery or controller, replace it with a high-quality, compatible part. -
Seek Professional Help
For complex issues or if you cannot identify the problem, contact a qualified technician. This step helps you avoid further damage or voiding the warranty.
Tip: Keep a log of your troubleshooting steps and observations. This record helps you track recurring issues and improves future maintenance.
Common Causes
You often encounter a few common issues when you troubleshoot problems in solar street lights. Knowing these causes helps you fix problems faster and prevent them from happening again.
|
Problem |
Likely Cause |
What to Check |
|---|---|---|
|
Light does not turn on |
Power switch off, dead battery, faulty wiring |
Switch, battery, wiring |
|
Dim or flickering light |
Loose connections, weak battery, LED failure |
Wiring, battery, LED |
|
Short lighting time |
Dirty panel, shading, low battery capacity |
Panel, shading, battery |
|
No charging |
Dirty or shaded panel, controller fault |
Panel, controller |
|
Controller errors |
Faulty controller, incorrect settings |
Controller, settings |
You see that most problems come from a few sources. Dirt on the solar panel, loose wiring, and battery issues are the most frequent. Regular cleaning and inspection prevent many outages. You also need to check for shading, as even a small shadow can reduce charging efficiency.
Note: Batteries and controllers wear out over time. Plan to replace these parts every few years to keep your system reliable.
Quick Fixes
Maintenance professionals recommend several quick fixes for common issues in solar street lights. You can often restore normal operation with these simple actions:
- Make sure the manual ON/OFF switch is set to ON.
- Clean the solar panel to remove dust, dirt, and debris.
- Tighten all wiring connections and clean any corrosion.
- Use a multimeter to check battery voltage; replace the battery if it reads below 11 volts.
- Remove any shading from trees or buildings that block sunlight.
- Check the charge controller for error indicators; replace it if damaged.
- Confirm that the battery size matches the lighting load and that system settings are correct.
- Replace faulty batteries with deep-cycle types designed for solar use.
- Swap out the LED lamp or driver if you find a failure.
- Call a professional for complex or multiple issues.
🛠️ Quick Tip: Regular inspections and prompt repairs keep your solar street lights working efficiently and help you avoid unexpected outages.
You can prevent most common issues by cleaning the panels, checking the wiring, and testing the battery regularly. Prompt action when you spot a problem ensures your solar lighting system stays reliable and bright.
Solar Outdoor Lighting Maintenance
Cleaning
You keep your solar outdoor lighting working at its best when you clean the solar panels regularly. Dust, pollen, bird droppings, and pollution can build up on the surface. This layer blocks sunlight and reduces how much energy your system collects. You should use a soft cloth and water to wipe away dirt. Avoid harsh chemicals because they can damage the panel’s surface. In most cases, you do not need special tools.
The frequency of cleaning depends on your local environment. If you live in a dry or dusty area, you may need to clean the panels every three months. In places with less dust or pollution, cleaning twice a year is often enough. You should also check the panels after storms or heavy winds. Drops in energy output can signal that it is time to clean the panels.
Some advanced systems use hydrophobic coatings or automated cleaning devices. These features help reduce the need for frequent cleaning. Still, you should monitor your system’s performance and adjust your cleaning schedule as needed.
🧽 Tip: Clean the solar panels early in the morning or late in the afternoon. The panels stay cooler, and you avoid streaks from quick drying.
Inspection
You protect your investment in solar outdoor lighting by inspecting the system on a regular basis. Inspections help you catch small problems before they become big repairs. Look for cracks, loose wires, or signs of water inside the light housing. Check the mounting hardware to make sure it stays tight and rust-free.
A good inspection routine includes these steps:
- Examine the solar panels for cracks, chips, or cloudiness.
- Check all wiring for wear, corrosion, or animal damage.
- Inspect the battery compartment for leaks or swelling.
- Test the lights at night to confirm they work as expected.
- Review the waterproof seals and gaskets for signs of aging.
You should perform a full inspection every three to six months. In harsh climates or areas with high pollution, increase the frequency. Regular maintenance checks help you avoid unexpected outages and extend the life of your solar outdoor lighting.
Battery Replacement
Batteries power your solar outdoor lighting at night. Over time, batteries lose their ability to hold a charge. You may notice the lights grow dim or turn off early. Most batteries last three to five years, but extreme temperatures or deep discharges can shorten their life.
You should check the battery’s voltage with a multimeter during your inspection. If the voltage drops below the recommended level, replace the battery. Always use a battery that matches the original specifications. Dispose of old batteries at a recycling center to protect the environment.
Regular maintenance includes planning for battery replacement. By staying ahead of battery failure, you keep your solar outdoor lighting bright and reliable.
Seasonal Adjustments
Seasonal changes can affect how well your solar outdoor lighting works. You need to make a few adjustments throughout the year to keep your lights shining bright and reliable. Sunlight hours, weather conditions, and temperature shifts all play a role in how much energy your system collects and stores.
During the summer, you usually get longer days and more direct sunlight. Your solar panels can charge the batteries fully, and your lights will likely run at their best. In winter, the days become shorter, and the sun sits lower in the sky. Snow, rain, or fallen leaves can cover the panels and block sunlight. Cold temperatures can also reduce battery efficiency.
You can follow these steps to adjust your solar outdoor lighting system for each season:
-
Adjust the Panel Angle
Tilt your solar panels to match the sun’s position. In winter, increase the tilt angle so the panels face the lower sun. In summer, a flatter angle works better. This adjustment helps your panels collect the most sunlight possible. -
Clean Panels More Often in Fall and Winter
Leaves, snow, and ice can build up quickly. Check your panels after storms or heavy winds. Remove debris gently with a soft brush or cloth. -
Check Battery Performance
Cold weather can lower battery capacity. Test your batteries before winter starts. If you notice dim lights or shorter run times, consider replacing old batteries with ones rated for low temperatures. -
Update Controller Settings
Some controllers let you change the lighting schedule. In winter, you may want to reduce the brightness or shorten the lighting hours to save battery power. Review your controller’s manual for instructions. -
Inspect for Water Intrusion
Rain and melting snow can seep into the light housing or battery compartment. Check seals and gaskets for cracks or wear. Replace any damaged parts to keep your system waterproof.
🕒 Tip: Set a reminder to inspect your solar outdoor lighting at the start of each season. Regular checks help you catch problems early and keep your lights working all year.
Here is a quick table to guide your seasonal maintenance:
|
Season |
Key Actions |
Why It Matters |
|---|---|---|
|
Spring |
Clean panels, check for leaks |
Prepares for rainy weather |
|
Summer |
Adjust panel angle, monitor output |
Maximizes energy collection |
|
Fall |
Remove leaves, inspect batteries |
Prevents shading and failures |
|
Winter |
Clear snow, test battery, check seals |
Maintains performance in cold |
By making these seasonal adjustments, you ensure your solar outdoor lighting system stays efficient and dependable no matter the time of year.
When to Seek Help
Major Faults
You may face situations where troubleshooting does not solve the problem. Major faults often involve serious electrical issues or physical damage. If you see burnt wires, melted components, or a strong burning smell, you should stop working on the system. These signs can mean a risk of fire or electric shock. Water inside the battery compartment or controller also signals a major fault. You should never try to repair these problems yourself.
⚠️ Alert: If you notice smoke, sparks, or loud popping sounds, turn off the power immediately and call a qualified technician.
Here are some examples of major faults that require professional help:
- Burnt or melted wiring
- Cracked or shattered solar panels
- Swollen, leaking, or ruptured batteries
- Water damage inside electrical parts
- Repeated tripping of the circuit breaker
You protect yourself and your property when you let experts handle these dangerous situations.
Persistent Issues
Sometimes, you fix a problem, but it keeps coming back. Persistent issues can point to hidden faults or deeper system failures. If your solar street light flickers, dims, or shuts off often, you may have a problem that needs expert attention. You might also see error codes on the controller that do not clear after a reset.
A professional technician can use advanced tools to test each part of your system. They can find problems that basic checks might miss. You should seek help if you notice:
- Lights that fail to stay on after multiple repairs
- Batteries that drain quickly even after replacement
- Controllers that show repeated errors
- Panels that do not charge despite cleaning and repositioning
🛠️ Tip: Keep a log of all repairs and issues. This record helps technicians diagnose persistent problems faster.
Warranty
Your solar street light system may still be under warranty. Most manufacturers offer warranties for panels, batteries, and controllers. You should check your warranty documents before you buy new parts or pay for repairs. Using your warranty can save you money and ensure you get genuine replacement parts.
|
Component |
Typical Warranty Period |
What to Do If Faulty |
|---|---|---|
|
Solar Panel |
10–25 years |
Contact manufacturer |
|
Battery |
2–5 years |
Request replacement |
|
Controller |
1–3 years |
File a warranty claim |
You should contact the manufacturer or your installer if you suspect a covered fault. Provide them with your purchase details, photos of the problem, and your maintenance records. They will guide you through the warranty process.
📄 Note: Do not attempt major repairs yourself if your system is under warranty. Unauthorized repairs can void your coverage.
You get the best results when you use your warranty and seek professional help for major or persistent issues. This approach keeps your solar street lights safe, reliable, and long-lasting.
You can solve most solar street light problems by following a step-by-step troubleshooting process. Regular inspection and maintenance help you catch issues early and keep your lights working well. If you face complex or repeated problems, contact a professional for help. Ongoing care extends the life of your solar outdoor lighting and ensures reliable performance year-round.
FAQ
How often should you clean solar panels on street lights?
You should clean solar panels every three to six months. Dust, pollen, and bird droppings can block sunlight. Regular cleaning helps your panels collect more energy and keeps your lights working efficiently.
What tools do you need for basic troubleshooting?
You need a digital multimeter, insulated screwdrivers, safety gloves, and a soft cloth. These tools help you check voltage, tighten connections, and clean panels safely.
Why do solar street lights turn off early at night?
Your lights may turn off early because of a weak battery, dirty panels, or high power draw. Check the battery voltage, clean the panels, and review the controller settings to fix this issue.
Can you replace the battery yourself?
Yes, you can replace the battery if you follow safety steps. Turn off the system, wear gloves, and use the correct battery type. Always check your manual for specific instructions.
What does a blinking red light on the controller mean?
A blinking red light usually signals a system error or fault. Check your controller’s manual for the exact meaning. You may need to reset the controller or inspect the wiring.
How do you prevent corrosion on battery terminals?
Apply a thin layer of petroleum jelly to clean terminals. This coating protects against moisture and slows corrosion. Regular inspections help you catch corrosion early.
When should you call a professional for help?
Call a professional if you see burnt wires, repeated errors, or water damage. Major faults and persistent problems need expert attention to keep your system safe.
Do solar street lights work in winter?
Yes, solar street lights work in winter. Shorter days and snow can reduce charging. Adjust the panel angle, clean off snow, and check battery health for best performance.