You achieve the best results with solar stadium lights when you focus on proper installation and careful planning. Select high-quality products for reliable performance. Inspect each component before you begin. Maintain your lighting system regularly to ensure long-term efficiency. By following these steps, you create a sustainable and safe environment for any large outdoor space.
Key Takeaways
- Proper planning is crucial. Assess the stadium layout and sunlight exposure to ensure optimal light coverage.
- Choose high-quality solar lights. Select models with strong materials and high IP ratings for durability and weather resistance.
- Inspect all components before installation. Check solar panels, batteries, and LEDs for any damage to ensure reliable performance.
- Follow a step-by-step installation guide. Securely mount fixtures and position solar panels to capture maximum sunlight.
- Conduct thorough post-installation checks. Test light output and battery charging to confirm the system operates efficiently.
- Regular maintenance is essential. Clean solar panels and check battery health to extend the lifespan of your lighting system.
- Document your installation process. Keep records of fixture locations and maintenance schedules for future reference.
- Investing in solar lights leads to long-term savings. Enjoy reduced energy costs and lower maintenance expenses while supporting environmental sustainability.
Planning Solar Stadium Lights
Site Assessment
Stadium Layout
You start by examining the stadium layout. Measure the field dimensions and note the seating arrangement. Identify areas that require the most illumination, such as the pitch, spectator stands, and walkways. Consider obstacles that might block light or solar panel exposure. A clear map helps you plan where to install solar lights for maximum coverage.
Sunlight Exposure
Assess sunlight exposure across the site. Look for spots with direct sunlight throughout the day. Avoid placing solar panels near tall buildings, trees, or structures that cast shadows. Seasonal changes affect sunlight hours, so check how winter and summer sun paths differ. Regions with frequent cloud cover may need larger battery capacities to maintain reliable lighting. Sunlight availability directly influences the efficiency of outdoor solar lights.
Tip: Use a solar pathfinder or similar tool to track sun movement and identify optimal panel locations.
|
Factor |
Description |
|---|---|
|
Lighting Requirements |
Analyse the required illuminance levels based on sport type, stadium size, and broadcasting needs. |
|
Solar Panel Placement |
Choose locations free from shading and with maximum sun exposure. |
|
Smart Lighting Controls |
Consider dynamic controls that adjust lighting based on real-time conditions. |
|
Compliance with Regulations |
Ensure you meet local ordinances and sports league standards. |
Choosing Rackora Solar Stadium Lights
Product Features Overview
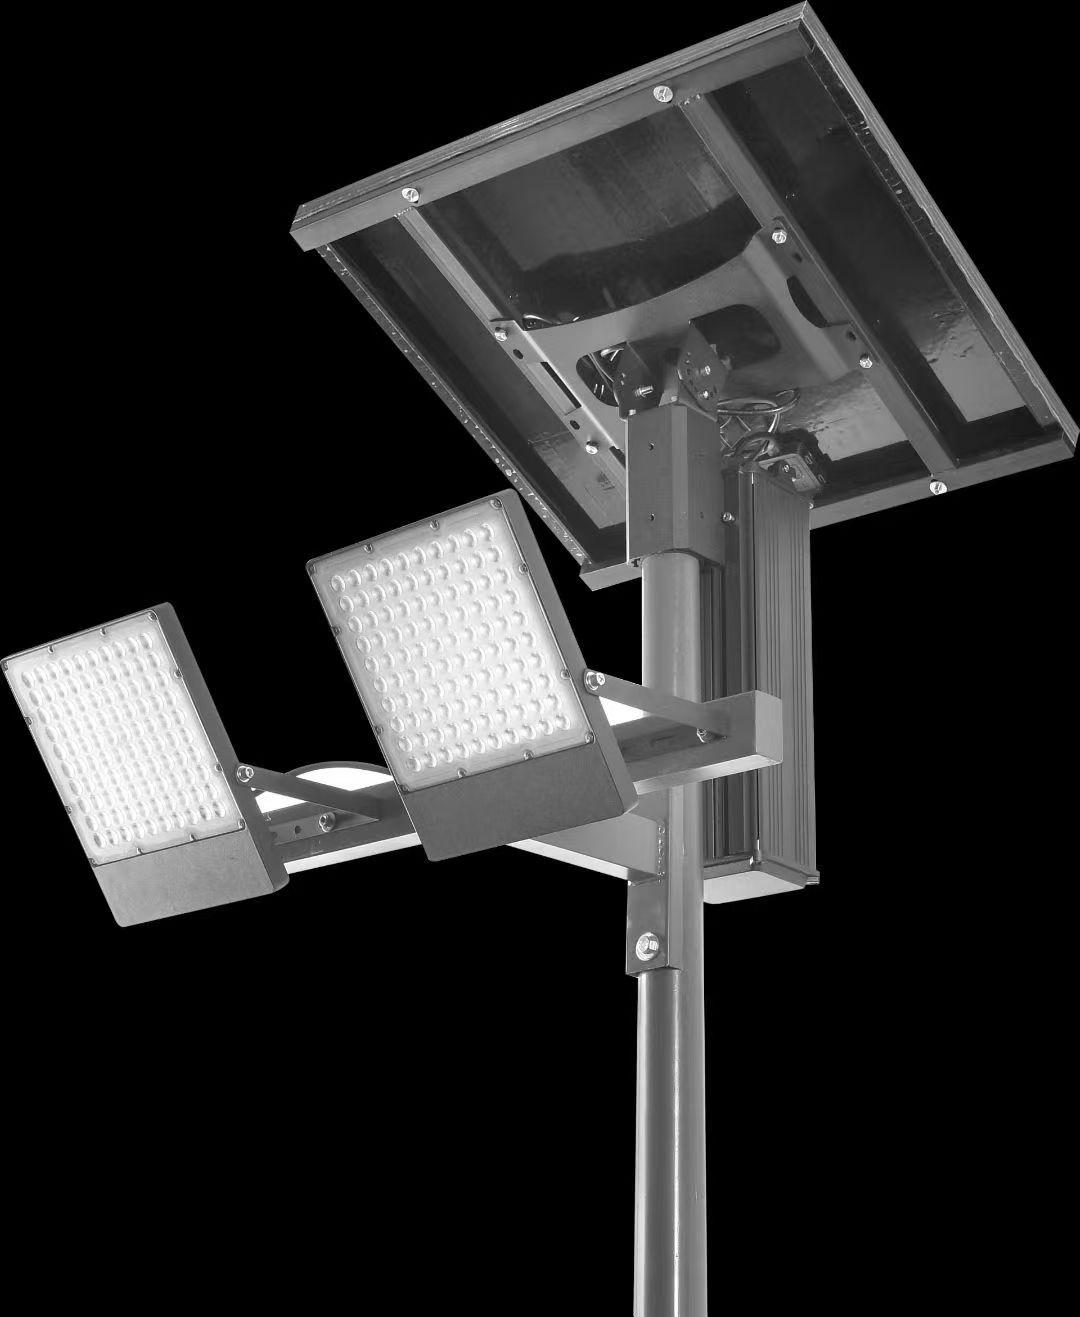
Rackora offers advanced solar stadium lights designed for durability and efficiency. The 2025 Super High Power Solar LED Stadium Light delivers 10,000 lumens with only 50 watts of power consumption. It features an IP66 waterproof rating and a battery that lasts up to seven days, even in cloudy weather. The die-cast aluminium construction improves heat dissipation and resists rust. The High-Power All-in-Two Solar LED Stadium Light provides options from 80W to 150W, with up to 20,000 lumens and robust ADC12 aluminium housing.
|
Criteria |
Description |
|---|---|
|
Durability |
Select models with strong materials and high IP ratings for harsh weather. |
|
Weather Resistance |
Look for IP66 or higher for dust and water protection. |
|
Temperature Tolerance |
Ensure operation in extreme climates. |
|
UV Resistance |
Prevent fading and maintain appearance. |
|
Warranty |
Choose products with at least a three-year warranty for peace of mind. |
User reviews often highlight the long-lasting performance and ease of installation of Rackora products. Patterns in feedback show high customer satisfaction and responsive support.
Selecting the Right Model
Match the product features to your project requirements. For smaller venues or community courts, the 2025 Super High Power model suits most needs. Larger stadiums may benefit from the All-in-Two model with higher wattage and lumen output. International certifications such as CE and RoHS confirm safety and compliance. Rackora’s customer story from Chengdu demonstrates how six units of 50W solar stadium lights transformed a basketball court, providing reliable lighting and reducing costs.
Lighting Requirements
Activity-Based Needs
Determine the lighting levels based on the activities hosted. Football matches, training sessions, and local competitions each require different illuminance. For example, FIFA standards recommend over 2,500 lux for international matches, 2,000 lux for national competitions, and 1,250 lux for training or local events.
|
FIFA Lighting Standard |
Application Level |
Average Horizontal Illuminance (lux) |
Average Vertical Illuminance (lux) |
|---|---|---|---|
|
A |
International matches, World Cup |
> 2500 |
> 1500 |
|
B |
National and professional competitions |
> 2000 |
> 1000 |
|
C |
Training, amateur, and local competitions |
> 1250 |
> 700 |
Compliance and Standards
Check local regulations and sports league standards before you install solar lights. Confirm that your lighting system meets safety and energy efficiency requirements. International certifications and robust warranties add confidence to your investment.
Pre-Installation Steps
Before you install solar lights in a stadium, you need to prepare carefully. This preparation ensures a smooth process and helps you avoid common mistakes.
Tools and Materials
Essential Tools List
Gather all necessary tools before you begin. Having the right equipment saves time and reduces errors. You will likely need:
- Adjustable spanners and screwdrivers
- Cordless drill with drill bits
- Spirit level and measuring tape
- Wire cutters and strippers
- Insulated tools for electrical work
- Ladder or scaffolding for elevated areas
Tip: Keep spare bolts, nuts, and washers on hand in case you need replacements during installation.
Safety Equipment
Safety must always come first. You should use personal protective equipment (PPE) to minimise the risk of injury. Essential items include:
- Hard hats to protect your head from falling objects
- Safety eyewear to shield your eyes from dust and debris
- Insulated gloves for handling electrical components
- High-visibility vests for working in busy areas
- Non-slip footwear to prevent slips and trips
Before starting, conduct a safety briefing with your team. Discuss potential hazards, such as slippery surfaces or overhead power lines. Always inspect the work area for risks and ensure everyone knows emergency procedures.
Product Inspection
Checking Solar Panels
Inspect each solar panel before installation. Look for cracks, chips, or dirt on the surface. Clean panels with a soft cloth to remove dust or debris. Check the mounting brackets for any signs of damage. Make sure all electrical connections are intact and free from corrosion. A clean and undamaged panel will help your outdoor solar lights perform at their best.
Verifying Batteries and LEDs
Examine the batteries and LED modules. Confirm that the batteries are fully charged and show no signs of leakage or swelling. Inspect the LED chips for any visible defects. Test the LEDs briefly to ensure they light up correctly. Check that all wiring matches the manufacturer’s specifications. This step helps you avoid problems after you install solar lights.
Preparing the Site
Marking Mounting Points
Mark the exact locations where you will install each light. Use a measuring tape and chalk or marker to outline the mounting points. This step ensures even coverage and helps you visualise the final lighting layout. Remove any rocks, weeds, or debris from the area to create a stable base.
Ensuring Accessibility
Make sure you can easily access each mounting point. Clear pathways for ladders or lifts. If you need to dig or set posts, loosen the soil and improve drainage if necessary. Good accessibility allows you to work safely and efficiently, especially when handling heavy equipment or elevated fixtures.
Note: Proper site preparation not only speeds up installation but also ensures your lighting system operates reliably for years to come.
Solar Light Installation Guide
Installing solar stadium lights requires careful attention to detail. You need to follow a step-by-step guide to installing solar lights to achieve reliable and long-lasting lighting for your venue. This section covers panel positioning, mounting, wiring, and activation.
Positioning Solar Panels
Optimal Tilt and Orientation
You must position solar panels to capture the maximum amount of sunlight. Tilt the panels at an angle that matches your local latitude. This angle helps the panels absorb sunlight efficiently throughout the year. Face the panels towards true south if you are in the northern hemisphere, or true north if you are in the southern hemisphere. Adjust the tilt seasonally if possible, as winter and summer sun paths differ.
Tip: Use a spirit level to check the tilt and ensure the panel sits flat. This prevents water pooling and dirt build-up.
Avoiding Obstructions
Check the area for any objects that might cast shadows on the solar panels. Trees, buildings, and tall structures can block sunlight and reduce efficiency. Place the panels in the sunniest spot available. Remove any debris or obstacles before installation. You should also consider future growth of trees or new construction that could affect sunlight exposure.
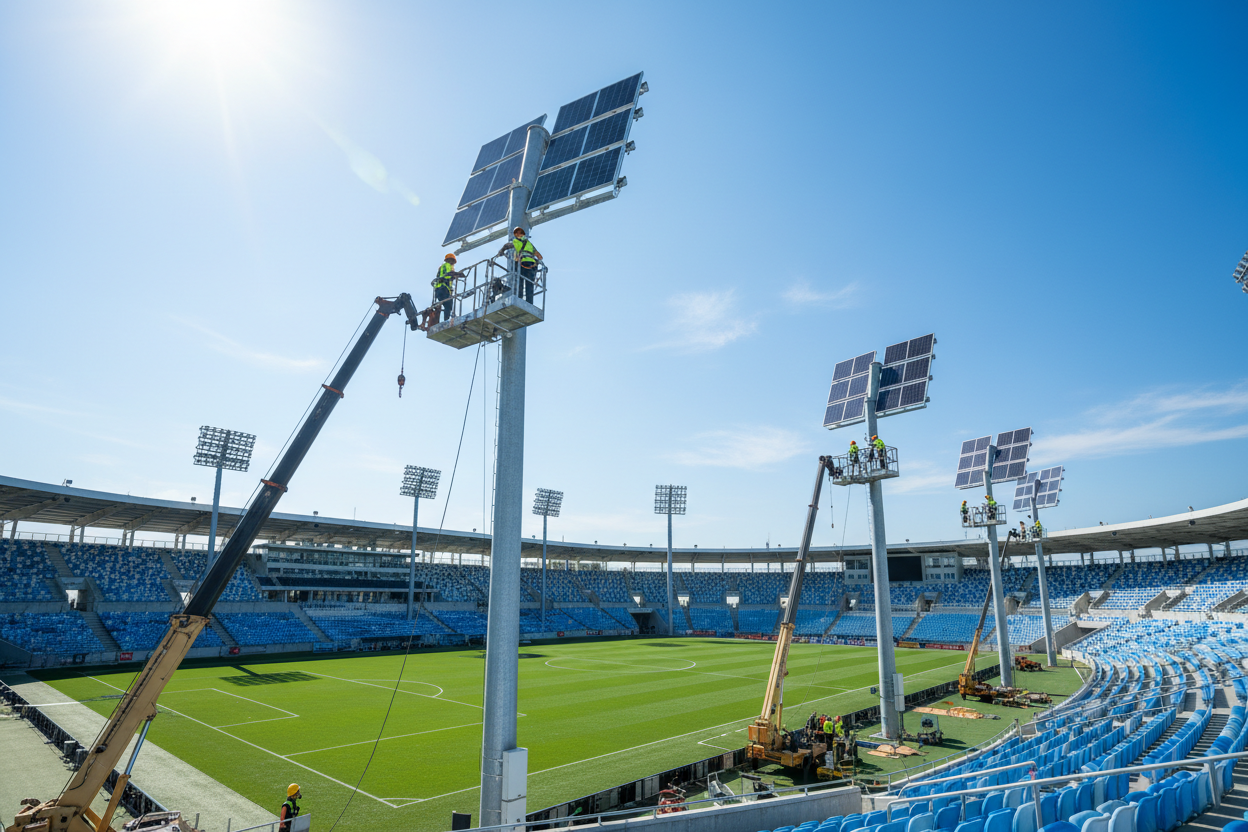
Mounting Rackora Stadium Lights
Bracket Adjustment
Rackora stadium lights feature adjustable mounting brackets. You can set the angle and direction of each light to cover the desired area. Begin by marking your mounting spots with a marker. Drill pilot holes if needed. Attach the brackets securely using bolts and washers. Adjust the bracket to achieve the best coverage for your outdoor solar lights.
Securing Fixtures
You must ensure each fixture is stable and weather-resistant. Follow these steps for a secure installation:
- Survey your installation site. Check for underground utilities to avoid damage.
- Clear and level the ground. Remove debris for a stable base.
- Pick the sunniest spot for the solar panel.
- Choose high-quality solar flood lights with integrated panels.
- Plan for maintenance. Make sure you can access the lights for cleaning and battery replacement.
- Mark your mounting spots.
- Attach the brackets. Screw them in tightly after drilling pilot holes.
- Mount the light fixture. Adjust the angle to cover the area.
- Position the solar panel. Tilt it towards the sun.
- Check for stability. Make sure the fixture can withstand windy conditions.
Note: Rackora’s IP66 weatherproof design protects your lighting system from rain and dust. Always check for stability after mounting.
Wiring and Connections
Safe Cable Management
Proper wiring is essential for safe and efficient operation. Use insulated tools to handle electrical components. Route cables neatly and avoid sharp bends. Seal all connectors to prevent rainwater infiltration. Match wire diameters to manufacturer specifications. Label each wire clearly for future maintenance.
|
Wiring Error |
Description |
Solution |
|---|---|---|
|
Incorrect Grounding and Bonding |
Errors in grounding can lead to safety hazards and equipment damage. |
Ensure all metallic components are correctly bonded and grounded according to electrical codes. |
|
Inverter Connection Errors |
Incorrect connections can cause system failures or grid instability. |
Verify phase connections and breaker sizing, and consider using devices like ConnectDER for ease. |
|
Neglecting Overcurrent Protection |
Omitting fuses or circuit breakers can leave systems vulnerable to damage. |
Always include appropriate overcurrent protection devices in the installation. |
|
Ignoring Local Electrical Codes |
Failing to adhere to local codes can lead to failed inspections and legal issues. |
Verify and follow local electrical codes during installation. |
|
Inadequate Labelling and Documentation |
Poor labelling can complicate maintenance and emergency response. |
Ensure clear labelling and comprehensive documentation of all components. |
Common pitfalls include poor wiring connections, reversed wiring, and exposed wires. Unsealed connectors can cause short circuits. Mismatched wire diameters affect efficiency and safety. Always double-check connections before powering up.
Initial Power-Up
You need to follow a safe process when activating your solar light installation:
- Read the installation instructions completely. Review the manual to understand setup and troubleshooting.
- Make sure the solar panel sits in direct sunlight. This ensures enough power generation.
- Follow all labels on wires and parts. Adhere to manufacturer guidance to avoid mistakes.
- Check all connections and fixtures for stability.
- Switch on the system and observe the lights. Confirm that each unit operates as expected.
Alert: If you notice any flickering or dimming, switch off the system and inspect the wiring and battery connections.
You have now completed the installation of your solar stadium lights. You can enjoy efficient and sustainable lighting for your venue.
Post-Installation Checks
After you install solar stadium lights, you need to check that everything works as expected. These checks help you confirm that your system delivers reliable lighting and operates efficiently.
System Performance
Light Output Testing
Test the brightness of each light. Walk around the stadium at night and observe how well the lights illuminate the field, stands, and walkways. Use a lux meter to measure the light output in different areas. Compare the readings to your target values. If you notice dark spots or uneven coverage, you may need to adjust the fixtures.
|
Metric |
Description |
|---|---|
|
Solar Panel Efficiency (%) |
Shows how well panels convert sunlight into energy. |
|
Battery Performance |
Measures how long the battery powers the lights after sunset. |
|
Lighting Output (Lumens) |
Indicates the brightness and coverage of the lights. |
|
Durability and Weather Resistance |
Assesses how well the lights withstand rain and extreme temperatures. |
|
IP Ratings |
Reveals the product’s resistance to dust and water. |
Battery Charging Verification
Check that the batteries charge fully during the day. Monitor the charge level using the system’s display or a multimeter. If batteries do not reach full charge, inspect the solar panels for dirt or shading. Clean the panels with a soft cloth and mild detergent. Make sure all connections are secure and free from corrosion.
Adjustments and Fine-Tuning
Light Angle Optimisation
Adjust the angle of each fixture to improve coverage. Use the adjustable brackets to direct light where you need it most. Proper placement ensures uniform illumination and reduces energy waste. High-efficiency LED fixtures help you achieve better results.
|
Method |
Description |
|---|---|
|
Optimise Fixture Placement |
Place fixtures carefully for even coverage and energy efficiency. |
|
Match Fixtures with Power Supply |
Use compatible fixtures and power sources for best performance. |
|
Use Smart Control Systems |
Adjust light intensity and timing with smart controls. |
|
Regular Maintenance |
Clean fixtures monthly to maintain brightness. |
Panel Repositioning
If you notice poor charging or reduced performance, reposition the solar panels. Move them to areas with more sunlight and adjust the tilt to match your local latitude. Remove any objects that cast shadows on the panels. Regular cleaning prevents dirt from blocking sunlight.
Documentation
Installation Records
Keep detailed records of your installation. Note the location of each fixture, the type of equipment used, and the date of installation. This information helps you track performance and plan future upgrades.
Maintenance Scheduling
Set a schedule for routine inspections. Inspect each fixture at least twice a year, or more often in harsh conditions. During inspections, check for wear, loose connections, and damage. Test the system to ensure proper illumination. Examine electrical components for hazards. Document your findings and address any issues quickly. Involve trained professionals for thorough checks and repairs.
Tip: Use soft cloths and mild detergents for cleaning. Avoid abrasive cleaners to protect your outdoor solar lights.
Regular documentation and maintenance keep your lighting system reliable and efficient.
Maintaining Outdoor Solar Lights
Regular maintenance keeps your solar stadium lights working efficiently and extends their lifespan. You can prevent most issues by following routine maintenance tips and checking each component carefully. Rackora’s stadium lights require minimal upkeep due to their robust design and weatherproof construction, but you should still inspect them periodically to ensure peak performance.
Cleaning Solar Panels
Tools and Techniques
Clean solar panels to maintain maximum energy absorption. Dust, bird droppings, and pollution can block sunlight and reduce efficiency. You should use safe and effective methods for cleaning:
|
Technique |
Description |
|---|---|
|
Mild Detergents |
Mix mild detergent with water to gently remove dirt and grime. |
|
Water-Fed Pole Systems |
Clean panels from the ground, improving safety and thoroughness. |
|
Automated Cleaning Systems |
Use robotics and AI for efficient cleaning, reducing labour costs. |
|
Robotic Cleaners |
Employ robots with water and cleaning solutions for effective dirt removal. |
|
Sprinkler Systems |
Use sprinklers for consistent and thorough cleaning. |
|
Electrostatic Cleaning |
Utilise electrostatic charges to attract and remove dirt. |
|
Regular Inspections |
Inspect panels for damage or wear to maintain optimal performance. |
Follow these steps for manual cleaning:
- Turn off the solar panel system for safety.
- Use a soft brush or sponge to remove loose dirt.
- Wipe away soapy water with a squeegee to avoid streaks.
- For stubborn stains, let the soapy water sit before scrubbing.
- Rinse thoroughly with clean water.
- Inspect the panels for any signs of damage or wear.
Tip: Always use soft materials to avoid scratching the panel surface.
Cleaning Frequency
The frequency of cleaning depends on your local environment. You should adjust your schedule based on dust and pollution levels.
|
Climate Zone |
Cleaning Frequency |
|---|---|
|
Clean environments |
Once or twice every two years |
|
Moderately dusty areas |
Every three to six months |
|
Highly polluted areas |
Monthly cleaning may be needed |
You can increase cleaning intervals if you notice a drop in lighting performance or battery charging speed.
Battery and Component Care
Battery Health Checks
Check the battery health regularly to ensure reliable operation. You should:
- Turn on the solar lights and observe their operation at night.
- Clean the solar panels to maintain charging efficiency.
- Use high-quality rechargeable batteries for better performance.
- Replace old batteries if you notice reduced lighting duration.
- Inspect wiring connections and overall component condition.
Monitor the charging cycle by placing the light in sunlight for a full day. Observe the light’s performance over several days to confirm consistent operation.
Replacing Components
Replace batteries and other components when necessary. Follow these steps for safe replacement:
- Take photographs of battery connections before disassembly.
- Disconnect wires carefully and inspect for corrosion.
- Install the new battery, verifying specifications and connecting terminals in the correct order.
- Reassemble the unit, ensuring weatherproof integrity and secure connections.
Test the light after replacement to confirm it activates. You should always use compatible parts to maintain system reliability.
Note: Rackora’s warranty support covers many component issues, giving you peace of mind during maintenance.
Troubleshooting
Dimming or Flickering Lights
If you notice dimming or flickering, you should:
- Check if the cables are appropriately sized for the load and distance.
- Monitor AC voltage under load conditions to identify voltage sags.
- Use a meter to check voltage at the connection point of the dimming light.
- Assess whether the issue existed before installation or after adding new equipment.
Loose connections or undersized cables often cause flickering. You can resolve most problems by tightening connections and replacing faulty wires.
Charging Issues
Charging problems can reduce the effectiveness of outdoor solar lights. Common causes and solutions include:
|
Cause |
Solution |
|---|---|
|
Dirty Solar Panel |
Clean the panel with a wet cloth regularly |
|
Faulty Battery |
Replace with new compatible batteries |
|
Blocked Solar Panel |
Ensure it is free from obstructions |
|
Incorrect Battery Type |
Use specified rechargeable batteries |
|
Defective Solar Panel |
Inspect for cracks and replace if broken |
Batteries may degrade over time, leading to reduced performance. Insufficient sunlight exposure can also cause charging issues. You should check the solar panel’s position and ensure it receives direct sunlight throughout the day.
Callout: Routine maintenance tips help you avoid most problems and keep your lighting system running smoothly. Rackora’s durable design and minimal maintenance needs make these tasks straightforward.
You can maximise the lifespan and efficiency of your stadium lights by following these steps. The customer story from Chengdu shows how regular cleaning and battery checks resulted in zero maintenance visits over ten months, even during harsh weather. You can achieve similar results by staying proactive with your maintenance schedule.
Benefits of Solar-Powered Lights
Energy Efficiency
You can achieve remarkable energy efficiency when you choose solar-powered lights for stadiums and large outdoor spaces. These systems use advanced solar panels and LED technology to convert sunlight directly into electricity. This process reduces the need for grid power and lowers your overall energy consumption. Many stadiums have reported energy savings of 60–70% after switching from traditional lighting to solar-powered alternatives.
Here is a quick comparison:
|
Energy Savings |
Cost Savings |
Environmental Impact |
|---|---|---|
|
60–70% |
Significant |
Reduced carbon footprint |
You will notice that solar-powered lights deliver consistent brightness while using far less energy than conventional systems. This efficiency not only benefits your venue but also supports broader sustainability goals.
Cost Savings
When you install solar-powered lights, you set yourself up for long-term financial benefits. The initial investment may seem high, but you quickly recover costs through reduced electricity bills and lower maintenance expenses. For example, an NFL stadium saved over $500,000 each year on electricity after switching to LED lights combined with solar power. Over five years, stadiums with solar-powered lighting systems experience substantial cost savings. These savings come not only from lower energy use but also from the reduced need for frequent bulb replacements and repairs.
You will find that solar-powered lights require less maintenance because they have fewer moving parts and use durable components. This reliability means you spend less time and money on upkeep, allowing you to focus on providing a safe and well-lit environment for your visitors.
Tip: Investing in solar-powered lights can help you free up budget for other important projects at your venue.
Environmental Impact
You make a positive impact on the environment when you choose solar-powered lights. These systems use clean, renewable energy from the sun, which means you reduce your reliance on fossil fuels. By switching from traditional lighting to LEDs, you can cut your stadium’s carbon footprint by up to 70%.
- You help lower greenhouse gas emissions.
- You reduce air pollution in your community.
- You support global efforts to combat climate change.
Solar-powered lights also operate quietly and do not produce harmful by-products. This makes them an excellent choice for venues that want to lead by example in environmental responsibility. When you use solar-powered lights, you show your commitment to a greener future.
Real-World Results with Rackora
You can see the true value of solar-powered lights when you look at real-world examples. In Chengdu, a residential community decided to upgrade their basketball court lighting. They replaced old halogen lamps with Rackora solar LED stadium lights. The results were impressive and immediate.
Residents noticed brighter and more even lighting across the court. Children could play safely after sunset. Seniors used the space for morning exercise. The community felt safer at night because the area stayed well-lit, even during heavy rain and floods. The lights continued to work without interruption, showing their reliability in harsh weather.
You do not need to worry about frequent repairs. The Chengdu community reported zero maintenance issues after the installation. The robust design of Rackora lights meant that you could avoid the hassle and cost of regular bulb replacements. This reliability gave peace of mind to both residents and property managers.
Energy costs dropped sharply. The switch from halogen to solar-powered lights led to a significant reduction in electricity bills. The community saved money each month, which they could use for other improvements. Over time, these savings added up, making the investment in solar lighting a smart financial decision.
“Our basketball court is now the heart of the community. The new lights let us enjoy the space every evening, and we feel much safer,” said one resident.
Property values in the area increased. Well-lit public spaces attract families and boost the appeal of a neighbourhood. The improved lighting made the court a popular spot for gatherings and activities. You can see how a simple upgrade can transform a community space.
Here is a summary of the benefits observed in Chengdu:
|
Benefit |
Outcome |
|---|---|
|
Safety |
Improved visibility and reduced accidents |
|
Reliability |
No maintenance needed, even during floods |
|
Cost Savings |
Lower energy bills and no bulb replacements |
|
Community Satisfaction |
Increased use and positive feedback |
|
Property Value |
Noticeable increase after installation |
You can achieve similar results by choosing Rackora for your stadium or outdoor area. The Chengdu project shows that solar-powered lights deliver more than just illumination. They create safer, more vibrant, and more sustainable communities.
You achieve long-term reliability with solar stadium lights by following a clear process:
- Plan your lighting layout and assess sunlight exposure.
- Select robust, high-efficiency products for durability.
- Install each fixture with care and check all connections.
- Maintain your system with regular cleaning and battery checks.
Choosing solar stadium lights from Rackora ensures energy efficiency and lower maintenance costs. The table below highlights the most important steps for a successful project:
|
Step |
Description |
|---|---|
|
Planning |
Analyse needs and design for even light distribution. |
|
System Design |
Use simulations to set mounting heights and angles. |
|
Installation |
Position panels for maximum sun and secure fixtures. |
|
Ongoing Support |
Monitor and adjust for consistent performance. |
By investing in solar-powered lights, you create a sustainable and cost-effective solution for any outdoor venue.
FAQ
How do you choose the right solar stadium light for your venue?
You should assess the size of your space and the required brightness. Compare lumen ratings and battery capacity. Rackora offers models for small courts and large stadiums. Review product specifications and select a light that matches your needs.
Can you install Rackora solar stadium lights yourself?
You can install most Rackora solar stadium lights with basic tools and safety equipment. Follow the instructions in the manual. If you work at height or with electrical wiring, consider hiring a qualified professional for safety.
How often should you clean solar panels?
You should clean solar panels every three to six months in most environments. If you notice dust, bird droppings, or reduced charging, clean them sooner. Regular cleaning helps maintain maximum energy absorption and lighting performance.
What should you do if your solar light flickers or dims?
Check all cable connections and battery health. Clean the solar panel to remove dirt. Replace faulty wires or batteries if needed. Flickering often results from loose connections or insufficient power supply.
Are Rackora stadium lights weatherproof?
Rackora stadium lights feature an IP66 rating. You can use them outdoors in rain, dust, and extreme temperatures. The robust aluminium housing protects the lights and ensures reliable operation year-round.
How long do the batteries last on a full charge?
Rackora’s LiFePO4 batteries can power the lights for up to seven days, even in cloudy weather. You should monitor battery health and replace them when you notice shorter lighting duration.
Do you need to replace LED bulbs frequently?
You do not need to replace LED bulbs often. Rackora uses high-efficiency LEDs with minimal light decay. Most installations run for years without bulb changes, reducing maintenance costs.