You want your outdoor spaces to shine with clear, reliable light. The Rackora SL-BMW1600 solar street light gives you powerful brightness and wide coverage, but smart placement makes all the difference. Pay attention to mounting height, spacing, and orientation. Avoid obstructions like trees or buildings that can block sunlight. Consider local conditions to get the most from your installation. A careful approach helps you achieve both excellent performance and lasting value.
Key Takeaways
- Mount the SL-BMW1600 solar street light between 4 and 6 meters high for the best coverage and brightness.
- Space each light 20 to 25 meters apart to ensure even lighting without wasting energy.
- Face the solar panel south in the northern hemisphere and keep it free from shadows for full charging.
- Measure and map your outdoor area carefully to plan light placement and avoid dark spots or overlaps.
- Use different light patterns like linear or grid to fit your space and improve uniform lighting.
- Place lights closer in high-traffic areas and farther apart in low-traffic zones to save energy.
- Keep solar panels clean and accessible for easy maintenance and reliable performance.
- Avoid placing lights under trees or near buildings that block sunlight to maintain strong charging.
Placement Principles
Proper placement of your Rackora SL-BMW1600 solar street light ensures you get the best lighting coverage and efficiency. You need to consider three main factors: mounting height, spacing, and orientation. Each plays a key role in how well your outdoor area lights up at night.
Mounting Height
Height Guidelines
Mounting height affects how much area your solar street light can cover. For the SL-BMW1600, a height between 4 and 6 meters works best. This range allows the powerful 1600W output and 1152 LED beads to spread light evenly across 280 to 360 square meters. If you mount the light too low, you create bright spots but leave dark patches. If you mount it too high, you lose brightness on the ground.
Tip: Use a sturdy pole or wall that supports the weight and size of the unit. Make sure the mounting point is stable and secure.
Adjusting for Area Size
You should adjust the mounting height based on the size of your space. For small gardens or pathways, use the lower end of the height range. For parking lots or wide streets, go higher to maximize coverage. Always check that the light beam reaches all corners of your target area.
Spacing
Distance Recommendations
Spacing between each solar street light matters for even illumination. Place each unit 20 to 25 meters apart for most outdoor settings. This distance uses the SL-BMW1600’s wide-angle coverage efficiently. If you need brighter light or have high-traffic zones, reduce the spacing slightly.
Avoiding Overlap
Avoid placing lights too close together. Overlapping beams waste energy and create uneven lighting. Use a simple map or sketch to plan your layout. Mark each light’s coverage area to prevent overlap and dark spots.
Orientation
Sunlight Direction
Panels on your solar street light need direct sunlight to charge fully. Face the solar panel south if you live in the northern hemisphere. This direction captures the most sunlight during the day. Remove any obstructions like tree branches or nearby buildings that could cast shadows on the panels.
Seasonal Adjustments
Seasons change the angle and intensity of sunlight. In winter, the sun sits lower in the sky. Tilt the solar panel slightly upward if possible, or choose a mounting spot that gets sunlight all year. Check for new obstructions as trees grow or buildings go up nearby.
Note: Regularly inspect your installation area for anything that might block sunlight. Keeping the panels clear ensures reliable charging and long-lasting performance.
Solar Street Light Placement Guide
Area Assessment
Measuring Space
Start by measuring your outdoor area. Use a tape measure or a digital measuring tool to record the length and width of the space you want to illuminate. Write down these numbers. Accurate measurements help you plan the best layout for your lights. If you have an irregularly shaped area, break it into smaller rectangles or squares. Measure each section separately and add the totals together.
Mapping Coverage
Draw a simple map of your area on paper or use a digital tool. Mark important features like driveways, walkways, trees, and buildings. Show where you want to place each light. This map helps you see where shadows might fall and where you need the most light. You can use free online mapping tools or apps to create a more precise plan. Mapping your space makes it easier to avoid missed spots or wasted light.
Light Calculation
Number of Units
Calculate how many lights you need for full coverage. The Rackora SL-BMW1600 covers 280 to 360 square meters. Divide your total area by the coverage of one unit. For example, if your area is 720 square meters, you need at least two lights for full coverage. Round up if you want brighter lighting or if your area has obstacles that block light.
Tip: Always plan for a little overlap at the edges to avoid dark corners.
Using Coverage Data
Use the coverage data to place your lights efficiently. The SL-BMW1600’s wide-angle design lets you cover more ground with fewer units. Place each light so its coverage area touches but does not overlap too much with the next. This method saves energy and gives you even lighting. If you use mapping software, you can simulate the coverage circles to check your plan before installation.
Positioning
Uniform Lighting
Aim for uniform lighting across your space. Place each light at the recommended height and spacing. Check your map to make sure every part of your area receives light. Walk through the space at night after installation to spot any dark patches. Adjust the position of your lights if needed.
Arrangement Patterns
Choose an arrangement pattern that fits your area. For straight roads or paths, use a linear pattern with lights on both sides. For parking lots or open spaces, try a grid or staggered pattern. This approach spreads light evenly and reduces shadows. Use your map to test different patterns before you install the lights.
Note: Mapping and simulation tools help you visualize your plan and make changes easily. You can find free tools online or use simple graph paper for manual planning.
Special Considerations
When you plan your SL-BMW1600 Solar Street Light installation, you need to think about the unique needs of your location. Different environments require different strategies for the best results. This section will help you adapt your placement for maximum safety, efficiency, and reliability.
Traffic Levels
High-Traffic Areas
High-traffic areas, such as busy streets or parking lots, need bright and consistent lighting. Place your lights closer together in these zones. This setup reduces shadows and improves visibility for drivers and pedestrians. You should also mount the lights at the higher end of the recommended range. This approach spreads light over a wider area and helps prevent dark spots.
Tip: Use a grid or staggered pattern for parking lots. This pattern ensures every corner receives enough light.
Low-Traffic Areas
Low-traffic areas, like quiet residential streets or farm paths, do not need as much brightness. You can space the lights farther apart. This method saves energy and reduces light pollution. For these areas, use the lower end of the mounting height range. You still get good coverage without wasting resources.
Security Needs
Entrances and Exits
Entrances and exits need extra attention. Place a light directly above or near each entry point. This placement deters unwanted visitors and helps people see clearly when entering or leaving. Make sure the light covers the entire doorway or gate area.
Surveillance Zones
If you have security cameras, position your lights to support them. Aim the SL-BMW1600 so it lights up the camera’s field of view. Good lighting improves video quality and helps you spot details. You can use the smart remote control to adjust brightness or set motion detection for added security.
Note: Well-lit surveillance zones make your property safer and more secure.
Climate Impact
Weather Resistance
The SL-BMW1600 features a weatherproof design. You can install it in areas with rain, snow, or dust. The durable housing protects the internal components from harsh conditions. This feature makes the light suitable for farms, gardens, and commercial spaces that face tough weather.
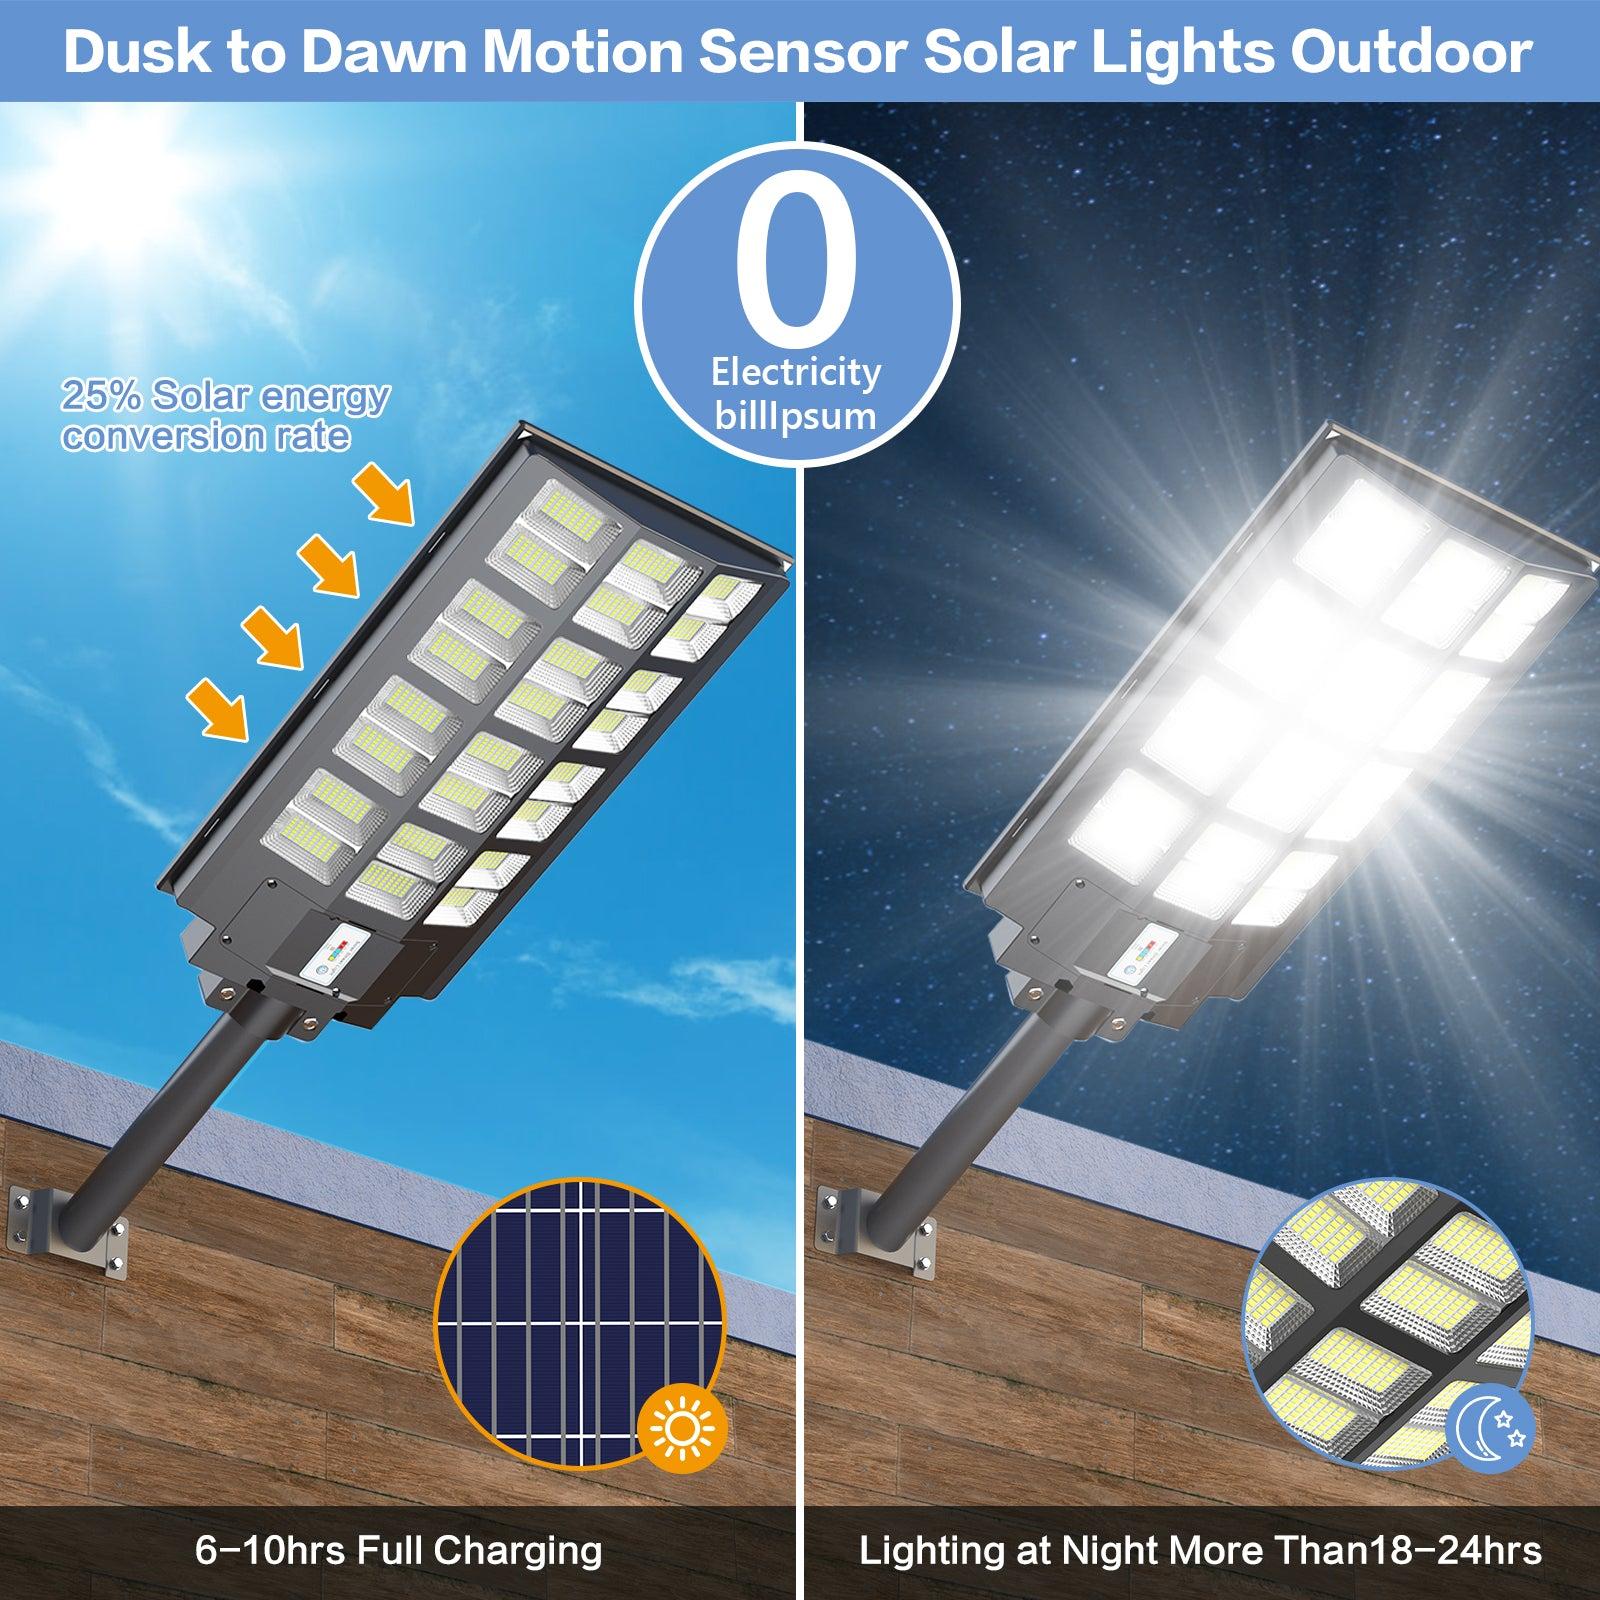
Charging Reliability
Solar street lights rely on sunlight to charge. Place the panels where they get direct sunlight for most of the day. Avoid shaded spots under trees or near tall buildings. In regions with frequent clouds or long winters, check the battery level regularly. The SL-BMW1600’s efficient solar technology helps maintain reliable performance, even when sunlight is limited.
Reminder: Clean the panels often to remove dust or debris. Clean panels charge faster and last longer.
|
Environment |
Placement Focus |
Special Tips |
|---|---|---|
|
Residential Streets |
Even spacing |
Avoid trees that block sunlight |
|
Parking Lots |
Grid pattern |
Use higher mounting for wide reach |
|
Farms |
Key pathways & gates |
Check for animal movement zones |
|
Commercial Areas |
Entrances & cameras |
Use smart features for flexibility |
Common Mistakes
When you install your SL-BMW1600, you want to avoid common mistakes that can reduce performance or create extra work. Paying attention to these issues helps you get the most from your solar street light.
Overlapping Lights
Wasted Energy
Placing lights too close together causes their beams to overlap. This overlap wastes energy because you light the same area twice. You might think more lights mean better coverage, but you end up using more power without improving visibility. Always plan your layout so each light covers its own area.
Uneven Coverage
Overlapping lights can also create uneven lighting. Some spots become too bright, while others stay dim. This makes your outdoor space look patchy and can even cause glare. Use a map or layout tool to space your lights evenly. Check your area at night to spot any uneven patches and adjust as needed.
Shaded Installations
Identifying Shade
Shade is a big problem for solar street lights. If you place your light under a tree or next to a tall building, the panel cannot charge well. Look for shadows during different times of the day. Walk around your installation area and check for anything that blocks sunlight. Even a small amount of shade can lower charging efficiency.
Seasonal Changes
Seasons change the way sunlight hits your panels. In summer, trees have more leaves and cast bigger shadows. In winter, the sun sits lower in the sky. You need to check your installation area throughout the year. Move your light or trim branches if you notice new shadows.
Maintenance Access
Space for Repairs
You need to leave enough space around each light for repairs. If you install lights too close to walls, fences, or bushes, you make it hard to reach them. Good access helps you fix problems quickly and keeps your lights working longer.
Easy Cleaning
Dust and debris can build up on your solar panels. Easy access makes cleaning simple. Clean panels charge faster and last longer. Plan your installation so you can reach each light with a ladder or cleaning tool.
Tip: The SL-BMW1600’s remote control and smart features make maintenance easier:
- You can operate your solar street light from a distance, so you do not need to climb up for every adjustment.
- The remote lets you change brightness, set timers, and activate motion sensing.
- Smart features allow you to monitor battery status and system health remotely.
- The manual provides troubleshooting steps and preventive maintenance tips.
- Remote access helps you manage and diagnose issues quickly, saving time and effort.
Avoiding these mistakes ensures your SL-BMW1600 works efficiently and lasts for years. Careful planning and regular checks keep your outdoor spaces bright and safe.
You can achieve the best results with your Rackora SL-BMW1600 Solar Street Light by following these key tips:
- Measure your area and plan your layout.
- Mount lights at the right height and spacing.
- Avoid shaded spots and allow for easy maintenance.
For complex installations, check the product manual or ask a professional for help.
Choose the SL-BMW1600 for reliable, efficient, and stylish lighting that brightens every outdoor space.
FAQ
How do you install the SL-BMW1600 Solar Street Light?
You can mount the light on a pole or wall using the included hardware. Make sure the solar panel faces direct sunlight. Follow the step-by-step instructions in the manual for a secure and safe installation.
What is the recommended height for mounting?
Mount the SL-BMW1600 between 4 and 6 meters above the ground. This height gives you the best coverage and brightness for most outdoor spaces.
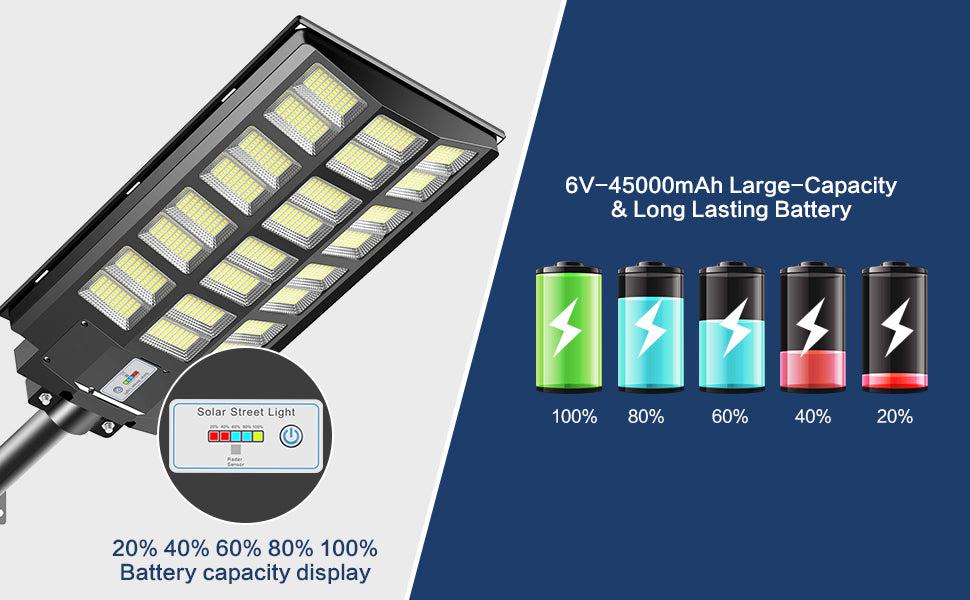
How long does the battery last after a full charge?
A full charge powers the light for 16 to 24 hours. The exact time depends on weather and usage. The high-capacity battery ensures reliable lighting through the night.
Can you control the light remotely?
Yes! The included remote lets you adjust brightness, set timers, and activate motion sensing. You can manage your light from a distance for added convenience.
What should you do if the light is not turning on?
Check the solar panel for dirt or obstructions. Make sure the battery is charged. Review the manual for troubleshooting steps. If the problem continues, contact Rackora support.
Is the SL-BMW1600 weatherproof?
Absolutely. The SL-BMW1600 features a weatherproof design. You can use it in rain, snow, or dusty conditions without worry.
How do you clean the solar panel?
Use a soft cloth and water to wipe the panel. Clean it regularly to remove dust and debris. Clean panels charge faster and keep your light working at its best.