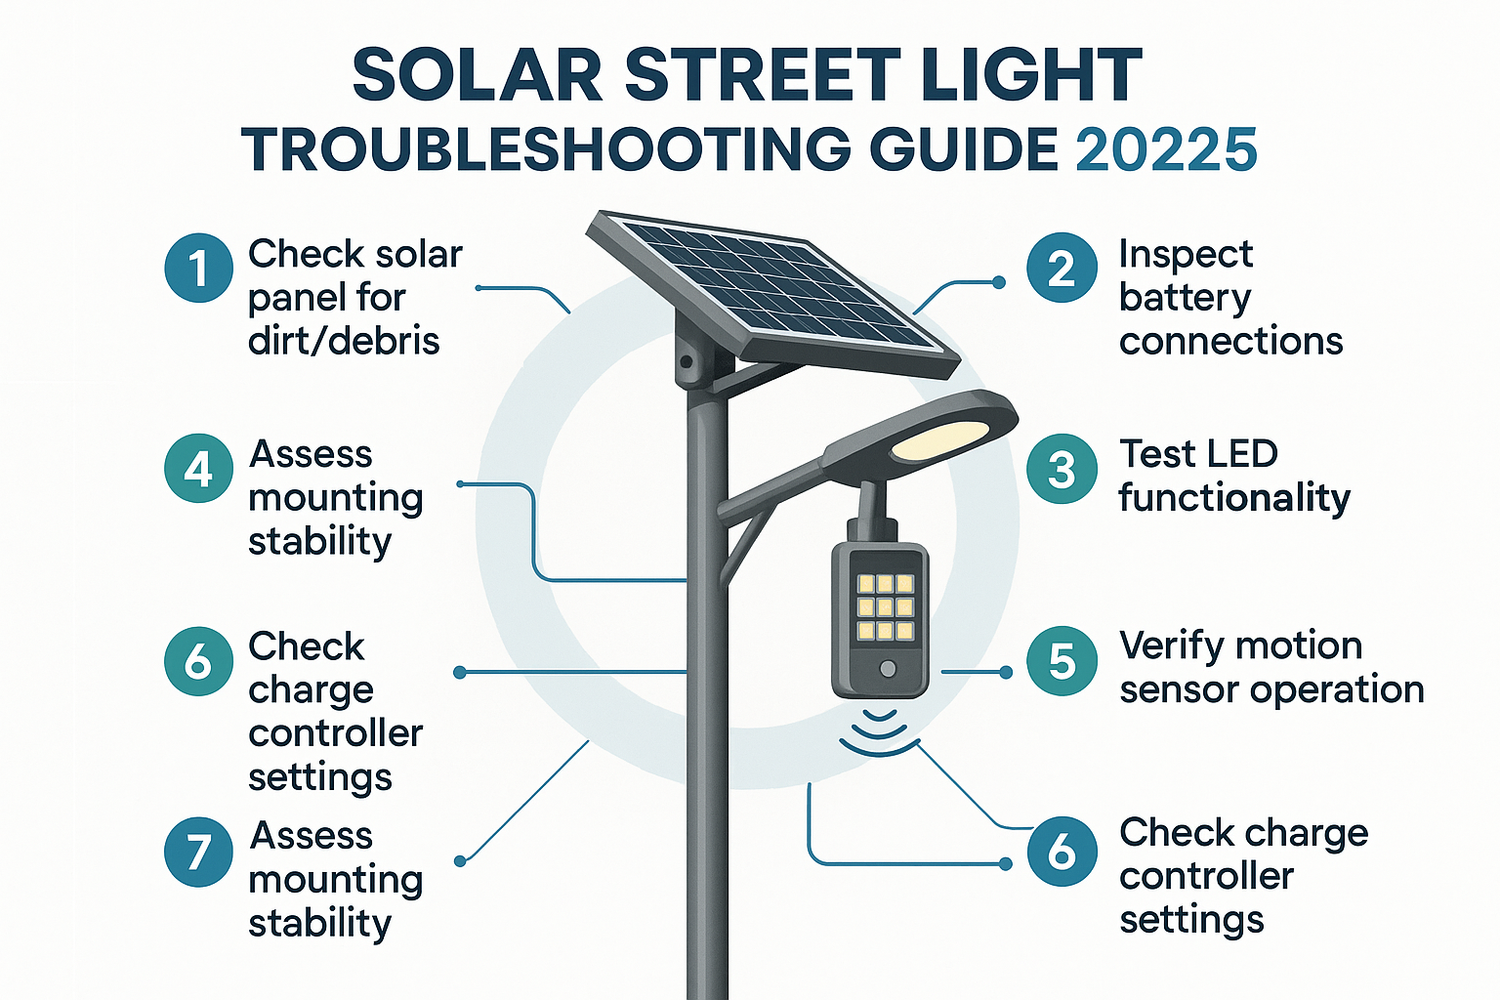
If you want to troubleshoot problems in solar street lights, you need to approach each issue with a clear, step-by-step method. Start by understanding how each part works. Many solar street lights stop working because of simple issues like dirty panels or loose wires. You can often fix these with basic cleaning or inspection. Knowing the main components helps you find solutions faster. 🛠️
Key Takeaways
- Know the main parts of solar street lights and how they work to find problems faster.
- Watch for common issues like lights not turning on, dimming, flickering, or staying on during the day.
- Start troubleshooting with a visual check, clean solar panels, and test the battery health.
- Check the controller and wiring carefully, as loose or damaged connections often cause faults.
- Keep solar panels clean and properly positioned to ensure good charging and longer lighting time.
- Regularly inspect sensors, LED lamps, and controller settings to fix flickering or sensor problems.
- Perform routine maintenance like cleaning, testing, and battery care to keep lights reliable and safe.
- Call a professional if problems persist, especially for complex electrical issues or safety concerns.
Solar Street Light Systems Overview

Main Components
You need to know the main parts of solar street light systems before you can troubleshoot them. Each part plays a key role in how the system works. The table below shows the essential components and their functions:
|
Component |
Function |
|---|---|
|
Converts sunlight into electrical energy and sends it to the battery for storage. |
|
|
Battery |
Stores electrical energy generated during the day for use at night. |
|
Controller |
Regulates battery charging and discharging, manages voltage and current, and protects the system. |
|
LED Light Source |
Provides efficient, long-lasting illumination with low power consumption. |
|
Pole and Bracket |
Supports the solar panel, battery, and lighting fixture; determines the height and stability. |
Tip: If you understand what each component does, you can quickly identify where a problem might start in solar street light systems.
How the System Works
Solar street light systems use a simple but effective process to provide lighting at night. During the day, the solar panel captures sunlight and converts it into direct current (DC) electricity. This energy flows through wires to the controller. The controller manages the voltage and current, making sure the battery charges safely and does not get damaged by overcharging or deep discharging.
The battery stores the energy collected by the solar panel. When the sun goes down, the controller senses the drop in light and switches on the LED light source. The battery then supplies power to the LED, which gives off bright, energy-efficient light throughout the night. The controller continues to monitor the system, protecting the battery and making sure the light works as expected.
You will find that solar street light systems work best when each part functions properly. If the solar panel does not get enough sunlight, the battery may not charge fully. If the controller fails, the battery or light may not work at all. The LED light source uses very little energy, so it can run for many hours on a single charge. The pole and bracket keep everything in place and help the solar-powered street light stand up to wind and weather.
Solar street light systems offer a reliable and eco-friendly way to light streets, parks, and pathways. You can count on these systems to work well with regular maintenance and basic checks.
Troubleshooting Solar Street Light Systems
Common Issues
When you troubleshoot problems in solar street light systems, you often find that a few common faults appear again and again. Understanding these issues helps you choose the right troubleshooting methods and find solutions quickly. Here are the most frequent problems you may encounter:
- The solar street light does not turn on at all.
- The lighting time is too short, or the light dims quickly after turning on.
- The light stays on during the daytime, which wastes energy.
- Some LED chips fail, causing uneven or patchy lighting.
- The light flickers or turns on and off intermittently.
- The sensor function does not work, so the light does not respond to movement or changes in daylight.
- Physical damage, such as cracks or discoloration from overheating or sun exposure.
- Solar panels get blocked by dirt, leaves, snow, or ice, reducing charging efficiency.
- Wiring becomes worn or damaged due to weather or animals.
- The battery loses capacity, corrodes, or overheats because of poor ventilation.
Note: Regular cleaning and inspection prevent many of these problems and keep solar street light systems working efficiently.
Symptoms to Watch For
You can identify most issues in solar street light systems by watching for specific symptoms. Recognizing these signs early helps you apply the right troubleshooting methods and avoid bigger problems later. Here is a table that matches common issues with their typical symptoms:
|
Common Issue |
Symptoms to Watch For |
|---|---|
|
Light not turning on |
No illumination at night, even after sunny days; battery voltage remains low |
|
Lighting time too short |
Light turns off earlier than expected; dims quickly after turning on |
|
Light stays on during daytime |
Light remains on when it should be off; sensor may not detect daylight |
|
Flickering or intermittent light |
Light blinks, flashes, or cycles on and off; may be caused by low battery or controller failure |
|
Uneven or dim lighting |
Some LEDs are out; overall brightness is reduced; dirty panels or aging LEDs |
|
Sensor failure |
Light does not respond to movement or changes in daylight; stays on or off incorrectly |
|
Physical damage |
Cracks, discoloration, or visible wear on panels, battery compartment, or wiring |
|
Solar panel blockage |
Reduced charging, visible dirt, leaves, snow, or ice on the panel surface |
|
Wiring or connection issues |
Light works intermittently; visible frayed or disconnected wires |
|
Battery failure |
Light does not turn on or dims quickly; battery voltage stays low; no charge current detected during sunlight |
You may notice that battery failure often leads to the light not turning on or dimming quickly. If you check the battery voltage and find it remains low, or if you see no charging current during the day, the battery likely needs attention. Over time, batteries lose capacity due to aging, overcharging, or harsh environmental conditions. You should also watch for signs of corrosion or overheating in the battery compartment.
Flickering lights usually point to low battery power or a controller problem. If the light stays on during the day, the sensor or controller may have failed. When you see uneven lighting, some LED chips may have failed, or the solar panel may not be charging efficiently due to dirt or aging.
Tip: Early detection of these symptoms allows you to troubleshoot problems before they become serious. Regular inspection and cleaning are simple solutions that prevent many common faults in solar street light systems.
By learning to spot these symptoms, you can apply effective troubleshooting solar street light systems techniques and keep your solar street lights running smoothly. This approach saves time and helps you avoid unnecessary replacements.
Troubleshoot Problems: Light Not Turning On
Visual Inspection
Start your troubleshooting by looking for obvious signs of problems. A careful visual inspection often reveals the root cause of a solar street light fixture not working. Walk around the light and check each component. Look for physical damage, loose wires, or anything out of place. Use the table below to guide your inspection:
|
Inspection Area |
Visual Signs to Check |
|---|---|
|
Solar Panel Connections |
Secure attachment, no loose or disconnected wires |
|
Charge Controller |
Physical damage, overheating signs |
|
Battery Connections |
Secure and intact wiring |
|
Light Fixture |
Secure mounting, no movement or vibration |
|
Surrounding Area |
No obstructions blocking sunlight |
Pay close attention to the solar panel. Dust, leaves, or bird droppings can block sunlight and cause solar panel not charging issues. Check for cracks or discoloration on the panel surface. Examine the battery compartment for corrosion or signs of overheating. Inspect the LED bulb for broken wires, discoloration, or burn marks. Look at the sensors and controller for cracks, loose connections, or dirt buildup.
|
Component |
Visual Signs of Physical Damage or Malfunction |
|---|---|
|
Solar Panels |
Dust and debris accumulation, cracks, discoloration, physical damage after storms |
|
Battery |
Visible corrosion around terminals, reduced lighting hours, slow charging times |
|
LED Bulbs / Light Output |
Dimming, color shifts, flickering, visible damage to bulbs |
|
Structural Elements |
Rust, corrosion, loose fixtures, cracks, bends in poles, mounts, and casings |
|
Sensors and Controllers |
Cracks, loose connections, corrosion, dirt or debris obstructing sensors |
|
Weather-related Damage |
Water ingress, broken fixtures, damage from high winds or storms |
Tip: If you see rust, corrosion, or loose fixtures, address these problems immediately. Cleaning and tightening connections can solve many issues before you move to more advanced troubleshooting.
Solar Panel Check
After your visual inspection, focus on the solar panel. The panel must receive direct sunlight to charge the battery. If you notice dirt or debris, clean the panel with a soft cloth and water. Avoid harsh chemicals that could damage the surface. Make sure nothing shades the panel during the day, such as tree branches or new construction.
Check the panel’s angle and orientation. The panel should face the sun for maximum efficiency. If the panel is not positioned correctly, adjust it to improve charging. Look for any signs of physical damage, such as cracks or discoloration. These can reduce the panel’s ability to generate power.
If you still have problems, use a multimeter to measure the panel’s output voltage during daylight. Compare the reading to the manufacturer’s specifications. A low voltage reading may indicate a solar panel not charging problem. In this case, you may need to replace the panel or repair the wiring.
Note: Regular cleaning and proper positioning of the solar panel prevent many common problems and extend the life of your solar street lights.
Battery Test
If the light still does not turn on, test the battery. A weak or damaged battery often causes the led light not turning on or the battery not holding charge. Start by checking the battery terminals for corrosion or loose connections. Clean the terminals if needed and tighten any loose wires.
To accurately test battery health, follow these steps:
- Capacity Testing: Discharge the battery under controlled conditions and measure how much energy it provides. If the battery cannot hold enough charge, you may need a replacement.
- Internal Resistance Testing: Use a battery tester to check internal resistance. High resistance means the battery cannot deliver power efficiently.
- Open Circuit Voltage Measurement: Use a DC voltmeter to measure the battery voltage without any load. A low voltage reading suggests the battery is not holding charge.
- Voltage and Temperature Monitoring: Record the battery’s voltage and temperature during charging and discharging. Unusual readings can signal internal defects.
- Insulation Resistance Testing: Ensure the insulation between the battery’s electrodes and housing is intact. This prevents fire risks and ensures safety.
If you find the battery swollen, leaking, or showing signs of overheating, replace it immediately. Do not attempt to use a damaged battery. If the battery passes all tests but the light still does not work, continue with the step-by-step troubleshooting guide to check the controller and wiring.
Alert: Never ignore signs of battery damage. A faulty battery can cause further problems and pose safety risks.
By following these steps, you can troubleshoot problems with solar street lights that do not turn on. Careful inspection and testing help you isolate the cause and find effective solutions.
Controller and Wiring
The controller acts as the brain of your solar street light system. It manages charging, discharging, and switching the light on and off. If your light does not turn on, you should check the controller and wiring next. Many problems start here, especially after storms or long periods without maintenance.
Start by inspecting the controller for any visible signs of trouble. Look for water stains, rust, or burn marks. Water can enter the controller and cause short circuits. If you see moisture or corrosion, the controller may need replacement. Use a multimeter to measure resistance across the terminals. Low resistance often means a short circuit.
Wiring problems can also prevent your light from working. Check all connections between the solar panel, battery, controller, and lamp. Loose or corroded wires can interrupt the flow of electricity. Make sure each wire is secure and free from rust or fraying. If you find damaged wires, replace them right away.
You may also encounter issues like reversed polarity. If the positive and negative wires from the solar panel connect incorrectly, the light may stay on all the time. Double-check the wiring diagram and correct any mistakes.
The table below lists frequent controller and wiring faults, their signs, and what you should look for:
|
Fault Type |
Description and Diagnostic Signs |
|---|---|
|
Water ingress in controller |
Short circuits; look for water stains or rust on controller terminals. Use a multimeter to check resistance. Low resistance means you need to replace the controller. |
|
Reversed polarity of solar panel |
Light stays on continuously. Check positive and negative connections. Correct if reversed. |
|
Poor circuit interface contacts |
Flickering light. Ensure all circuit interfaces have good contact. |
|
Battery faults |
Lighting issues or flickering. Measure battery voltage and replace if too low. |
|
Faults in controller circuit |
Light does not work or flickers. Inspect the controller and replace if needed. |
Tip: Always disconnect the battery before working on the controller or wiring. This prevents accidental short circuits and keeps you safe.
If you notice the controller’s indicator lights are off, this usually means the controller has failed. Replace the controller if you cannot restore function after checking connections and cleaning terminals.
When you finish checking the controller and wiring, test the system again. If the light still does not turn on, move on to the next step and check the sensors and lamp.
Lighting Time and Brightness Issues
Battery and Charging
You may notice that lighting time and brightness often decrease as your solar street lights age. The battery plays a crucial role in this process. When the battery cannot hold enough charge, you will see shorter lighting times and dimmer output. This problem, known as battery not holding charge, is one of the most common issues in solar lighting systems.
Several factors can cause reduced lighting time:
- Battery issues such as reverse polarity, poor contact, or reaching the end of its lifespan.
- Dust on solar panels, which lowers solar panel efficiency and leads to less charging.
- Incorrect controller settings, which can cause irregular lighting times.
- Low-quality components that degrade quickly and reduce reliability.
Battery degradation happens over time. As the battery ages, it stores less energy. You will see the system either lower the brightness or shorten the lighting period to compensate. Most lithium batteries in solar street lights last between 2.7 and 5.5 years. Regular maintenance can extend this lifespan, but you cannot avoid degradation completely. When you notice dim lights or shorter operation, check the battery first. Replacing an old battery often restores optimal performance.
Tip: Clean the solar panel regularly and check battery connections to prevent charging problems. This simple step can solve many issues before they affect lighting duration.
Solar Panel Orientation
The orientation of your solar panel directly affects how much energy it can capture. If you want to achieve optimal performance, you must position the panel correctly. For most locations, you should face the panel toward the terrestrial equator—south in the northern hemisphere and north in the southern hemisphere. The tilt angle should match the latitude of your site. This setup ensures the panel receives maximum sunlight throughout the year.
A misaligned panel can lead to solar panel not charging problems. Even a small deviation in orientation or tilt can reduce energy capture, especially if trees or buildings cast shadows on the panel. Always check for obstructions and adjust the panel as needed. Fixed installations like street lights benefit most from a one-time, careful setup.
Note: Proper orientation and regular cleaning help maintain solar panel efficiency and prevent common issues related to poor charging.
Power Consumption
The amount of power your solar street lights use affects both brightness and lighting time. If you add features like dimming controls, video surveillance, or real-time data collection, you increase power consumption. Higher energy demand means the battery drains faster, especially during cloudy or rainy days.
|
Aspect |
Impact of Increased Power Consumption |
|---|---|
|
Energy Demand |
Higher wattage requires larger batteries and solar panels to maintain lighting duration. |
|
Efficiency |
Low efficiency causes early light-off and reduces reliability. |
|
Lighting Duration |
More power use shortens battery life and lighting time if system capacity is not increased. |
|
System Design |
You need a balance between wattage and lumens for the best results. |
|
Example |
A 25W light providing 5,000 lumens lasts twice as long as a 50W light with the same output. |
Intelligent solar street lights use smart controls to manage energy use. These systems adjust brightness based on battery level and environmental conditions. By optimizing power consumption, you extend battery lifespan and improve reliability. If you notice reduced lighting time, check for added features or settings that may increase energy use. Adjusting these can provide simple solutions to restore normal operation.
Callout: Always match your system’s power consumption to the capacity of your battery and solar panel. This balance prevents many issues and supports long-term performance.
Environmental Factors
Environmental factors play a major role in how well your solar street lights perform. You need to understand how the surroundings affect both lighting time and brightness. Many issues start with the environment around your installation.
One of the most common problems comes from shading. Trees, buildings, and other tall objects can block sunlight from reaching your solar panels. When panels do not get enough sunlight, they cannot generate enough energy. This leads to shorter lighting times and dimmer lights at night. You should always check for new sources of shade, especially as trees grow or new structures appear.
Tip: Walk around your solar street light during different times of the day. Look for shadows that move across the panel. Even a small amount of shade can reduce charging efficiency.
You can use several strategies to reduce the impact of shading and other environmental challenges:
- Mount solar panels away from trees, buildings, or anything that casts a shadow.
- Adjust the angle of the panel to capture the most sunlight throughout the year.
- Use high-quality materials that resist weather damage and maintain performance over time.
- Choose advanced optical designs that help panels work better even when some shading occurs.
Weather also affects your solar street lights. Dust, snow, and ice can cover the panels and block sunlight. Heavy rain or storms may cause physical damage or move the panels out of alignment. You should clean the panels regularly and check for debris after bad weather. In areas with frequent snow, install panels at a steeper angle so snow slides off more easily.
Temperature changes can influence battery performance. Very hot or cold weather may reduce how much energy the battery can store. You should use batteries designed for your local climate to avoid sudden drops in lighting time.
Here is a quick summary of key environmental factors and their effects:
|
Environmental Factor |
Impact on Solar Street Light Performance |
|---|---|
|
Shading |
Reduces energy generation, shortens lighting time |
|
Dust/Debris |
Blocks sunlight, lowers charging efficiency |
|
Weather Events |
Causes physical damage, misalignment |
|
Temperature |
Affects battery storage and lifespan |
You can improve reliability by planning your installation carefully. Identify all possible sources of shade before you set up your lights. Use flexible mounting systems so you can adjust panels as needed. High-quality technology and materials help your system stay stable and efficient, even when the environment changes.
🌞 Regular checks and smart installation choices help you get the best performance from your solar street lights, no matter what the weather or surroundings bring.
Troubleshooting: Flickering, Dim, or Intermittent Light
When your solar street light flickers, dims, or works only sometimes, you need to check several possible causes. These problems often point to deeper issues in the system. You can solve most of them by following a step-by-step approach.
LED Lamp Condition
Start by checking the LED lamp itself. LED lights should provide steady, bright illumination. If you see flickering or dimming, the problem may come from the lamp or its driver. The LED driver controls the current and voltage for the lamp. When the driver fails or uses poor-quality parts, you may notice flickering or uneven light. Heat can also damage the driver, making the light unstable.
Common causes related to the LED lamp include:
- Weak or dying batteries that cannot supply enough power, leading to dim light.
- Low-quality LEDs or drivers that fail to stabilize the current.
- Incompatibility with dimmer circuits, which can cause rapid on/off cycling and flicker.
You should also check for loose wiring connections at the lamp. Improperly secured wires or oxidation can cause intermittent contact, resulting in flickering. If you see any visible damage or signs of overheating, replace the lamp or driver.
Tip: Always use high-quality LED lamps and drivers to reduce the risk of flickering and extend the life of your solar street lights.
Power Supply Stability
A stable power supply is essential for consistent lighting. If your light flickers or dims, unstable voltage may be the cause. You might notice audible noise from the lamp or controller. Sometimes, you hear a buzzing sound from passive components. You may also see the light jitter or experience sudden changes in brightness during load changes.
Look for these signs of unstable power supply:
- Audible noise from the lamp or controller.
- Unexpected jittering or rapid changes in light output.
- Extreme oscillations in brightness when the battery charges or discharges quickly.
- Occasional failures in the lamp or controller switches.
Voltage fluctuations often happen when the solar panel does not get enough sunlight. Shading or poor placement reduces charging, which leads to weak batteries and unstable power. You should check the solar panel for dirt or obstructions and make sure it receives at least six hours of direct sunlight each day.
If you notice these issues, inspect the wiring and battery connections. Secure all wires and replace any that show signs of wear or corrosion.
Controller Settings
Incorrect controller settings can also cause flickering, dim, or intermittent light. Many controllers have fixed lighting schedules. For example, some turn the light on for six hours at full brightness, then shut off. If you do not set the controller to dusk-to-dawn mode, your light may turn off earlier than expected.
Here are some controller-related causes of intermittent lighting:
- The controller’s lighting schedule is not set correctly, causing premature shutdowns.
- Energy-saving or motion-sensing modes may dim or turn off the light when no motion is detected.
- The controller may activate unwanted features if not programmed properly.
You should review the controller’s settings and adjust them as needed. Set the controller to dusk-to-dawn mode if you want the light to stay on all night. Disable energy-saving features if you do not need them. Proper configuration helps prevent many issues, including led light not turning on or shutting off at the wrong time.
Note: Always consult the controller’s manual before changing settings. This ensures you use the correct mode for your needs.
By checking the LED lamp, ensuring a stable power supply, and setting the controller correctly, you can fix most flickering, dim, or intermittent light issues in your solar street lights.
Sensor and Controller Problems
Solar street lights rely on sensors and controllers to operate automatically and efficiently. When these parts fail, you may notice your lights do not work as expected. Understanding how to identify and fix these problems helps you keep your system running smoothly.
Motion Sensor
Motion sensors detect movement and trigger the light to turn on. When the motion sensor malfunctions, you might see several symptoms:
- The light does not turn on when someone walks by.
- The light turns on even when there is no movement.
- The light flickers or behaves unpredictably.
You can trace these issues to several causes. Sometimes, the battery is dead or not charging. Dirty or blocked solar panels can also prevent the sensor from working. Incorrect placement of the sensor or solar panel may cause missed detections. A faulty or misaligned sensor, over-sensitivity, or sunlight interference can also lead to problems. Loose or damaged wiring and environmental factors, such as wind or animals, may trigger false alarms.
To diagnose and fix motion sensor faults, follow these steps:
- Check and replace the battery if needed.
- Clean the solar panel to ensure proper charging.
- Reposition the solar panel and sensor for better sunlight and motion detection.
- Adjust the sensor’s sensitivity to avoid false triggers.
- Inspect wiring for damage or looseness and repair as necessary.
- Test the sensor’s alignment and replace it if it is faulty.
Tip: Regular cleaning and inspection of your solar panels and sensors help prevent most motion sensor problems.
Light Sensor
The light sensor tells your solar street light when to turn on or off based on ambient light. If the sensor fails, your light may stay on during the day or not turn on at night. The most common issue happens when strong light shines on the solar panel, causing the controller to think it is still daytime. This prevents the light from activating at night.
You can prevent these problems by making sure nothing blocks or reflects light onto the sensor or panel. Adjust the sensitivity settings if your controller allows it. Place your solar street light in an area with clear exposure to natural light and away from artificial light sources that may confuse the sensor.
|
Problem |
Possible Cause |
Solution |
|---|---|---|
|
Light stays on in daytime |
Sensor misinterprets light |
Adjust sensor placement/settings |
|
Light does not turn on |
Sensor blocked or faulty |
Clean or replace sensor |
Note: Most sensor issues involve incorrect light detection. You can solve them by adjusting placement and keeping the sensor clean.
Controller Function
The controller acts as the system’s brain. It manages charging, discharging, and switching the light on and off. Damage to the controller or its printed circuit board (PCB) can stop your light from working at night.
You can test and verify controller function with these steps:
- Observe the controller’s indicator lights. A flashing green light during the day means proper charging. A red light may signal a problem.
- If you see a flashing red light and the light does not work, try replacing the controller with a known good one.
- Use a multimeter to check voltages at key points. Measure the solar panel voltage in sunlight and the battery voltage when disconnected.
- If the controller shows no lights, inspect connectors for water damage or shorts.
- Make sure the solar panel is clean and positioned correctly to support charging.
🛠️ If you find damage or persistent faults, replace the controller to restore normal operation.
By following these steps, you can quickly identify and resolve most sensor and controller problems in your solar street light system.
Preventative Maintenance for Solar Street Lights
Cleaning and Inspection
You can extend the lifespan of your solar street lights by following a routine cleaning and inspection schedule. Dirt, dust, and debris often collect on solar panels, which reduces their ability to generate power. Clean the panels every three to four months under normal conditions. If you live in a dusty area or experience frequent storms, increase the cleaning frequency. Use a soft cloth and mild detergent to avoid scratching the panel surface.
Regular maintenance also includes inspecting the entire system. Look for cracks in the panels, rust on mounting brackets, and loose or corroded wire connections. Check the LED fixtures for signs of water ingress. Tighten any loose bolts or screws you find. By catching these issues early, you prevent reduced lighting hours, flickering, or even total system failure.
Here is a table to help you plan your cleaning and inspection routine:
|
Task |
Frequency |
Purpose |
|---|---|---|
|
Clean solar panels |
Monthly or as needed |
Remove dust and debris for better efficiency |
|
Inspect LED lights |
Annually |
Detect flickering or dimming; replace as needed |
|
Check wiring and connections |
Annually |
Prevent loose or corroded contacts |
|
Inspect mounting hardware |
Annually |
Avoid rust and structural damage |
|
Test lighting function |
Quarterly |
Confirm system works as expected |
🧹 Tip: Document your maintenance activities and keep spare parts for critical components. This habit helps you respond quickly if you spot a problem.
Battery Care
Battery care plays a key role in the performance and lifespan of your solar street lights. You should monitor battery voltage every month. Look for signs of corrosion on the terminals and check for swelling or leaks. If you notice the battery cannot hold a charge or the lighting time drops, consider replacing it.
Regular battery monitoring helps you avoid sudden outages and keeps your lights working reliably. Always disconnect the power before handling the battery. Wear protective gloves and eyewear for safety. Replace batteries that show capacity loss or physical damage. By following these steps, you support consistent lighting output and prevent premature failures.
A few best practices for battery care include:
- Monitor battery voltage monthly.
- Clean terminals to prevent corrosion.
- Replace batteries showing reduced capacity or physical damage.
- Store spare batteries in a cool, dry place.
⚡ Note: Neglecting battery maintenance can lead to reduced lighting hours and unexpected system shutdowns.
Weather Protection
Weather can challenge the durability of your solar street lights. You need to protect your system from rain, wind, dust, and extreme temperatures. Use weather-resistant materials and UV-resistant coatings to prevent damage from sunlight. Apply proper sealing and water-resistant coatings to keep water and dust out of sensitive parts.
Inspect mounting structures for rust or looseness every year. Reinforce poles and brackets if you live in a windy area. In cold climates, use batteries with low-temperature protection or internal heating systems. For hot climates, choose brackets with good heat dissipation and consider adding heat sinks to controllers.
Here is a table of recommended weather protection measures:
|
Weather Condition |
Protection Measures |
|---|---|
|
Cold Weather |
Use low-temp batteries, insulation, anti-frost coatings on panels |
|
Rain and Humidity |
Waterproof housings, sealed joints, anti-corrosion coatings |
|
Wind and Storms |
Reinforced poles, aerodynamic designs, deep-buried foundations |
|
Sand and Dust |
Self-cleaning coatings, enclosed fixtures, regular cleaning |
|
Lightning |
Install lightning rods, ensure proper grounding |
You can also use smart programming to adjust lighting based on weather patterns. Adaptive lighting technologies, such as dimming and motion sensors, help optimize energy use during harsh conditions. By practicing proactive maintenance practices, you ensure your solar street lights remain reliable and efficient, even in challenging environments.
🌦️ Callout: Regular maintenance and weather protection keep your solar street lights working longer and reduce the risk of unexpected failures.
Regular Testing
You need to include regular testing as part of your solar street light maintenance routine. Regular testing helps you catch problems early and keeps your system running smoothly. When you test your solar street lights, you make sure every component works as it should. This step is just as important as cleaning or battery care.
Start by creating a simple testing schedule. You can test your lights every three months, but you may want to check them more often if you live in a harsh climate. Use a checklist to keep track of each test. This habit makes your regular maintenance more effective.
Here are some key steps for regular testing:
-
Check Light Operation
Turn on the lights at dusk and watch how they perform. Make sure each light turns on at the right time and stays bright through the night. -
Test Sensors
Walk near the motion sensors and see if the lights respond. Cover the light sensor briefly to check if the system reacts to changes in ambient light. -
Inspect Battery Performance
Use a voltmeter to measure battery voltage before and after charging. Compare the readings to the manufacturer’s guidelines. This process supports regular battery monitoring and helps you spot weak batteries early. -
Review Controller Settings
Look at the controller’s indicator lights. Make sure the settings match your needs for lighting time and brightness. -
Examine Wiring and Connections
Gently tug on wires and check for loose or corroded connections. Secure any loose wires right away.
🛠️ Tip: Keep a logbook for your maintenance and testing activities. This record helps you track changes and spot patterns over time.
Regular testing works best when you combine it with other maintenance tasks. For example, test the lights after cleaning the panels or replacing a battery. This approach ensures that your regular maintenance covers every part of the system.
You should also pay attention to seasonal changes. Test your lights after storms, heavy rain, or snow. These events can cause hidden damage that only shows up during operation. By adding regular testing to your maintenance plan, you reduce the risk of sudden failures and extend the life of your solar street lights.
Remember, regular maintenance is not just about fixing problems. It is about preventing them. When you test your system often, you protect your investment and keep your community safe and well-lit.
When to Seek Professional Help
Complex Electrical Issues
You may face problems with your solar street lights that go beyond basic troubleshooting. Complex electrical issues often require specialized knowledge and tools. If you notice persistent faults after checking the battery, controller, and wiring, you should consider calling a professional. Water damage inside the light fixture, battery compartment, or solar panel can cause corrosion and short circuits. These problems can lead to permanent damage or even safety hazards.
You should also seek expert help if you encounter tasks such as firmware updates or advanced controller diagnostics. Professionals have the right equipment and training to handle these jobs safely. They can ensure your system meets all regulations and works at its best.
- Hire professional maintenance services to save time and effort.
- Professionals help you achieve optimal performance and extend the lifespan of your solar street lights.
- Service contracts often include regular maintenance, emergency repairs, and cost benefits.
- Partnering with reputable providers guarantees your system receives professional care.
Tip: If all your troubleshooting steps fail, or if you feel unsure about any repair, contact a qualified electrician or the solar light manufacturer.
Warranty Support
Your solar street lights may come with a warranty that covers certain repairs or replacements. If you suspect a component has failed within the warranty period, do not attempt to fix it yourself. Instead, reach out to the manufacturer or authorized service provider. Attempting repairs on your own can void the warranty and lead to extra costs.
Most manufacturers require that only certified technicians perform repairs under warranty. These professionals know how to handle warranty claims and use approved parts. They can also document the repair process, which helps protect your investment.
- Contact the manufacturer for warranty support if you notice early failures.
- Use authorized service centers to avoid losing warranty coverage.
- Keep all purchase and service records for easy claim processing.
Note: Always check your warranty terms before starting any repairs. This step ensures you receive the full benefits of your coverage.
Safety Concerns
Safety should always come first when working with electrical systems. Some repairs can expose you to high voltages or hazardous materials. If you see signs of water ingress, corrosion, or overheating, do not try to fix the problem yourself. These issues can cause electric shocks or fires.
Professional technicians follow strict safety protocols. They use insulated tools and wear protective gear. They also know how to disconnect power safely and test for hidden faults. By relying on experts, you reduce the risk of injury and prevent further damage to your system.
- Seek professional help if you detect water damage or corrosion.
- Call an expert if you feel unsure about any repair step.
- Professionals ensure your system remains safe and compliant with local regulations.
⚠️ Alert: Never ignore safety warnings. When in doubt, let a professional handle the repair to protect yourself and your property.
You can solve most solar street light problems by following a step-by-step approach. Start with visual checks, test each component, and clean your system regularly. Always put safety first. If you cannot fix the issue, contact a professional.
🛠️ Regular maintenance keeps your lights reliable and bright. Take action early to protect your investment and keep your community safe.
FAQ
What should you do if your solar street light works only sometimes?
Check the battery and wiring first. Clean the solar panel. Make sure the controller settings match your needs. Test the sensors. Replace any damaged parts. Regular maintenance helps prevent this issue.
How often should you clean your solar panels?
You should clean your solar panels every three to four months. If you live in a dusty area or near trees, clean them more often. Clean panels help your system charge better and last longer.
Can you replace the battery yourself?
Yes, you can replace the battery if you follow safety steps. Disconnect the power first. Wear gloves and eye protection. Use the correct battery type. If you feel unsure, contact a professional.
Why does your solar street light stay on during the day?
A faulty light sensor or incorrect controller settings often cause this problem. Check for dirt or obstructions on the sensor. Adjust the settings if needed. Replace the sensor if it does not work after cleaning.
What type of battery works best for solar street lights?
Lithium-ion batteries work best for most solar street lights. They last longer, store more energy, and handle temperature changes well. Always use the battery type recommended by your manufacturer.
How can you tell if your solar panel is charging?
Use a multimeter to measure the voltage output during daylight. The voltage should match the panel’s specifications. You can also check the controller’s indicator lights for charging status.
What should you do if your light flickers at night?
Inspect the battery and wiring. Check for loose connections. Clean the solar panel. Review the controller settings. Replace the LED lamp or driver if needed. Flickering often means unstable power or a failing component.
Do solar street lights work in winter?
Yes, solar street lights work in winter. Shorter days and snow may reduce charging. Clean snow off the panels. Use batteries rated for cold weather. Adjust the panel angle for better sunlight exposure.