It can feel frustrating when your solar lights suddenly stop working. You might wonder if you need to replace them or call for help. The good news? In most cases, you can get your lights shining bright again with a few simple steps. Common issues like dirty panels, weak batteries, or loose wires often have quick fixes you can handle at home.
- You can usually solve problems by:
- Cleaning the panels
- Swapping out old batteries
- Resetting sensors
- Checking for shade from overgrown branches
Rackora always aims to deliver quality and innovation, making solar lights that are both stylish and reliable.
Key Takeaways
- Solar lights often stop working due to dirty panels, weak batteries, poor sunlight, wiring issues, or water damage.
- Clean solar panels regularly with a soft cloth and mild soap to keep them charging efficiently.
- Replace rechargeable batteries every few years to maintain bright, long-lasting light.
- Place solar lights where they get at least six hours of direct sunlight daily and avoid shade.
- Check wiring for damage or loose connections and fix them safely to restore light function.
- Reset solar lights by turning them off, removing batteries briefly, then turning them back on to fix sensor glitches.
- Perform seasonal checks and routine maintenance to extend your solar lights’ lifespan and performance.
- Choose high-quality, weatherproof solar lights like Rackora for better durability, brightness, and customer support.
Why Solar Lights Fail
Lack of Sunlight
You might notice your solar lights not shining as brightly after a few cloudy days. Sunlight is the main source of power for these lights. When your garden or driveway gets less sun because of overgrown trees, new buildings, or just bad weather, your solar lights can’t charge fully. Even a few hours of shade during the day can make a big difference. In some climates, you have to deal with long stretches of rain or snow, which means your lights get even less energy. If you live in an area with lots of shade or frequent storms, your solar lights may need a bigger battery or a more efficient panel to keep up. Engineers often design solar lights with these challenges in mind, but you still need to check if your lights are getting enough sun every day.
Tip: Try moving your solar lights to a sunnier spot if you notice they aren’t charging well. Sometimes, just a small change in placement can make a huge difference.
Dirty Panels
Have you ever wiped your finger across a window and seen how much dust comes off? The same thing happens to solar panels. Dirt, pollen, and even bird droppings can build up on the surface. When this happens, your solar lights lose efficiency fast. Studies show that dirty panels can cause up to 80% of solar light failures. Even a thin layer of dust can block 20-50% of sunlight from reaching the panel. That means your lights might not charge enough to last through the night. If you live in a dusty area or near trees that drop a lot of pollen, you’ll want to check your panels often. Cleaning them with a soft cloth and a little water can help your solar lights work like new again.
- Dust and dirt block sunlight.
- Pollen and dew can stick together and form a stubborn layer.
- Micro-cracks or scratches also reduce panel effectiveness.
Battery Issues
Batteries are the heart of your solar lights. Over time, every battery wears out. Most solar lights use rechargeable batteries, but these have a limited lifespan. For example, Nickel-Metal Hydride (NiMH) batteries usually last 1-3 years. Lithium-Ion batteries can last 3-5 years or more if you take care of them. You might notice your lights don’t stay on as long as they used to, or maybe they look dim even after a sunny day. Sometimes, the lights flicker or turn off and on by themselves. These are all signs that you might need a solar light battery replacement.
- Shorter runtime at night
- Dimmer light output
- Flickering or inconsistent performance
When you decide to do a solar light battery replacement, always use the same type and capacity as the original. This helps your lights work safely and efficiently. Don’t forget to recycle your old batteries properly to protect the environment.
Note: If your solar lights are still not working after a solar light battery replacement, you might want to check the wiring or look for water damage.
Wiring Problems
Wiring problems can sneak up on you and cause your solar lights to stop working or act strangely. You might see your lights flicker, dim, or not turn on at all. Sometimes, the issue hides inside the light’s casing or along the wires that connect the solar panel, battery, and LED bulb.
Here are some of the most common wiring issues you might face:
- Frayed or damaged wires from wind, animals, or even lawn equipment. These can break the connection and stop your solar lights from working.
- Loose or corroded connections. If you notice your lights flickering or dimming, check the wire connections. Corrosion can build up over time, especially in damp environments.
- Faulty connections at the junction points. The spots where wires meet the solar panel, battery, or LED bulb can sometimes come loose or wear out.
You don’t need to be an electrician to spot these problems. Just look for any exposed wires, rust, or places where the wires don’t seem secure. If you find a problem, you can often fix it by tightening the connections or replacing a damaged wire. Regularly checking your solar lights for these issues helps keep them shining bright.
Tip: Always turn off your solar lights and remove the battery before inspecting or fixing any wiring. Safety first!
Water Damage
Water and electricity never mix well, and your solar lights are no exception. Even though many outdoor lights are built to handle rain and moisture, water can still find its way inside if seals wear out or if the light gets damaged.
Water damage can cause several problems:
- It can ruin the battery or controller inside your solar lights, making them stop working much sooner than expected.
- If water gets into the circuitry, you might see your lights fail after a heavy rain or snowstorm.
- Sometimes, water can damage the solar panel itself, leading to poor charging and weak performance.
High-quality solar lights, like those from Rackora, use special designs and materials to keep water out. For example, products with an IP65 waterproof rating have tight seals that protect the important parts inside. This means your lights can handle rain, snow, and even the occasional splash from a garden hose.
You can help prevent water damage by placing your solar lights in spots where water won’t pool around them. Make sure to check the seals and clean off any dirt that might let water sneak in. Choosing weather-resistant lights and keeping up with maintenance will help your solar lights last longer and work better, no matter the weather.
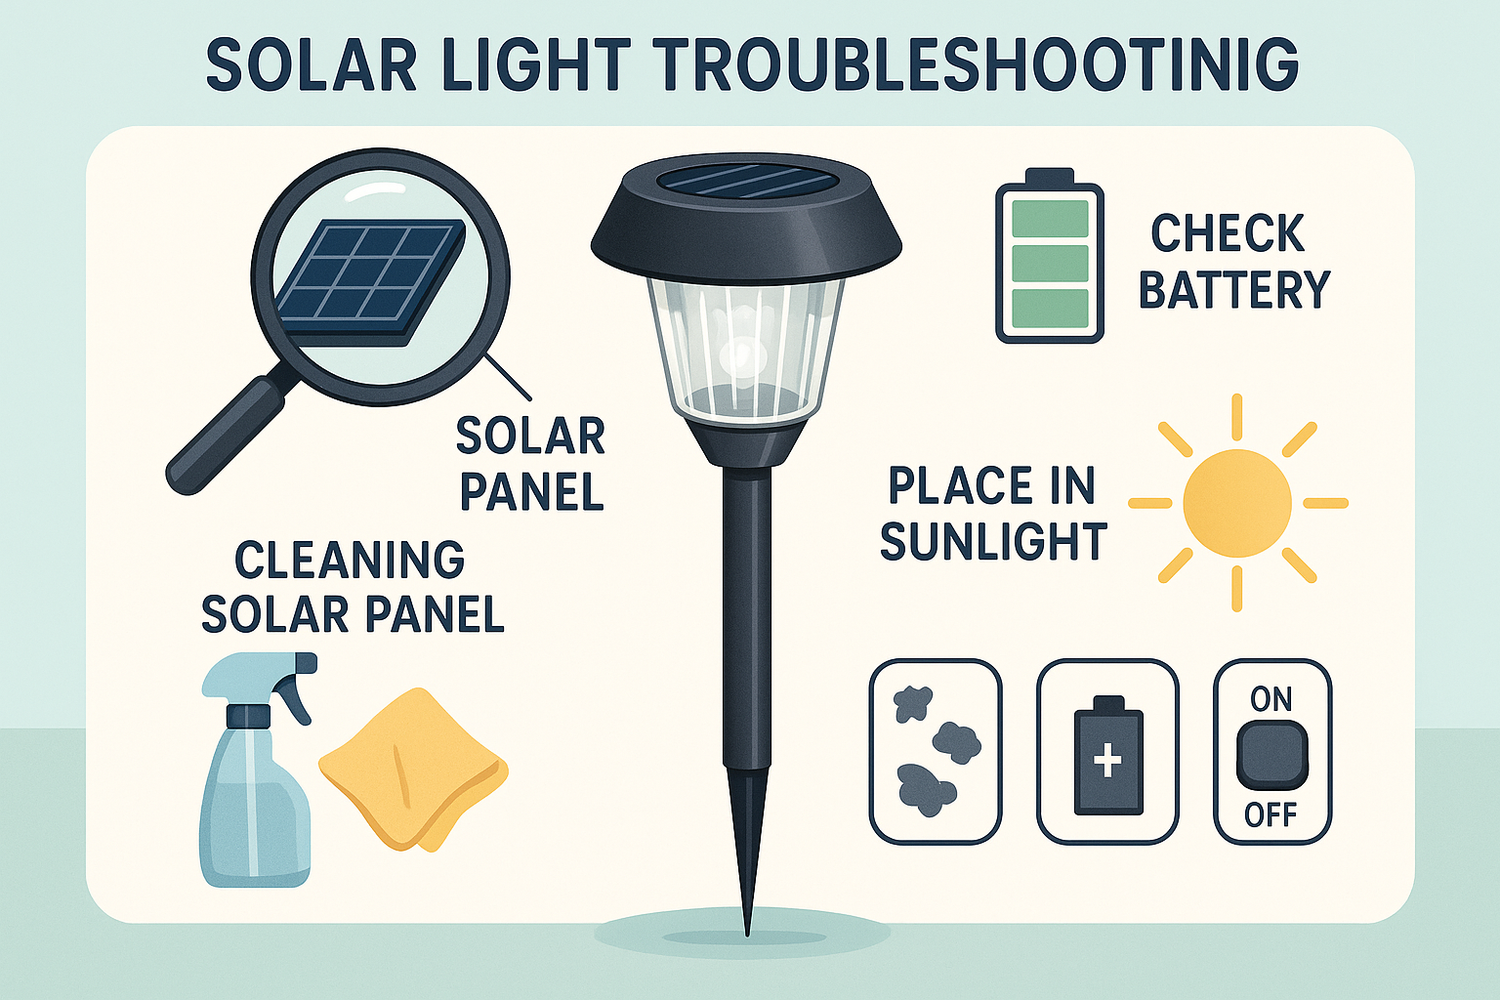
Troubleshooting Solar Lights
Check Sunlight Exposure
If your solar powered yard lights aren’t shining as they should, start by checking how much sunlight they get each day. Sunlight is the fuel that keeps your solar lights glowing at night. Sometimes, a simple change in the environment can block the sun—think new tree branches, a parked car, or even a garden decoration.
Here’s how you can make sure your solar lights get the best exposure:
- Place your solar powered yard lights where they receive at least 4–6 hours of direct sunlight daily.
- Face the solar panel toward true south if you live in the Northern Hemisphere, or true north if you’re in the Southern Hemisphere. This orientation helps maximize sunlight.
- Adjust the tilt of the panel to match your location’s latitude. A steeper tilt in winter and a flatter angle in summer can boost performance.
- Watch out for shade. Even a little bit of shadow—like from a fence or a bush—can cut your solar lights’ energy by half.
- Use a smartphone app like Sun Surveyor or SunCalc to track the sun’s path and spot any hidden shade during the day.
Tip: Move your solar powered yard lights around your yard to test different spots. Sometimes, just a few feet can make a big difference in how well they charge.
If you have a Rackora light, you’ll find that the intelligent design makes it easy to adjust the panel’s angle and orientation. This helps you get the most out of every sunny day.
Clean the Panel
Dirt, dust, and pollen can sneak up on your solar lights and block the sunlight they need. Even a thin layer of grime can cut down how much energy your solar powered yard lights collect. If you notice your lights looking dim or not lasting through the night, it might be time for a quick cleaning.
Follow these steps to keep your panels sparkling:
- Clean your solar panels early in the morning or late in the evening when they’re cool. This prevents water spots and streaks.
- Use a soft-bristled brush or a gentle sponge with mild, non-abrasive soap and distilled water. Avoid harsh chemicals and rough scrubbers—they can scratch the panel.
- Rinse with a gentle stream of water. Skip the pressure washer, as it can damage the panel.
- Wipe dry with a soft cloth to avoid streaks.
- Check for cracks, chips, or other damage while you clean. If you spot any, you may need to replace the panel or consult support.
- Clean your solar powered yard lights at least twice a year. If you live in a dusty area or near lots of trees, you might need to clean them more often.
Note: Always turn off your solar lights before cleaning to stay safe. If your lights are hard to reach, consider asking a professional for help.
Rackora’s outdoor lights are designed for easy maintenance. The smooth surfaces and weather-resistant materials make cleaning quick and simple, so your lights stay bright all year.
Inspect the Battery
If your solar lights still aren’t working after checking sunlight and cleaning the panels, it’s time to look at the battery. The battery stores the energy your solar powered yard lights collect during the day. Over time, batteries wear out and need replacing.
Here’s a step-by-step guide for inspecting and replacing your battery:
- Look for signs that the battery is failing. If your lights are dim, don’t last as long, flicker, or don’t turn on at all, the battery might be the culprit.
- Open the battery compartment and check for corrosion, swelling, or leaks. Clean any corrosion with a little vinegar or baking soda solution, then dry thoroughly.
- If your solar light uses more than one battery, replace them all at the same time. Use the same type and voltage as the original—never mix different kinds.
- Choose the right replacement. For solar light battery replacement, always use rechargeable batteries (like NiMH, NiCd, or Li-ion) that match the original specs.
- Dispose of old batteries at a recycling center. Never throw them in the trash, especially if they’re NiCd, which can be hazardous.
- For best results, replace NiMH or NiCd batteries every 1–2 years, Li-ion every 3–5 years, and LiFePO₄ batteries every 5–10 years.
- Keep your solar powered yard lights running longer by making sure the panels stay clean and the lights get plenty of sun each day.
Pro Tip: If you’re not sure about battery health and connection, use a multimeter to check the voltage. If the reading is much lower than the battery’s rating, it’s time for a solar light battery replacement.
Rackora’s solar lights make battery access simple, so you can swap out old batteries without hassle. If you ever get stuck, check the product manual or reach out to Rackora’s support team for help.
Test the Switch
Sometimes, the problem with your solar lights is as simple as a faulty switch. You might overlook this step, but the switch controls whether your solar powered yard lights turn on or off. If the switch gets stuck, feels loose, or collects dirt, your lights may not work at all.
Here’s how you can test and restore the switch:
- Turn off your solar lights using the on-off switch.
- Remove the batteries and wait about 30 seconds. This helps reset any sensor glitches.
- Reinsert the batteries, making sure you match the correct polarity.
- Cover the solar panel for a few seconds. This tricks the sensor into thinking it’s nighttime.
- Uncover the panel and turn the switch back on.
If your solar powered yard lights start working, you’ve solved the issue. If not, check if the switch feels sticky or blocked. Dirt or moisture can cause problems, so gently clean around the switch with a dry cloth. Try turning the switch off, waiting a few seconds, then turning it back on. If your solar lights still don’t respond, the switch might need replacement or professional attention.
Tip: Always make sure your batteries have enough charge before testing the switch. Low battery power can make it seem like the switch is broken.
Rackora designs switches that are easy to access and clean. You can quickly troubleshoot without taking apart the whole fixture.
Examine Wiring
Wiring issues can stop your solar powered yard lights from working, even if everything else looks fine. You don’t need special skills to check the wiring, but you do need to be careful.
Follow these steps to inspect and repair wiring:
- Power off your solar lights before you start. Safety comes first.
- Look for cuts, abrasions, exposed wires, or corrosion. Damaged wires can break the connection and cause your solar lights to fail.
- Check connectors and cable clamps. Make sure they’re tight and show no signs of damage.
- Use a multimeter to test for continuity. This helps you find hidden faults that aren’t visible.
- Replace any damaged cables right away. Use approved parts for best results.
- If you need to splice wires, match positive to positive and negative to negative. Use solder and heat shrink tubing to make secure, weatherproof connections.
- Protect your cables with sleeves and strain reliefs. This prevents damage from wind, animals, or lawn equipment.
- Coil and store cables properly. The “over-under” method helps avoid internal wire breakage.
You should also check for anything that might shade your solar panels or block the light beam. In split-design solar powered yard lights, inspect the wiring for cracks or wear that could let water in. Tighten mounting screws or clamps, especially after storms or strong winds.
Note: If you find severe damage or can’t fix the problem, reach out to Rackora’s support team or a professional electrician.
Rackora’s solar lights use high-quality wiring and connectors, making inspection and repair easier for you.
Reset the Light
Sometimes, your solar lights just need a reset to get back on track. Sensors and controllers can glitch, especially after battery changes or power interruptions. Resetting your solar powered yard lights is a quick way to solve many common problems.
Here’s how you can reset your solar lights:
- Turn off the light using the switch.
- Remove the batteries and wait for about 30 seconds.
- Put the batteries back in, making sure they’re installed correctly.
- Cover the solar panel for a few seconds to reset the sensor.
- Uncover the panel and turn the switch back on.
This process helps clear minor sensor or battery errors. If your solar powered yard lights start working again, you’ve fixed the issue. If not, check the manual for your specific Rackora model. Some advanced lights have remote reset options or intelligent controls that make troubleshooting even easier.
Pro Tip: Always consult your product manual for reset instructions. If you’re still having trouble, Rackora’s customer service can guide you through more advanced steps.
Resetting your solar lights is often the fastest way to restore normal operation. You don’t need special tools or skills—just a little patience and attention to detail.
Maintaining Solar-Powered Lights
Regular Cleaning
If you want your garden solar lights to shine bright every night, regular cleaning is a must. Dust, pollen, and even bird droppings can block sunlight from reaching the panels. When you clean your solar-powered lights, you help them charge better and last longer. Most people find that a quick wipe every month or two keeps things running smoothly, but if you live in a dusty area or have lots of trees, you might need to clean more often.
Here’s a quick guide to cleaning solar-powered lights:
- Wipe the solar panel with a soft, damp cloth. Use mild soap and water if needed.
- Avoid harsh chemicals or rough brushes that could scratch the panel.
- Remove leaves, snow, or ice that might cover the panel.
- Check for cracks or damage while you clean.
- Clean the light’s casing and lens to keep your solar light garden looking its best.
How often should you clean? It depends on your environment and the cleaning method. Take a look at this table for some common cleaning intervals:
|
Cleaning Method |
System Type |
Optimal Cleaning Interval (days) |
|---|---|---|
|
Manual Cleaning |
Fixed-tilt PV |
|
|
Water-based Cleaning |
Fixed-tilt PV |
7.20 |
|
Washing Trucks |
Fixed-tilt PV |
6.48 |
|
Movable Dry-cleaning |
Fixed-tilt PV |
99.01 |
|
Linear Robots |
Fixed-tilt PV |
52.03 |
|
Electrostatic/Passive |
Fixed-tilt PV |
Daily |
|
Manual Cleaning |
Tracking PV |
~16.5 - 16.8 |
|
Water-based Cleaning |
Tracking PV |
~7.6 - 7.8 |
|
Linear Robots |
Tracking PV |
~55.1 - 55.2 |
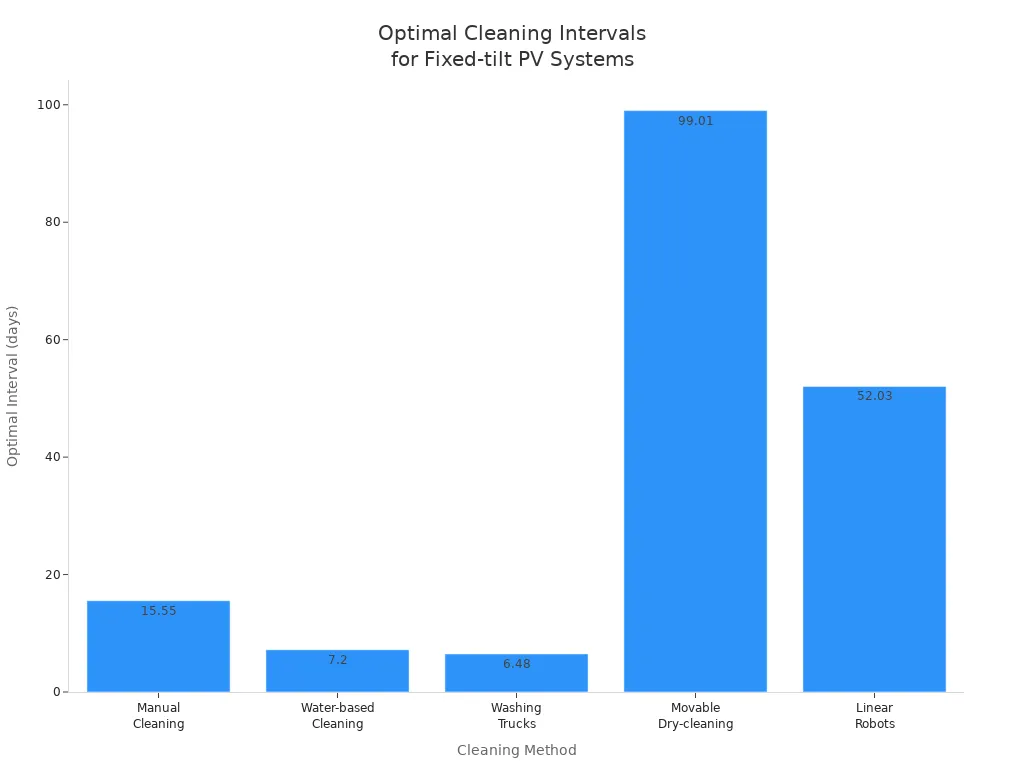
For most garden solar lights, manual cleaning every two weeks works well. If you use water-based cleaning, you might want to do it weekly.
Battery Care
Taking care of the batteries in your solar powered yard lights keeps them glowing longer. Before you use new lights, charge them in direct sunlight for at least eight hours with the switch off. This helps condition the battery. During daily use, keep the switch off while charging to avoid draining the battery. If you plan to store your lights, turn them off and keep them in a cool, dry place.
Watch for signs that you need a solar light battery replacement. If your garden solar lights seem dim, don’t last as long, or flicker, it’s probably time. Most NiMH batteries last one to three years, while lithium-ion batteries can go three to five years or more. Always match the battery type and capacity when you replace them. For best results, replace all batteries in a set at the same time.
Tip: Reset your solar powered yard lights after a solar light battery replacement. Turn them off, remove the batteries for a minute, put them back in, cover the panel briefly, then turn the switch back on.
Weather Protection
Weather can be tough on your solar light garden. Rain, snow, humidity, and dust all affect how well your lights work. Dust and dirt can stick to panels, especially in humid places, making cleaning solar-powered lights even more important. Regular cleaning and maintenance help prevent efficiency loss.
- Use weather-resistant lights, like the Rackora 15" Black Outdoor Post Light, for extra durability.
- Bring garden solar lights indoors during heavy snow or ice storms.
- Check for loose mounting screws after strong winds.
- Inspect wiring for wear, especially in split-design solar powered yard lights.
- Keep panels clear of leaves and debris to maintain solar lights at their best.
By following these simple steps, you’ll keep your solar light garden shining bright, no matter the weather.
Seasonal Checks
Seasonal checks keep your garden solar lights working their best all year. You might think cleaning and battery care are enough, but each season brings new challenges for your solar light garden. Spring, summer, fall, and winter all affect how your lights perform. If you want reliable lighting, you need to adjust your routine as the weather changes.
Here’s a simple checklist to follow every season:
- Inspect your garden solar lights after storms or heavy winds. Look for leaves, branches, or debris covering the panels. Remove anything that blocks sunlight.
- Clean the panels at least twice a year. Late summer is a great time for a deep clean. Dust, pollen, and bird droppings build up fast, especially in busy gardens. Dirty panels can lose up to 25% efficiency, so regular cleaning helps your solar light garden shine bright.
- Check battery health before winter and summer. Extreme temperatures can shorten battery life. If your garden solar lights seem dim or don’t last as long, consider a solar light battery replacement. Always use the same type and capacity for safety.
- Monitor performance with apps or built-in controls. Many modern garden solar lights, like Rackora’s outdoor models, let you track energy output. Watch for sudden drops in brightness or runtime. These signs might mean it’s time for maintenance.
- Inspect wiring and connections. Seasonal changes can cause wires to loosen or corrode. Tighten any loose connections and look for rust or wear.
- Adjust placement for maximum sunlight. As the sun’s angle shifts, your solar light garden may get more shade. Move your lights if needed to keep them in direct sunlight.
Tip: If you live in an area with sensitive wildlife, use warmer light tones in your garden solar lights. This helps protect local animals and follows environmental guidelines.
Here’s a quick table to help you remember what to check each season:
|
Season |
What to Check |
Why It Matters |
|---|---|---|
|
Spring |
Clean panels, check for debris |
Boosts charging after winter |
|
Summer |
Inspect batteries, deep clean |
Handles heat and pollen |
|
Fall |
Remove leaves, check wiring |
Prepares for storms |
|
Winter |
Test battery, move lights |
Prevents cold-related issues |
You don’t need fancy tools for these checks. A soft cloth, a screwdriver, and a little attention go a long way. If you notice your garden solar lights aren’t performing as usual, don’t wait. Quick action keeps your solar light garden glowing through every season.
Note: Regular seasonal checks not only extend the life of your garden solar lights but also help you spot problems before they get worse. This means fewer surprises and more nights with a beautifully lit solar light garden.
When to Replace or Upgrade
Signs of Irreparable Damage
Sometimes, no matter how much you clean, reset, or swap batteries, your solar lights just won’t bounce back. How do you know when it’s time to stop troubleshooting and start shopping for a replacement? Here are some clear signs your solar light is beyond repair:
- The battery looks swollen or leaks fluid.
- You get low voltage readings even after a full day of sun.
- The light turns on briefly after charging but fades out fast.
- The controller shows odd behavior, like blinking LEDs or no lights at all.
- The light flickers, stays on during the day, or refuses to turn on at night.
- The panel doesn’t charge, even though the battery and panel look clean and healthy.
- The solar panel has cracks, peeling layers, or produces no voltage in sunlight.
If you spot any of these issues, it’s usually best to replace the whole light. Trying to fix these problems often costs more time and money than simply upgrading.
Choosing New Lights
Ready to pick out new solar lights? You have lots of options, but a few key tips can help you make the right choice for your space and needs:
- Decide where you need light and why. Only install lights where they serve a real purpose.
- Aim the light exactly where you want it. Use shields or adjust the angle to avoid lighting up areas you don’t need.
- Pick the lowest brightness that still gets the job done. This helps reduce light pollution and saves energy.
- Look for features like timers or motion sensors. These let your lights run only when needed, saving battery life.
- Choose warm-colored lights. They’re easier on the eyes and better for the environment.
- Make sure your new lights get at least 6–8 hours of direct sunlight each day. Avoid placing them in shaded spots.
- Match the style to your space—think pathway lights for walkways, spotlights for gardens, or post lights for driveways.
- Check for weatherproofing and sturdy materials. Outdoor lights need to handle rain, snow, and heat.
- Go for models with automatic dusk-to-dawn sensors for hassle-free operation.
- Clean the panels regularly and replace batteries when you notice dimming.
Tip: Always check the lumen rating to make sure your new lights are bright enough for your needs.
Benefits of Rackora Upgrades
Upgrading to advanced Rackora solar lights brings a whole new level of performance and style to your outdoor space. Here’s what you get when you choose Rackora:
- Super-bright illumination—up to 1800 lumens—keeps your yard safe and well-lit.
- Sleek, modern designs fit right in with any garden, walkway, or driveway.
- Long-lasting lithium iron phosphate (LiFePO₄) batteries mean fewer replacements and more reliable power.
- Rugged construction with die-cast aluminum and PC materials stands up to rain, snow, and heat.
- Smart remote controls let you adjust brightness, set schedules, and manage multiple lights from a distance.
- Easy installation with detachable parts—no complicated wiring required.
- Customizable lighting options, including warm or cool color temperatures, help you set the perfect mood.
- Eco-friendly solar power slashes your electricity bills and cuts down on maintenance.
- Advanced LED technology and robust build mean you spend less time fixing and more time enjoying your lights.
If you want to take your outdoor lighting to the next level, check out Rackora’s T-7 Integrated Solar Street Light or the 45000LM Commercial Solar Street Light. These models offer powerful brightness, smart controls, and long-lasting batteries—perfect for anyone who wants reliable, stylish, and eco-friendly lighting that just works.
Preventing Future Issues
Best Placement
Getting the placement right for your solar lights makes a huge difference in how well they work and how long they last. You want your garden solar lights to soak up as much sun as possible. Here are some tips to help you get the most out of your solar light garden:
- Place solar lights where they get at least six hours of direct sunlight every day.
- Face solar panels south if you live in the Northern Hemisphere. This helps them collect the most energy.
- Keep solar lights away from shade caused by trees, fences, or buildings.
- Adjust the placement as the seasons change. The sun’s path shifts, so what works in summer might not work in winter.
- Mount panels securely to prevent wind damage and keep them pointed in the right direction.
- Space your garden solar lights so you can clean and maintain them easily.
- Manage cables carefully to protect them from weather and animals.
- Choose a height that looks good but also lets you reach the lights for cleaning.
- Trim nearby plants and branches so your solar lights always get clear sunlight.
- Improve drainage around your solar light garden to avoid water pooling near the base.
- Use UV protection during extreme heat to keep components safe.
Tip: Check your solar garden lights every few months. Move them if you notice new shadows or changes in sunlight.
Routine Maintenance
Routine maintenance keeps your solar lights shining bright and helps you avoid common problems. You don’t need fancy tools or special skills. Just a little attention goes a long way. Clean the panels every month to remove dust, dirt, and bird droppings. This simple step boosts energy production and keeps your solar light garden glowing.
Monitor battery health and replace batteries when you notice dimming or shorter runtimes. Inspect the wiring and connectors for signs of wear or corrosion. Trim plants and grass around your garden solar lights to prevent shading. Protect batteries from extreme temperatures by moving lights indoors during harsh weather.
Here’s a quick checklist for routine maintenance:
|
Task |
How Often |
Why It Matters |
|---|---|---|
|
Clean panels |
Monthly |
Improves charging |
|
Check batteries |
Every 6 months |
Extends lifespan |
|
Inspect wiring |
Quarterly |
Prevents failures |
|
Trim vegetation |
Monthly |
Maintains sunlight exposure |
|
Test light output |
Monthly |
Spots issues early |
Note: Regular cleaning and inspections help you catch small problems before they turn into big repairs.
Using Quality Products
Choosing high-quality solar lights makes your solar light garden more reliable and easier to maintain. Premium solar garden lights use monocrystalline panels for better energy conversion. They have lithium-ion batteries that charge fast and last longer. LED bulbs give you bright light and use less energy than old-fashioned bulbs.
Look for features like weatherproof construction, motion sensors, and remote controls. These make your garden solar lights more durable and convenient. Materials like stainless steel and cast aluminum resist rust and damage from rain or snow. Advanced controls let you set timers or adjust brightness, saving energy and extending battery life.
High-quality solar lights also come with strong warranties and responsive customer service. You get peace of mind knowing help is available if you need it. When you choose brands like Rackora, you invest in products designed for performance, style, and long-term value.
Tip: Spend a little more upfront for quality. You’ll save time and money on repairs and replacements down the road.
Rackora Solutions and Support
When you choose Rackora, you get more than just a solar light. You get a partner who cares about your experience from start to finish. Rackora stands out for its commitment to innovation, customer support, and advanced solutions that help you get the most from your solar lighting.
Power Optimization
You want your solar lights to work their best, no matter where you install them. Rackora understands this need. That’s why you’ll find advanced power optimization features in many Rackora products. These features help your lights adjust to changing weather, sunlight, and energy demands. For example, Rackora’s solar street lights use smart controls to balance energy use and keep your lights shining, even on cloudy days.
If you want to learn more about how Rackora optimizes solar street light power, check out their Solar Street Light Power Optimization and Matching solution. This guide explains how Rackora uses intelligent algorithms and dynamic management to reduce energy waste and extend battery life. You’ll see how these innovations help your lights last longer and perform better, season after season.
Tip: Choosing a light with power optimization means less time worrying about maintenance and more time enjoying bright, reliable lighting.
Customer Service
Have a question or need help with your solar lights? Rackora’s customer service team is ready to assist you. You can reach out by email at service@rackorapro.com for fast, friendly support. Whether you need troubleshooting tips, installation advice, or help finding the right replacement part, Rackora’s team will guide you every step of the way.
You can also explore Rackora’s official website for product manuals, FAQs, and detailed guides. These resources make it easy to solve most issues on your own. If you ever feel stuck, you’re never alone—Rackora’s support is just a message away.
Product Warranty
You deserve peace of mind when you invest in solar lighting. Rackora backs its products with a Satisfaction Guarantee, including up to a 3-Year Risk-Free guarantee on solar lighting products like solar street lights. This warranty shows Rackora’s confidence in the quality and reliability of their lights. If you ever have a problem within the warranty period, you can count on Rackora to make it right.
Here’s a quick look at what you get with Rackora’s warranty:
|
Product Type |
Warranty Period |
|---|---|
|
Solar Street Lights |
Up to 3 Years |
|
Commercial Solar Lights |
Up to 3 Years |
|
Outdoor Post Lights |
Up to 3 Years |
Note: Always keep your purchase information handy. This helps speed up the warranty process if you ever need support.
With Rackora, you get innovative technology, helpful customer service, and a warranty that protects your investment. That’s support you can trust for years to come.
You can keep your solar lights shining bright by following a few simple steps. Clean the panels every few months, check connections, and replace batteries when needed. Make sure your lights get plenty of sun and inspect seals for waterproofing. Try these fixes before calling for help. Rackora stands behind you with quality products and support. With a little care, you’ll enjoy reliable solar lights and a beautifully lit space all year long.
FAQ
How do I know if my solar light battery needs replacing?
You’ll notice your light gets dim, flickers, or doesn’t last through the night. If you see corrosion or swelling in the battery compartment, it’s time for a new battery.
Can I leave my solar lights outside all year?
Yes, you can. Just make sure your lights have a weatherproof rating like IP65. For heavy snow or storms, bring them inside or check for water buildup after bad weather.
Why do my solar lights turn on during the day?
This usually means the sensor is blocked or dirty. Wipe the solar panel clean. If the problem continues, check the wiring or reset the light using the on-off switch.
How often should I clean my solar panels?
Clean your panels every two weeks for best results. If you live in a dusty area or near trees, check them more often. Clean panels help your lights charge faster and shine brighter.
What should I do if my solar light still won’t work after troubleshooting?
Double-check the battery, panel, and wiring. If nothing works, contact Rackora’s support team or check your warranty. Sometimes, it’s just time for a replacement.
Can I use regular batteries in my solar lights?
No, you should only use rechargeable batteries. Regular batteries can leak or damage your solar lights. Always match the battery type and voltage to the original.
How do I contact Rackora for help?
You can email Rackora at service@rackorapro.com. You’ll get friendly support and quick answers. You can also visit the Rackora website for manuals and FAQs.
Do Rackora solar lights come with a warranty?
Yes! Most Rackora solar lights include up to a 3-year warranty. Keep your purchase info handy. If you have any issues, reach out to Rackora for help.