You can fix solar issues with street lights quickly by checking a few simple things. Many solar lights stop working because of dirty panels, old batteries, or poor placement. Common problems include lights not turning on, charging problems, dimming, and weather damage. You might think that more LEDs or bigger panels always mean brighter lights, but that is not true. Cleaning your solar street lights and changing batteries often solve most issues. With a little care, you can fix solar issues and keep your solar lights shining bright without needing an expert.
Key Takeaways
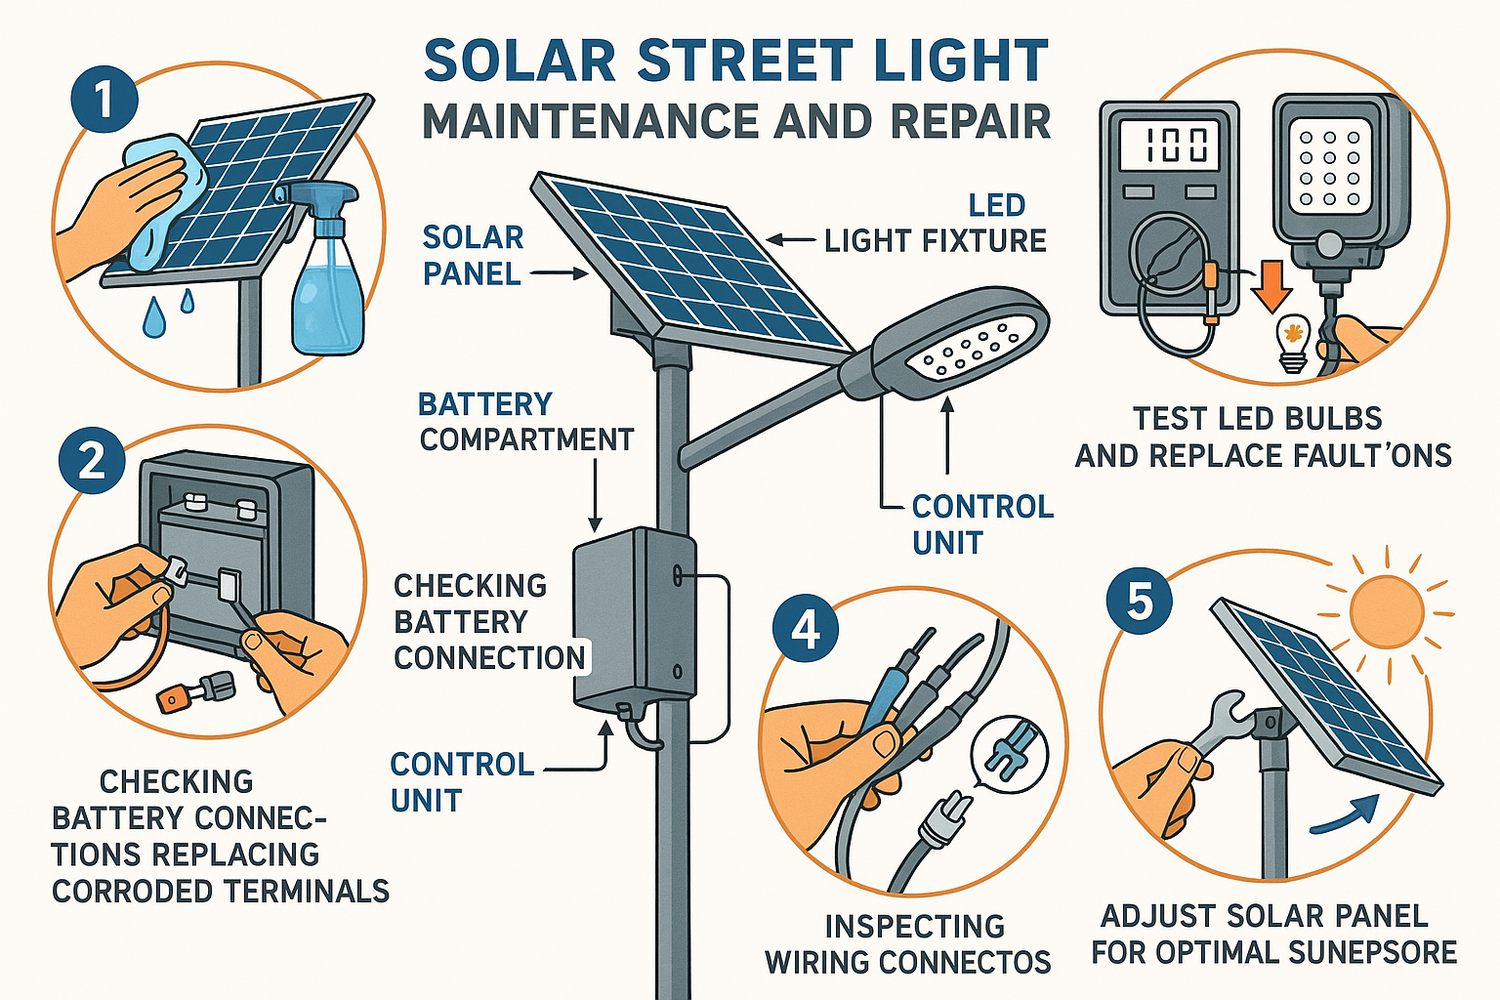
- Regular cleaning of solar panels boosts charging efficiency and prevents most lighting problems.
- Check batteries often; replace them if voltage is low or they show signs of damage.
- Inspect wiring and connections to avoid loose, corroded, or reversed wires that cause failures.
- Proper placement and angle of solar panels ensure maximum sunlight and better light performance.
- Use a multimeter to test batteries, panels, and wiring for quick and accurate troubleshooting.
- Fix flickering or dim lights by checking LEDs, drivers, and battery health regularly.
- Weatherproof your lights by sealing joints, tightening bolts, and using corrosion-resistant parts.
- Call a professional for complex electrical faults or if problems persist after basic fixes.
Quick Fixes
Troubleshooting Checklist
When your solar street lights stop working, you can often fix the problem with a few quick steps. Use this checklist to guide you through troubleshooting solar street light systems:
- Check the manual power switch. Make sure the solar street light is turned on. If you do not see a switch, move to the next step.
- Use a multimeter to measure the battery voltage. For most solar street light systems, a healthy 12V battery should read above 11 volts. If the voltage is low, disconnect the load and let the solar panel charge the battery.
- Inspect all wiring and connections. Look for loose wires, corrosion, or reversed polarity. Secure or replace any damaged parts.
- Examine the charge controller. Check for indicator lights or signs of damage. If you see error indicators, you may need to replace the controller.
- Clean the solar panel. Remove dust, dirt, or debris. Make sure nothing shades the panel during the day.
- Verify the solar panel wiring and polarity. Use a multimeter to confirm the output voltage during daylight.
- Test the battery under load. If the voltage drops quickly, the battery likely needs replacement.
- Simulate night by covering the solar panel. The LED light should turn on automatically. If it does not, check the wiring and controller settings again.
- Tighten all bolts and connections. Shaking or weather can loosen them over time.
- If you still cannot fix the issue, contact the manufacturer or a professional for further help.
Tip: Always follow safety guidelines when working with electrical parts. Wear gloves and safety glasses to protect yourself.
Tools Needed
You do not need advanced equipment to fix most solar lights. Here are the basic tools and materials you should have for repairs and troubleshooting solar street light systems:
- Multimeter: Essential for checking battery and panel voltage.
- Safety glasses: Protect your eyes during repairs.
- Wire stripper and cutter: Remove insulation from wires.
- Sandpaper or file: Clean wire ends for better connections.
- Lead-free electrical solder: Make durable, eco-friendly connections.
- Rosin paste flux: Prevents oxidation while soldering.
- Silicone paste: Protects wires from moisture and corrosion.
- Soldering gun: Connects wires or repairs circuit boards.
- Heat shrink tubing: Insulates and secures soldered joints.
- Lighter or heating gun: Shrinks tubing for a tight seal.
- Helping hand tool (optional): Holds wires in place during repairs.
You may also find clamp meters, thermal imagers, and solar power meters useful for advanced troubleshooting solar street light systems. These tools help you diagnose problems in solar street light systems quickly and safely. With the right tools and this checklist, you can fix most issues in your solar lights and keep your lights working well.
Common Solar Streetlight Problems
Light Not Turning On
You may find that your solar street lights do not turn on at all. This is one of the most common solar streetlight problems. Several factors can cause a solar streetlight not working, such as controller flooding, battery failure, solar panel issues, or LED light source faults. Start by checking if the solar panels are clean and free from dust or debris. Dirty panels block sunlight and prevent the system from charging the batteries. Use a multimeter to test the solar panel output during the day. If you see no voltage, the panel may need replacement.
Next, inspect the batteries. Low or zero voltage often means the batteries have failed or entered deep protection mode. Try activating the batteries with a DC power supply or replace them if they do not recover. Examine all wiring and connectors for corrosion, loose connections, or water damage. Test the LED lamp by connecting it to a known good power source. If the light still does not turn on, the LED may need replacement. Finally, check the controller for error indicators. A flashing red or green light can signal specific faults. Reset or update the controller firmware if needed.
Tip: Environmental factors like strong ambient light or improper installation angles can also prevent your lights from turning on. Make sure nothing shades the panels during the day.
Battery Issues
Battery problems are among the most common issues in solar street lights. Over time, batteries lose capacity due to aging. For example, lead-acid batteries can lose up to 40% of their capacity after just two or three years. If you notice your lights do not stay on as long as before, the batteries may not store enough electricity. Overcharging or deep discharging, often caused by a faulty controller, can also damage batteries. Swelling, overheating, or leaking are signs you need to replace them.
Outdoor conditions can worsen battery issues. Damaged insulation or loose wiring increases resistance, making it harder for the system to charge the light properly. Regularly check all connections and replace any corroded wires. If you see flickering or dim lights, test the battery voltage under load. Replace batteries that cannot hold a charge.
Charging Problems
Charging problems are another set of common solar streetlight problems. Pollution, dust, or bird droppings on the solar panels reduce their efficiency. You should clean the panels every few months, especially in dusty or humid environments. Incorrect installation angles or shading from trees and buildings also lower charging performance. Make sure your panels face the sun directly and avoid shaded areas.
The table below shows how different factors impact charging efficiency and what you can do:
|
Factor |
Impact on Charging Efficiency |
Suggested Solution |
|---|---|---|
|
Pollution on Solar Panels |
Blocks sunlight, reduces efficiency |
Clean panels regularly |
|
Improper Installation Angle |
Fails to capture enough sunlight |
Adjust panel angle for your location |
|
Unsuitable Solar Panel |
Not enough power for local climate |
Choose panels rated for your area |
|
Climate Factors |
Cloudy or rainy weather reduces sunlight |
Add backup power or increase panel size |
|
Shading |
Less sunlight reaches panels |
Install in open, sunny locations |
Temperature and humidity also affect solar lights. High humidity can lower power output by over 30%. Each degree Celsius rise in temperature drops panel efficiency by about 0.4%. Regular cleaning and proper placement help prevent these common issues and keep your solar street lights working well.
Flickering or Dim Lights
You may notice your solar street lights flicker or become dim over time. This is one of the most common issues with solar lights, especially after a couple of years of use. About 68% of solar street light systems used for more than two years experience a decline in brightness. Around 15% lose basic lighting function because of serious degradation. If you use low-quality LEDs, the failure rate can reach up to 30% per year, while high-quality LEDs have a much lower failure rate of about 5% per year.
Several factors can cause flickering or dimming in solar street lights:
- LED driver failure from heat and aging
- Loose wiring or poor connections inside the fixture
- Low-quality LEDs and drivers that cannot handle voltage changes
- Voltage fluctuations from a shared power supply
- Dimmer switches that do not work well with LED technology
You can use a simple checklist to diagnose these solar streetlight problems:
- Check all wiring and connections for looseness or corrosion.
- Inspect the LED driver for signs of overheating or damage.
- Test the battery voltage. Low battery performance often leads to dim lights.
- Clean the solar panels to remove dust or debris that blocks sunlight.
- Make sure the control system settings match the LED requirements.
|
Aspect |
Data / Cause Description |
|---|---|
|
Percentage of brightness decline |
68% of solar street light systems used over 2 years experience brightness decline |
|
LED light source failure rate |
Up to 30% per year for poor quality LEDs; high-quality LEDs have ~5% failure rate per year |
|
Primary causes of flickering/dimming |
LED failure, battery decay, hidden circuit faults, control errors, environmental factors (shading, dirty panels) |
Tip: Regular cleaning and using high-quality components help prevent most common issues with flickering or dim lights.
Weather Damage
Weather damage affects the performance and lifespan of solar street lights in many ways. You might see reduced charging efficiency during cloudy or rainy days because less sunlight reaches the panels. Water can enter the fixture during heavy rain or high humidity if the waterproofing is not strong enough. High temperatures speed up battery aging and reduce solar panel efficiency. Cold weather makes batteries discharge less efficiently, which shortens lighting duration. Strong winds can damage the structure if the installation is not secure. Snow or debris can block the panels, reducing energy capture.
Here are some common issues caused by weather:
- Corrosion from moisture or salt, especially in coastal areas
- Physical damage from wind or falling branches
- Battery performance drops in extreme heat or cold
- Water ingress damaging internal parts
- Snow or dust blocking solar panels
You can reduce weather-related solar streetlight problems by choosing corrosion-resistant materials like aluminum or stainless steel. Use batteries designed for temperature extremes, such as lithium-ion types. Make sure your lights have at least an IP65 waterproof rating. Smart control systems can adjust brightness and power use during bad weather to keep your solar lights working longer.
Note: Regular maintenance, such as cleaning panels and checking for loose bolts, helps your solar street lights withstand harsh weather and last longer.
Fix Solar Issues Step-by-Step
Check Placement
You can often fix solar issues by starting with the placement of your solar street lights. Proper placement ensures your lights receive enough sunlight to charge the batteries and work efficiently at night. Begin by checking if any trees, buildings, or other objects cast shadows on the panels during the day. Even partial shading can reduce charging efficiency and cause your lights to dim or stop working.
Consider the climate and weather patterns in your area. Dust, snow, or heavy rain can affect how much sunlight reaches the panels. You should position solar panels to face true south if you live in the northern hemisphere, or true north if you live in the southern hemisphere. This orientation captures the most sunlight throughout the year. Adjust the placement and angle of the panels to help snow slide off and keep them clear.
Use the table below to guide your placement decisions:
|
Aspect |
Recommendation |
|---|---|
|
Geographic Factors |
Consider climate, weather patterns, and environmental challenges like dust, snow, or heavy rain. |
|
Lighting Needs |
Design based on area illumination requirements (road width, pedestrian paths, intersections). |
|
Spacing |
Maintain proper spacing between poles to ensure uniform lighting and avoid dark spots. |
|
Pole Height |
Set heights according to area type: taller for highways, shorter for pedestrian paths. |
|
Orientation |
Position solar panels facing true south (northern hemisphere) or true north (southern hemisphere) for max solar capture. |
|
Foundation |
Ensure stable foundations, especially in windy or unstable soil areas. |
|
Electrical |
Use proper wiring and waterproof connectors to protect against moisture. |
|
Testing |
Verify functionality of panels, batteries, LEDs, and controllers before finalizing installation. |
Smart solar street lights with IoT features can help you monitor performance and detect faults in real time. This technology makes it easier to fix solar issues before they become bigger problems. If you notice your lights are not working as expected, adjust the placement to maximize sunlight exposure and check for any environmental obstacles.
Tip: Always check placement after storms or landscaping changes. New obstructions can block sunlight and reduce performance.
Clean Solar Panels
Dirty panels are a leading cause of reduced performance in solar street lights. Dust, bird droppings, and pollution can block sunlight and lower charging efficiency by up to 20%. If you neglect cleaning, you may lose up to 25% of your light’s energy capacity over time. To fix solar issues related to poor charging, clean the solar panel regularly.
Follow these steps to clean your panels safely and effectively:
- Gather your cleaning tools: a soft-bristled brush, clean water, a mild cleaning agent (if needed), a dry cloth, and safety equipment for high locations.
- Make sure you can reach the panels safely. Use a seat belt or ask for professional help if the lights are mounted high.
- Gently brush off loose dust and debris. Avoid using harsh chemicals or abrasive materials that can scratch the surface.
- Wipe the panels with a damp cloth and mild detergent for stubborn stains. Rinse with clean water.
- Dry the panels with a soft cloth to prevent water spots.
- Remove any debris or snow around the base to keep the area clear.
|
Cleaning Method |
Description |
Key Benefits and Precautions |
|---|---|---|
|
Clean Water Flushing |
Rinsing solar panels with clean or tap water to remove dust and light stains. |
Simple, effective for low dust; best done in sunny weather; avoid temperature extremes to prevent damage. |
|
Cleaning Agent Method |
Use of mild cleaning agents (avoiding acids, alkalis, phosphorus) to remove stubborn stains. |
Effective for tough dirt; must control amount to avoid coating damage; avoid corrosive chemicals. |
|
Manual Cleaning |
Using soft brushes and professional tools to clean all panel surfaces, including hard-to-reach areas. |
Flexible and thorough; removes dust, bird droppings, and grime carefully without damaging panels. |
|
Self-Cleaning Street Lights |
Automated cleaning with roller brushes and waterless technology activated by one button. |
Saves labor; cleans dust, bird droppings, rain, snow; penetrates gaps without damage; improves efficiency. |
Regular cleaning can improve efficiency by up to 21% for residential and even more for commercial systems. Establish a routine maintenance schedule to keep your lights working at their best. Clean the solar panel every few months, or more often if you live in a dusty or industrial area.
Note: Always turn off the power before cleaning LED fixtures. Use a dry or slightly damp cloth for the lights themselves.
Inspect Batteries
Batteries store the energy that powers your solar street lights at night. If you want to fix solar issues like dimming or lights not turning on, you need to check the batteries. Start by inspecting the battery compartment for signs of corrosion, swelling, or leaks. Damaged batteries can cause your lights to fail or operate poorly.
Follow these steps to check the batteries and fix common problems:
- Verify that all connectors are waterproof and free from water damage.
- Use a multimeter to measure the voltage of the solar panel. Make sure it exceeds the minimum value needed for charging.
- Measure the battery voltage. For a 12V system, healthy batteries should read between 13.2V and 13.8V. If the voltage drops below 10V, the battery may need replacement.
- If the battery has entered protection mode and shows 0V, try charging it with an external DC power source set to the correct voltage. If the voltage does not recover, replace the battery.
- Inspect all connections for corrosion or looseness. Clean the terminals and ensure correct polarity.
- Perform a discharge test or use a capacity tester to check battery health.
- Avoid deep discharges below 20-30% capacity. This helps prevent permanent damage.
- Replace batteries that cannot hold a charge or show signs of aging. Most batteries cannot be repaired, so replacement is the best fix.
- After replacing batteries, consult your product manual to see if a reset is needed.
Tip: Inspect batteries every 3 to 6 months. Regular checks help you fix solar issues early and keep your lights shining bright.
Test Wiring
Wiring problems often cause solar street lights to stop working or behave unpredictably. You can fix many issues by carefully checking the wiring. Start by turning off the power to avoid electric shock. Look for these common wiring problems:
- Broken copper wires hidden inside the insulation. You might see voltage on your multimeter, but no current flows. This causes the battery to drain and the lights not to work.
- Short circuits from crushed insulation. This can make the light fail or even damage the controller.
- Reversed positive and negative connections. If you connect the wires backward, the controller indicator lights may flash abnormally.
To identify wiring issues, follow these steps:
- Inspect all visible wires for damage, corrosion, or loose connections.
- Check the controller’s indicator lights. Most controllers have three lights for the solar panel, battery, and light source. Normal patterns show the system works. If you see abnormal flashing, you may have a wiring problem.
- Use a multimeter to test for voltage and continuity. If you find voltage but no current, suspect a hidden wire break.
- Perform a spark test by briefly touching the solar panel wires at the access point. A small spark means correct charging and polarity. No spark means you need to inspect and repair the wiring.
- Watch for unusual behavior, such as lights working during the day. This often points to wiring errors or controller faults.
Tip: Always verify the wiring polarity and repair or replace damaged wires as needed. Secure all connections to prevent future problems.
Examine LEDs
LEDs are the main light source in solar street lights. When they fail, your lights may flicker, dim, or stop working. You can fix these problems by checking and replacing faulty LEDs.
Follow these steps to examine and fix LED issues:
- Use a multimeter in continuity mode to test each LED. Place the probes on the LED terminals. If you hear a beep, the LED works. No beep means the LED is dead.
- Remove the faulty LED by desoldering it from the circuit board.
- Install a new LED with a rating between 2.5V and 3V. Make sure you match the polarity.
- Add a 100–200Ω resistor in series with the new LED. This protects it from voltage spikes.
- For better protection, use surge protectors to stabilize voltage and prevent sudden failures.
- Avoid exposing LEDs to moisture. Keep the fixture sealed and away from direct rain or water.
Regular maintenance helps prevent LED failures. Clean the solar panels every month, check the batteries every year, and upgrade weatherproofing as needed. These steps can reduce LED failures by up to 80%.
|
Step |
Action |
Why It Matters |
|---|---|---|
|
Test with multimeter |
Confirms if LED is working |
Identifies dead LEDs |
|
Replace LED |
Use compatible voltage and correct polarity |
Ensures proper function |
|
Add resistor |
100–200Ω in series |
Prevents voltage spikes |
|
Use surge protector |
Install in circuit |
Protects against voltage fluctuations |
|
Seal fixture |
Keep out moisture |
Extends LED lifespan |
Note: Always use high-quality LEDs and components to extend the life of your solar street lights.
Reset and Test Sensors
Sensors control when your solar street lights turn on and off. If the lights do not respond to darkness or motion, you may need to fix or reset the sensors.
Here is how you can reset and test the sensors:
- Make sure the solar panels receive direct sunlight. Remove any obstructions like leaves or dirt.
- Clean the solar panels and the sensor lens with a soft cloth and mild detergent. Dirt can block light detection.
- Check the batteries. Replace them if they are old, corroded, or not charging well. Clean the battery contacts if needed.
- Inspect all wiring for damage or loose connections. Use a multimeter to test continuity and repair or replace wires as needed.
- Adjust the sensor sensitivity if your model allows it. Sometimes, you need to fine-tune the settings for best performance.
- Reset the solar light by switching it off, removing the batteries or disconnecting power, waiting a few minutes, then reconnecting and switching it back on. This can clear minor faults.
- Test the light by simulating darkness. Cover the solar panel to see if the light turns on. If it does not, repeat the steps or consider replacing the sensor.
- Protect the sensor from harsh weather. Use weatherproof covers and place the light in a good location.
If cleaning, battery replacement, and wiring inspection do not solve the problem, you may need to reset or replace the solar light. Always check your user manual for model-specific instructions.
Solar Streetlight Troubleshooting
Use a Multimeter
You can solve many solar streetlight troubleshooting problems by using a multimeter. This tool helps you check the voltage and current of your solar street light systems. Start by setting your multimeter to DC voltage mode. Choose a range higher than your panel’s rated voltage, such as 20V or 200V. Connect the black probe to the COM port and the red probe to the V/Ω/mA port. Touch the probes to the solar panel leads, matching red to positive and black to negative. Measure the open-circuit voltage while the panel sits in direct sunlight.
To check current, switch the multimeter to DC amperage mode. Move the red probe to the 10A port. Place the multimeter in series with the panel output. Make sure the panel faces the sun. This setup lets you see how much current the panel produces. Always disconnect the panel from the regulator before testing, and reconnect the regulator to the battery before the panel. This prevents damage to your solar street light systems.
When testing batteries, disconnect the solar panel first. Set the multimeter to DC voltage mode. Connect the red probe to the battery’s positive terminal and the black probe to the negative. A healthy 12V battery should read between 12.6V and 13.8V. If you see a lower voltage, the battery may need a recharge or replacement. Always keep your hands dry and avoid humid conditions during testing. Accurate readings help you assess the real-time performance of your solar street light systems and guide your troubleshooting solar street light systems process.
Check Controller Indicators
Controller indicator lights give you quick feedback on the health of your solar street light systems. Each light pattern tells you something different about the system’s status. Use this table as a solar streetlight troubleshooting guide:
|
Indicator Light Status |
Meaning |
|---|---|
|
ON (steady) |
Charging in progress |
|
Slow Flash |
Charging in progress |
|
OFF |
No charging |
|
OFF (steady) |
Battery over-discharging |
|
Quick Flash |
Battery over-discharging |
|
ON + Quick Flash |
Battery over-discharging and charging |
|
ON + OFF + Slow Flash |
Load missed (load not connected) |
|
ON + OFF + Quick Flash |
Load shorted (load short circuit) |
|
All OFF |
Battery hardware protection controller damaged |
If you see a quick flash or all lights off, check your batteries and wiring. These signals often point to deeper issues. Regularly checking these indicators helps you catch problems early and keeps your solar street light systems running smoothly.
Address Water Ingress
Water ingress can cause serious failures in solar street light systems. You need to prevent moisture from entering the enclosures and damaging the electronics. Follow these steps for effective solar streetlight troubleshooting:
- Install drainage holes at the base of the pole and battery compartment. This prevents water from pooling inside.
- Apply high-quality silicone sealant to the light head and battery compartment. This blocks moisture from seeping in.
- Inspect wiring and joints often. Look for signs of water seepage or tape failure.
- Use lamp holders with strong sealing performance. This enhances waterproofing.
- Add ventilation systems with dust filters in battery enclosures. This reduces moisture buildup while keeping water out.
- Apply anti-corrosion coatings to metal parts and UV-resistant coatings to plastics. These coatings protect against moisture and sun damage.
- Use enclosures with high IP ratings, such as IP65 or higher. These ratings ensure resistance to water jets and even immersion.
- After heavy rain, check all wiring systems for poor contacts or water damage.
Regular maintenance and these steps help you avoid water-related failures. By following this solar streetlight troubleshooting guide, you extend the life of your solar street light systems and reduce the risk of costly repairs.
Secure Installation
Proper installation is essential for the long-term performance of solar street light systems. If you want your lights to work reliably, you must make sure each component is secure and aligned. A stable setup prevents tilting, swaying, or misalignment, which can lead to reduced efficiency or even damage. You can follow these steps to ensure a secure installation:
- Select a sturdy pole or a structurally sound wall for mounting. The support must handle the weight of the solar street light systems and withstand strong winds.
- Align the solar street light with the mounting pole or bracket. Use a level to check that everything is straight.
- Use the bolts and screws provided by the manufacturer. Tighten them firmly with a wrench or socket set. This step keeps the light from moving or loosening over time.
- Adjust the solar panel angle so it faces the sun directly. Most solar street light systems come with adjustable brackets. Set the angle based on your location and lock it in place by tightening the adjustment bolts.
- For pole installations, check all components before lifting. Make sure the light head and battery board are fixed properly. When you lift the pole, avoid bumping or scratching the solar panel.
- Position the pole over the foundation. Rotate it so the lamp head points toward the road or area you want to light. Align the flange holes with the anchor bolts.
- Place washers and nuts on the anchor bolts. Tighten them evenly with a wrench to secure the pole. After removing the lifting equipment, check if the pole stands straight. Adjust if needed.
- For wall mounting, confirm the wall can support the weight. Fix the light securely and make sure it is level.
- Adjust the solar panel direction to face true south if you live in the northern hemisphere. Use a compass for accuracy.
- Inspect the lamp arm and lamp head for any skew. Correct their positions to ensure uniform lighting.
- After all adjustments, perform a final inspection. Check that every bolt and screw is tight and the light is stable.
Tip: Always follow the manufacturer’s instructions and local regulations, especially for public installations. A secure setup reduces the need for frequent solar streetlight troubleshooting and extends the life of your solar street light systems.
A well-installed light will resist weather, stay aligned, and deliver consistent performance. If you notice any movement or misalignment during routine checks, tighten the hardware and realign the panels. This simple habit can prevent many issues and makes your solar streetlight troubleshooting guide more effective.
Preventing Solar Light Issues
Regular Cleaning
You can prevent most solar street light problems by following a regular maintenance schedule. Cleaning and maintaining solar panels is one of the most important maintenance tips for longevity. Dust, pollen, and bird droppings block sunlight and reduce charging efficiency. Manufacturers recommend cleaning solar panels every 3-4 months under normal conditions. If you live in a dusty area, clean them monthly. Use a soft cloth and mild soapy water to avoid scratching the surface. Avoid harsh chemicals that can damage the panels.
Regular maintenance also means checking the light fixtures for dirt and debris. Clean the LED covers and sensor lenses to keep the lights bright and responsive. When you clean, inspect the mounting brackets for rust and make sure all bolts are tight. This simple routine helps you spot issues early and keeps your lights working efficiently.
Tip: Schedule cleaning during the early morning or late afternoon when the panels are cool. This prevents streaks and protects the glass.
Seasonal Checks
You should adjust your maintenance routine with the changing seasons. Seasonal checks help you catch problems caused by weather changes. In spring and fall, inspect all components for signs of wear or damage. Look for corrosion on metal parts, especially if you live near the coast or in humid areas. Apply anti-rust coatings or replace corroded parts as needed.
Check the battery voltage every month. Monitor charging and discharging patterns to spot early signs of battery degradation. Make sure the battery housing is clean and well-ventilated. Inspect all wire connections for tightness and look for water ingress after heavy rain or snow.
During winter, clear snow and ice from the panels and fixtures. In summer, check for overheating or signs of UV damage. Adjust the panel angle if needed to maximize sunlight exposure. These proactive maintenance practices help you avoid costly repairs and extend the lifespan of your solar street lights.
Timely Replacement
Timely replacement of key components is essential for reliable performance. Batteries and LED light sources wear out over time. Most batteries last 3-5 years, depending on usage and climate. Replace batteries that show significant capacity loss or cannot hold a charge. Swap out dim or flickering LEDs to maintain bright, efficient lighting.
Keep spare parts for critical components like batteries, LEDs, and controllers. Document all maintenance activities with logs and photos. This record helps you track when replacements are due and supports warranty claims if needed.
Regular maintenance and timely replacement reduce downtime and lower long-term costs. Preventive maintenance costs less than emergency repairs and helps you avoid unexpected failures. By monitoring your system and following these steps, you ensure your solar street lights stay reliable year-round.
Weatherproofing
Weatherproofing your solar street lights protects your investment and keeps your lights working through all seasons. You need to focus on this step as part of your regular maintenance routine. Weather can damage solar lights quickly if you do not take the right precautions. Rain, snow, wind, and extreme temperatures all pose risks.
Start by choosing lights with a high IP (Ingress Protection) rating. Look for IP65 or higher. This rating means your lights resist dust and water jets. You should check the seals around the battery compartment and LED housing. Replace worn or cracked seals during regular maintenance. Use silicone sealant to close any gaps you find.
You can use this checklist to improve weatherproofing:
- Inspect all seals and gaskets for cracks or wear.
- Apply silicone sealant to exposed joints.
- Tighten screws and bolts to prevent water from entering.
- Use anti-corrosion spray on metal parts.
- Cover exposed wiring with waterproof tubing.
Tip: Store portable solar lights indoors during storms or harsh winters. This simple step extends their lifespan.
A table can help you compare weatherproofing features:
|
Feature |
Why It Matters |
What You Should Do |
|---|---|---|
|
High IP Rating |
Blocks dust and water |
Choose IP65 or higher |
|
Quality Seals |
Prevents water ingress |
Inspect and replace as needed |
|
Anti-Corrosion Coating |
Stops rust on metal parts |
Apply spray during maintenance |
|
Waterproof Wiring |
Protects electrical connections |
Use tubing and check regularly |
|
Secure Mounting |
Resists wind and vibration |
Tighten bolts during maintenance |
You should always use quality parts for repairs and replacements. Cheap materials fail faster and make weatherproofing less effective. During regular maintenance, check for UV damage on plastic covers. Sunlight can make plastic brittle over time. Replace covers that show signs of cracking or fading.
Give your solar lights periodic breaks if possible. For example, turn them off during long stretches of bad weather. This reduces stress on the batteries and electronics. You can also use smart controllers that adjust brightness during storms to save energy.
Regular maintenance keeps your weatherproofing strong. Set a schedule to inspect your lights every season. Clean the panels, check the seals, and test the electronics. These steps help you catch problems early and avoid costly repairs.
Note: Weatherproofing is not a one-time job. You need to include it in your regular maintenance plan to keep your solar street lights shining bright year after year.
When to Call a Professional
Complex Electrical Faults
You can fix many solar street light problems yourself, but some issues require a professional. Recognizing these situations helps you avoid bigger problems and keeps your system safe. Here are signs that tell you it is time to call an expert:
- Solar lights stay on during the day, even after you clean the panels and check the photosensor.
- Several lights in your system show the same malfunction at once.
- You find damaged or deteriorated electrical components inside the fixture.
- The system wiring needs inspection or changes that go beyond simple tightening or cleaning.
- Water damage appears inside the light fixture or battery compartment, causing corrosion or possible short circuits.
- Problems continue after you complete all basic troubleshooting steps, such as cleaning, checking batteries, and testing wiring.
- Your solar lights are still under warranty, and you want to avoid voiding coverage by attempting repairs yourself.
A professional can run advanced diagnostics, replace certified parts, recalibrate sensors, and ensure the installation meets safety standards. You also get proper documentation for warranty claims. If you see any of these signs, do not try to fix the problem yourself. You risk making the issue worse or damaging your equipment.
Tip: If you notice multiple lights failing at once or persistent problems after basic repairs, contact a licensed technician. This step protects your investment and ensures a safe, lasting solution.
Safety Concerns
Working with solar street lights sometimes involves high voltages and complex circuits. Attempting advanced repairs without the right training can put you at risk. Here are some safety risks you should know:
- Solar inverters and control circuits can operate at several hundred volts. Only trained professionals should handle these voltages.
- Licensed technicians follow strict safety protocols, such as isolating faults and safely discharging dangerous voltages.
- DIY repairs on advanced electrical faults can cause serious injury, equipment damage, or even electrical fires.
- Specific faults like ground faults, arc faults, or insulation resistance failures can lead to overheating, electric shock, or fire hazards.
- Complex issues such as short circuits, damaged wiring, or faulty control boards require specialized tools and knowledge.
You should never attempt to repair advanced electrical faults if you do not have proper training. Professionals have the right equipment and experience to work safely. They know how to protect themselves and your property from harm.
Note: Your safety comes first. If you feel unsure or see signs of serious electrical problems, always call a professional. It is better to wait for expert help than to risk injury or further damage.
You can solve most solar street light problems with regular maintenance and quick troubleshooting. Cleaning panels, replacing batteries, and inspecting components address the majority of issues before they become serious. A structured maintenance plan not only extends the lifespan of your lights but also improves efficiency and safety. Remember, while you can handle basic upkeep, you should call a professional for complex repairs. By making maintenance a habit, you ensure your solar street lights stay reliable and cost-effective for years.
FAQ
How often should you clean solar street light panels?
You should clean your solar panels every three to four months. If you live in a dusty or polluted area, clean them monthly. Regular cleaning keeps your lights bright and efficient.
What type of battery works best for solar street lights?
Lithium-ion batteries work best for most solar street lights. They last longer, handle temperature changes well, and require less maintenance than lead-acid batteries.
Why do your solar street lights turn on during the day?
Your lights may turn on during the day if the sensor is dirty or faulty. Clean the sensor first. If the problem continues, you may need to replace the sensor or check the controller settings.
Can you replace the LED bulbs in solar street lights?
Yes, you can replace the LED bulbs. Always use bulbs with the same voltage and wattage as the original. Check your user manual for the correct specifications.
How do you know if your solar panel is charging?
Use a multimeter to check the voltage at the panel terminals during daylight. You should see a voltage higher than the battery voltage. Most controllers also have indicator lights that show charging status.
What should you do if your solar street light flickers?
Check the battery voltage first. Clean the solar panel and inspect all wiring for loose connections. Replace the LED or driver if needed. Regular maintenance prevents most flickering issues.
Is it safe to leave solar street lights outside in winter?
Yes, most solar street lights are weatherproof. You should check the IP rating and make sure all seals are intact. Clear snow from the panels to keep them charging.
How long do solar street lights usually last?
Most solar street lights last five to ten years. Battery and LED replacements may be needed sooner. Regular maintenance extends the lifespan of your system.