
Most solar lights stop working after a year because a few common issues affect their performance. You often see solar lights not working due to battery problems, dirty solar panels, sensor failure, heat damage, or poor installation. According to industry reports, the main reasons include:
- Poor quality batteries lose charge quickly.
- Lack of sunlight reduces battery life.
- Water exposure can damage solar components.
- Physical damage breaks fragile parts.
- Extreme heat or cold affects batteries.
Tip: You can revive your solar lights with simple fixes. Clean panels and replace batteries to restore brightness.
Key Takeaways
- Regularly clean solar panels to ensure they absorb maximum sunlight. Dirty panels can reduce energy production by up to 25%.
- Replace batteries every one to two years to maintain optimal performance. Choose high-quality batteries for longer life.
- Inspect and clean the light sensor to prevent malfunction. A dirty sensor can stop lights from turning on at night.
- Place solar lights in areas with direct sunlight for at least six to eight hours daily. Avoid shaded spots to enhance charging efficiency.
- Check for physical damage and ensure all wiring connections are secure. This prevents power loss and improves reliability.
- Store solar lights indoors during severe weather to protect them from water damage and extreme temperatures.
- Reset sensors if lights fail to operate correctly. This can often resolve minor glitches without needing replacements.
- Perform regular maintenance checks to catch issues early. Simple actions can prevent bigger problems and extend the life of your solar lights.
Batteries Need Replacing
Why Batteries Fail
You may notice your solar lights dimming or shutting off after a year. This often happens because the batteries have died. Most solar light batteries last two to four years, but several factors can shorten their lifespan.
- Environmental conditions, such as shade or dirt on solar panels, prevent batteries from charging fully.
- Maintenance issues, like not cleaning the panels, also reduce battery performance.
- Corrosion and loss of charge capacity occur over time, especially if water gets inside the battery compartment.
- Extreme temperatures can damage batteries and lower battery life expectancy.
Note: Lithium-ion batteries tend to last longer than NiMH or NiCd batteries. Choosing the right type can help your solar lights work better for years.
Signs of Bad Batteries
You can spot failing batteries by looking for these signs:
- Cracks or ruptures in the battery casing
- Bulging or swelling of the battery
- Discoloration or acid leaks
- Sudden drop in power output
- Battery drains quickly after a full charge
- Reduced efficiency in converting solar energy
If you see any of these problems, the batteries have died and you need to replace the batteries.
Replace Batteries
Choosing Batteries
When you need to replace the batteries in your solar lights, you should:
- Confirm the battery type to avoid mismatches and safety issues.
- Check the voltage to match your solar light’s requirements.
- Assess the battery’s capacity to keep the charge balanced.
- Measure the physical size so the battery fits the compartment.
- Make sure the new battery is compatible with your solar light model.
|
Battery Type |
Lifespan (Years) |
Notes |
|---|---|---|
|
Lithium-ion |
3-4 |
Longer life, higher cost |
|
NiMH |
2-3 |
Common, moderate price |
|
NiCd |
2-3 |
Older tech, lower price |
Replacement Steps
Follow these steps to safely replace the batteries:
- Access the battery compartment by removing the cover.
- Remove the old battery and disconnect any wires.
- Install the new battery, making sure it matches the specifications.
- Reassemble the unit and check the waterproof seal to prevent water damage.
Tip: Always double-check the voltage and size before you replace the batteries. This prevents controller damage and ensures a proper fit.
Tips to Extend Battery Life
You can make your solar lights last longer by following these tips:
- Invest in well-constructed solar lights with efficient panels and quality batteries.
- Store solar lights indoors during severe weather to protect them.
- Clean solar panels regularly so batteries charge fully.
- Place solar lights where they get sunlight all day, away from obstructions.
- Replace rechargeable batteries every one to two years for best results.
- Avoid deep discharges and keep batteries at moderate temperatures.
Regular maintenance and proper placement help you avoid frequent battery replacements and keep your solar lights shining bright.
Dirty Solar Panels
Impact of Dirt
You may wonder why your solar lights lose brightness or stop working after a year. Dirty solar panels are a major reason. When dust, leaves, bird droppings, or snow cover the solar panel, the panels cannot absorb sunlight efficiently. This leads to less energy for your solar lights. Research shows that dirty solar panels can produce up to 25% less energy than clean ones. Even a thin layer of dust can reduce charging efficiency by 5% to 25%. Leaves and bird droppings block sunlight and create shadows, while snow prevents sunlight from reaching the panel.
|
Type of Debris |
Impact on Efficiency |
|---|---|
|
Dust |
5% to 25% reduction |
|
Leaves |
Blocks sunlight |
|
Bird droppings |
Creates shadows |
|
Snow |
Prevents sunlight |
Tip: If you notice your solar lights dimming, check for dirty solar panels first. Cleaning the solar panel often restores full brightness.
Cleaning Solar Panels
Dirty solar panels need regular cleaning to keep your solar lights working well. You can clean the solar panel using simple methods and tools.
Cleaning Methods
Follow these steps to clean the solar panel on your outdoor solar lights:
- Turn off the solar lights before you start.
- Remove loose dirt with a soft brush or cloth.
- Scrub the solar panel gently with a soapy solution and a soft bristle brush or sponge.
- Rinse with clean water, making sure water does not enter the battery compartment.
- Use a vinegar and dish detergent mixture for stubborn debris.
- Wipe the panel dry with a soft cloth or sponge.
- Check for hard water deposits and clean with a vinegar solution.
- Inspect the battery compartment for corrosion or damage.
- Look at the light sensor and clean it if needed.
- Perform regular maintenance to keep the solar panel clear.
- Protect the solar lights from harsh weather when possible.
- Make sure the solar panel gets enough sunlight during the day.
Note: Always use gentle cleaning tools to avoid scratching the solar panel. Scratches can reduce the panel’s ability to absorb sunlight.
Cleaning Frequency
How often you clean the solar panel depends on your environment. Use this table to guide your cleaning schedule:
|
Environment Type |
Recommended Cleaning Frequency |
|---|---|
|
Highly polluted areas |
Monthly cleaning may be needed |
|
Moderately dusty areas |
Every three to six months |
|
Clean environments |
Once or twice every two years |
- In summer, clean the solar panel every two weeks to remove dust and bird droppings.
- In winter, clean as needed to remove snow and frost.
Regular cleaning helps your solar lights stay bright and reliable.
Best Placement
You can prevent dirty solar panels from losing efficiency by choosing the best placement for your solar lights. Place the solar panel where it receives direct sunlight most of the day. Avoid areas with shade from trees or buildings. In the Northern Hemisphere, face the solar panel south. Adjust the tilt angle to match your geographic latitude for maximum sunlight. Use adjustable mounts if your area gets less sun. Make sure nothing blocks the solar panel, especially during peak sunlight hours.
If you place your solar lights in a spot with clear skies and no shade, you help the solar panel charge fully and keep your lights shining longer.
Sensor Problems
Sensor Failure
You may notice your solar lights do not turn on at night or fail to respond to movement. This often means the sensor has stopped functioning. Sensors play a crucial role in detecting light levels and motion, so any malfunction can disrupt the entire system. Several factors explain why a sensor has stopped functioning:
- Battery power drops when batteries lose charge or fail to recharge, causing the sensor to stop working.
- Dirty solar panels block sunlight, reducing energy available for the sensor.
- Incorrect placement of the solar panel limits exposure to sunlight, which affects sensor performance.
- Faulty motion sensors or misaligned sensors fail to detect movement.
- Low sensitivity settings prevent the sensor from picking up motion.
- Obstructions in the sensor’s range, such as plants or debris, block detection.
- Dirt and debris on the light sensor interfere with its ability to read light levels.
- Artificial light interference confuses the sensor, making it think it is daytime.
- Aging or wear causes the sensor to lose sensitivity over time.
- Wiring issues, such as loose or corroded connections, disrupt communication between the sensor and the controller.
If your sensor has stopped functioning, check for these common causes before replacing any parts.
Reset Sensors
You can often fix the light sensor by resetting it. Resetting helps restore normal operation when the sensor has stopped functioning due to minor glitches or environmental factors. Follow these steps to reset the sensor:
- Locate the reset button or power switch on your solar lights.
- Press and hold the reset button for 10-15 seconds if available.
- If there is no reset button, turn the power switch off and on three times quickly.
- Remove the batteries for at least 60 seconds, then reinsert them.
- Inspect the solar lights for visible damage or wear.
- Clean the sensor to remove dirt or obstructions.
- Disconnect the solar lights for a few minutes to reset the sensor.
- Test the batteries and replace them if they are low or faulty.
- Check wiring connections for corrosion or loose ends.
- Clean the solar panel to ensure it receives enough sunlight.
- Position the lights for maximum sunlight exposure.
Tip: Regular cleaning and proper placement help fix the light sensor and prevent future sensor problems.
Replace Sensors
Sometimes, you cannot fix the light sensor by resetting or cleaning. In these cases, you need to replace the sensor. Follow this process to replace a faulty sensor in your solar lights:
- Purchase a replacement sensor that matches the specifications of your original sensor.
- Turn off the solar light and open the casing to access the sensor.
- Carefully remove the faulty sensor, noting the connections for the replacement process.
- If soldering is required, use a soldering iron to detach the old sensor and attach the new one.
- Reassemble the solar light, ensuring all connections are secure.
- Test the light to confirm the new sensor works correctly.
Note: Always check for water damage inside the casing before installing a new sensor. Water can cause corrosion and lead to future failures.
A sensor problem can stop your solar lights from working, but you can often fix the issue with simple troubleshooting or replacement steps. Regular maintenance and prompt action help keep your solar lights reliable.
LED and Heat Damage
LED Failure
You may notice your solar lights flicker or stop working after a year. This often happens because the LED bulbs inside the lights fail. LEDs in solar lights can break down for several reasons. You might see flickering, which usually means the solar panel is blocked, the battery is low, or the light does not get enough sunlight. Sometimes, the bulbs do not work at all. This can happen when the batteries are dead, the wiring is loose, or the bulb socket is faulty.
Here are the most common signs of LED failure:
- Flickering lights, which can signal low power or blocked panels.
- Non-functional bulbs, often caused by battery or wiring problems.
When you see these signs, you know the LEDs may need attention.
Heat Effects
Heat plays a major role in why LEDs stop working in solar lights. High temperatures speed up the breakdown of LED components. Poor-quality materials make this problem worse. When the temperature rises, the lifespan of LEDs drops sharply. You can see the effects in the table below:
|
Temperature Impact |
Effect on LED Lifespan |
Additional Effects |
|---|---|---|
|
High temperatures |
Up to 6 times reduction in lifespan |
Decreased brightness, color shifts, physical damage |
|
35.6°C to 37.4°C |
13% decrease in phosphor conversion efficiency |
Noticeable drop in light intensity |
|
75°C |
Light output reduction of 5% to 70% |
Permanent lumen degradation, color shifts to bluish hue |
High temperatures can cause LEDs to lose brightness, shift color, and even suffer physical damage. You may see your solar lights turn bluish or dim. Effective heat management is crucial for keeping your solar lights working well. If the lights use poor-quality materials, heat damage becomes more severe.
- High temperatures accelerate LED degradation.
- Good heat management helps maintain performance.
- Poor-quality materials make heat damage worse.
Fix or Replace LEDs
You can fix or replace LEDs in solar lights if you know what to check. Before you replace the LEDs, test the battery, solar panel, and wiring. Many problems come from these parts, not the LEDs themselves. If you confirm the LEDs have failed, follow these steps:
- Match the lumens and wattage of the new LEDs to the old ones. For example, use a 0.5W LED for path lights.
- Solder the new LEDs in place.
- Use heat-shrink tubing to keep the lights waterproof.
You should also test the LED on pin 4 while covering the solar panel to simulate darkness. Make sure pin 2 has battery power and check the power at pin 4, tracing it back to the LED and the negative wire. This process helps you find the real cause of the problem.
Tip: Always check for water damage before replacing LEDs. Water can cause corrosion and lead to more failures.
If you follow these steps, you can restore your solar lights and prevent future LED problems.
Installation Issues
Shaded Panels
You might wonder why your solar lights do not last as long as expected. One major reason is shaded panels. When you install solar panels in areas with shade from trees, buildings, or fences, the panels cannot collect enough sunlight. This leads to poor charging and weak performance. Even a small shadow can reduce the energy your solar lights receive.
The table below shows how different shade conditions affect charging and light output:
|
Shade Type |
Light Intensity Received by Solar Panel |
Charging Efficiency |
Expected Light Output |
|---|---|---|---|
|
Direct Sunlight |
100% |
100% |
Bright, Long-Lasting |
|
Cloudy Day |
10-25% of Direct Sunlight |
10-25% |
Dimmer, Shorter Duration |
|
Partial Shade |
5-15% of Direct Sunlight |
5-15% |
Very Dim, Short Duration |
|
Deep Shade |
<5% of Direct Sunlight |
<5% |
Minimal to None |
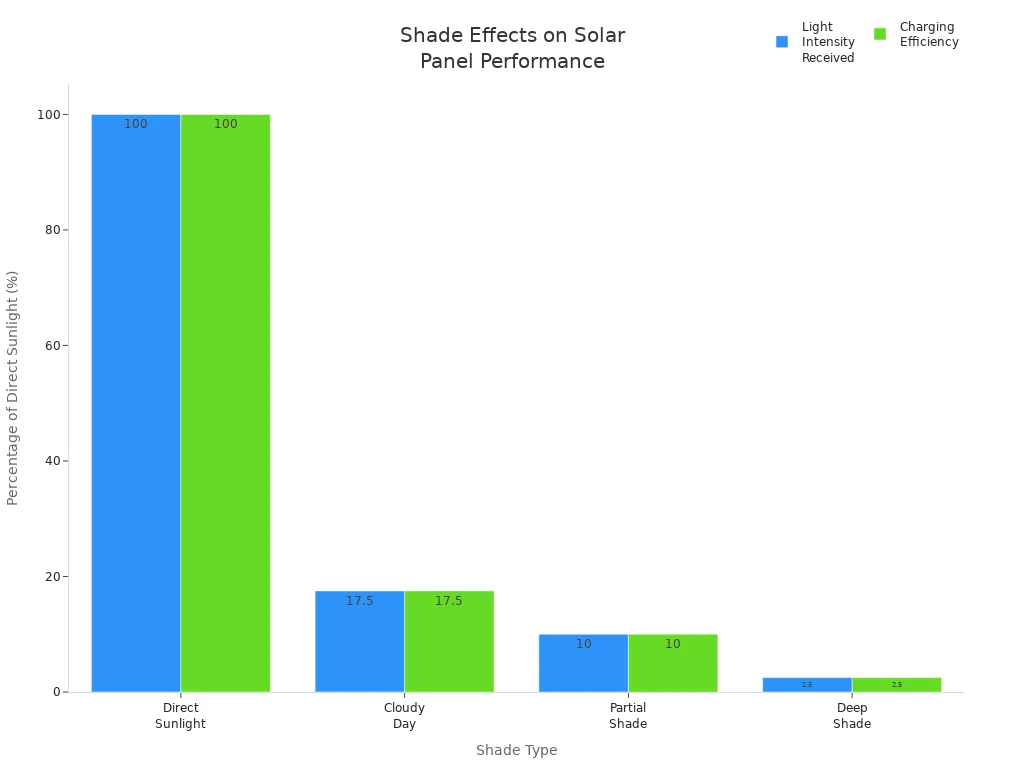
If you place your solar panels in deep shade, you will see almost no light at night. Partial shade can make your lights dim and reduce their working hours. Direct sunlight is essential for full charging and bright output.
Wrong Orientation
Incorrect orientation is another common reason why solar lights stop working well. If you do not face the solar panel toward the sun, the panel will not collect enough energy. The best results come when the panel is perpendicular to the sun’s rays. If you live in the Northern Hemisphere, you should face the panel south. In the Southern Hemisphere, face it north.
- Panels facing away from the sun during peak hours can lose up to 50% of their energy production.
- Shadows after 1 PM can cut your energy output in half.
- A tilt angle of 55 degrees gives maximum output, but increasing the tilt to 70 degrees can reduce output by 6% in winter.
You need to check the orientation of your solar panels to make sure they get the most sunlight possible.
Fix Placement
You can solve most installation issues by choosing the right spot for your solar lights. Start by watching how sunlight moves across your yard or garden. Look for places that get at least six to eight hours of direct sunlight each day. Avoid areas with shade from trees, walls, or decorations.
- Place solar panels where nothing blocks the sun during peak hours.
- Face panels south if you live in the Northern Hemisphere.
- Check for obstructions that might cast shadows as the sun moves.
- Make sure the area does not collect water, which can damage the lights.
Tip: A simple sunlight assessment helps you find the best location for your solar lights. Good placement ensures strong charging and longer-lasting lights.
By understanding why shaded panels and wrong orientation cause problems, you can fix placement issues and keep your solar lights working year after year.
Why Solar Lights Stop Working
Solar lights stop working after a year for several reasons. You might see your lights fade, flicker, or fail completely. Most of these issues come from common problems that you can identify and fix with a little effort.
Quick Troubleshooting
You can quickly diagnose why your solar lights stop working by checking a few key areas. Many issues start with the basics, such as power supply or physical damage. Here are the main reasons your lights might fail:
- Weather can damage wiring, sockets, and bulbs, making the lights useless.
- Batteries lose their charge after long use or when they do not get enough sunlight.
- Extreme temperatures and moisture affect battery performance and bulb clarity.
- Bulbs lose brightness or work inconsistently, especially if they are low quality.
- Physical damage from storms or accidents can crack or break bulbs.
To help you troubleshoot, use this checklist:
|
Task |
Description |
|---|---|
|
Check Power Source |
Place lights in direct sunlight and clean the solar panels. |
|
Inspect Wiring & Connections |
Look for loose or corroded wires and clean contacts. |
|
Test Light Sensor |
Cover the sensor to see if the light turns on. |
|
Diagnose LEDs |
Use a multimeter to check if the LEDs work. |
|
Check for Water Damage |
Look for moisture inside the light and seal any openings. |
|
Reset the Light |
Follow the reset steps to clear glitches. |
|
Replace vs. Repair |
Decide if repairs are worth it or if you should buy new lights. |
Tip: Clean your solar panels monthly and check batteries every 6-12 months. Inspect for rust or moisture every few months to prevent bigger issues.
Prevent Future Issues
You can prevent most issues with regular care and smart habits. Here are some effective ways to keep your solar lights working longer:
- Check and clean your solar lighting often. Remove dirt and debris so the panels get full sunlight.
- Do not let batteries stay uncharged for long. Keep them charged to avoid damage.
- Turn off your solar lights during rainy weather. This helps the batteries last longer.
- Bring your solar lamps inside during storms or harsh weather. This protects them from water and physical damage.
- Choose high-quality products with efficient solar panels and long-life batteries.
- Place your lights where they get plenty of sunlight and avoid shade.
- Replace rechargeable batteries every one to two years for best results.
Regular maintenance and smart placement help you avoid most issues. Simple fixes like cleaning panels or replacing batteries can restore your lights quickly.
By understanding why solar lights stop working, you can take action before small issues become big problems. With these troubleshooting steps and preventive measures, you keep your outdoor spaces bright and reliable year after year.
You often see solar lights stop working after a year because of dirty panels, dead batteries, or water damage. Most problems have simple solutions. Regular maintenance keeps your solar system running smoothly. Try these steps:
- Clean solar panels with a soft cloth and mild detergent.
- Replace batteries as needed and avoid extreme temperatures.
- Inspect wiring and connections for damage.
- Trim plants that block sunlight and protect lights from harsh weather.
|
Benefit |
Description |
|---|---|
|
Boosts Efficiency |
Maintenance increases the operational efficiency of solar. |
|
Prolongs Durability |
Routine care extends the lifespan of solar components. |
With these habits, you help your solar lights shine bright for years.
FAQ
Why do solar lights lose brightness over time?
You see solar lights dim because batteries lose capacity and solar panels collect less energy due to dirt or aging. Regular cleaning and battery replacement help restore brightness.
Why do solar lights stop working after rain?
Water can enter the casing and damage batteries or wiring. You prevent this by checking seals and placing lights in areas with good drainage.
Why do solar lights only work for a few hours at night?
Low battery charge causes short run times. Dirty panels, poor placement, or old batteries limit charging. You extend operation by cleaning panels and replacing batteries.
Why do solar lights fail in winter?
Cold temperatures reduce battery efficiency. Snow or frost blocks sunlight from reaching the panels. You improve winter performance by cleaning panels and using lights with cold-resistant batteries.
Why do solar lights flicker or turn off randomly?
Loose wiring, faulty sensors, or weak batteries cause flickering. You fix this by checking connections, cleaning sensors, and replacing batteries.
Why do new solar lights stop working quickly?
Poor installation, low-quality components, or incorrect battery type lead to early failure. You ensure longer life by choosing reliable brands and following setup instructions.